Editor's note: This text-based course is a transcript of the webinar, Wheelchair Seating For The Pediatric Population, presented by Michelle Lange, OTR, ABDA, ATP/SMS.
Learning Outcomes
- After this course, participants will be able to:
- Analyze 3 pediatric specific considerations in wheelchair seating.
- Evaluate if a child is positioned adequately in their seating system and if they have outgrown their seating system.
- Analyze 3 alternative positioning systems used in the pediatric population.
What We Will Be Covering Today
- Importance of Positioning
- Pediatric Seating Considerations
- How Do I Know if a Child is Positioned Adequately in Their Mobility Base?
- Alternative Positioning
- Case Study
Today, we are going to be talking about wheelchair seating for the pediatric population. I work almost exclusively with children myself, many of who have very complex positioning needs. We are going to be discussing those positioning needs within their mobility base, whether that be an adaptive stroller, a manual or power wheelchair, or even alternative positioning devices. Many kids have a large amount of equipment.
It is so important that we look at positioning, including specific considerations when we are working with this population. We are going to spend some time talking about how to determine if a child is positioned adequately in the seating that they have, and if they are not, what we should do about it. We will discuss when to refer to a team. Finally, we are going to finish discussing alternative positioning and a case study. Case studies are always fun.
The Importance of Positioning
- We tend to position ourselves to fit the task at hand
- Functional vs. resting
We tend to position ourselves depending on the task at hand. Our position is much different when watching TV in the evening versus an activity. Our clients also need those options. They need a position of function as well as a position of rest. One of the challenges is finding a position that provides both; a position to support biomechanical function and provide a chance to rest.
- Optimal postural support provides:
- Stability
- Alignment
- Biomechanical advantage
- Function
- Including the client's ability to participate in desired activities of daily living in context
- Improved sitting tolerance
- Pressure mitigation
Stability allows an individual to hold themselves upright, balance muscle groups, and dynamically move. Many of the clients that we work with do not have a lot of internal stability due to an imbalance of muscle tone, lack of strength, or even paralysis. In these cases, the client is going to rely on the seating system to give them that extrinsic stability that they lack intrinsically.
We want to provide symmetrical alignment for the client that facilitates function. It is important to note here that we never want to take away function by providing a position for a client.
For sitting tolerance, we want to know how the individual can be functionally positioned for a specific amount of time so they can do what they need to do. For some of our more involved clients, this might mean no more than a short time to access a switch to use a communication device. For others, this may be a long time to participate in their activities of daily living. Overall, clients should be able to sit for a number of hours at a time in their seating system, and if they cannot, we may need to go back to the drawing board.
Finally, even though most children are not at high risk for pressure injuries, it is still important to mitigate pressure risk as much as possible by looking at the materials that they are sitting on. We want to distribute pressure well throughout the body so there is not too much pressure on any one given area.
Pediatric Seating Considerations
Let's now talk a little bit about what is different between kids and adults when looking at seating systems.
What is the Difference Between Pediatric vs. Adult Seating?
There is a lot more involved than the fact that kids tend to be smaller and they grow. Once upon a time, most of the seating systems and mobility bases were basically adult systems that had been sized down. Now, there are options that are unique to this population.
Seating is Dependent Upon the Mobility Base
Seating is dependent upon the mobility base. Oftentimes very young children use adaptive strollers, and the available seating for those can be quite different than what is available in most manual and power wheelchairs. Thus, our seating choices may be limited by the mobility base.
Size
- Very small through adult size
- Children out of the Neonatal Intensive Care Unit (NICU)
- Thru…
- Teens who are as tall and heavy as the average adult
Obviously, seating will also be smaller due to children's sizes. We may even have to position a newborn discharged from a NICU. They may need a base that can support oxygen or other medical equipment. Pediatric seating systems also need to accommodate teenagers that could be as large as many adults.
One seating system is not going to have the capability to fit a newborn and a teenager, but we need to consider the entire gamut of sizes in seating systems.
Available Growth
- In seating system
- Before replacement is required
- Typically, 1-3 years
- In mobility base
- Before the frame is grown
- Before replacement is required
- Typically, 3-7 years
We need to make sure that the seating system allows for some growth before it needs to be replaced.
Some seating systems do not have any growth at all. For example, an off-the-shelf cushion might be 10 inches by 10 inches with no way to make it bigger. However, there are a number of tricks that we can use, along with the complex rehab supplier, to build in some growth for the client. Again, it is going to be dependent on the type of seating available.
Typically, depending on how quickly this child is growing, we want to look at a seating system to accommodate growth for about one to three years, but there are always exceptions.
People may also say that you are not able to replace equipment until a certain amount of time has elapsed. This is not accurate, and it depends on the justification for the change in seating. If the client has had a large growth spurt, and they have outgrown the available growth in the system, it needs to be replaced. Additionally, if the seating system no longer meets their postural support needs, it needs to be replaced.
Regardless of age, we can often justify a change of seating if it is appropriate. The mobility base itself can usually accommodate more growth. Thus, it is not uncommon for someone to get a mobility base, like an adaptive stroller or a manual or power wheelchair, and that chair will last them longer than the seating system.
The seating system may be replaced once or twice while the client uses the same mobility base. Getting a new seating system does not necessarily mean a new base is required. The base itself typically lasts three to seven years for a child.
Another thing to keep in mind is that a seating system or a mobility base may say it has a certain amount of growth available, like six inches of available seat depth. The available 6 inches is only if the client starts at its smallest available size. If the client starts somewhere in the middle of the available growth, then instead of six inches of available growth, there may only be three. The base will not last as long if you have a child that fits somewhere in between the available options on frames.
Flexibility to Accommodate Changes in Medical Condition
- Progressive conditions
- Most common: spinal muscular atrophy
- Seating support needs and shape can change
- Metabolic conditions can worsen, as well
Any seating system that we recommend should be flexible to accommodate other changes besides growth, like changes in medical condition. The client may have a progressive condition, like spinal muscular atrophy, which is the most common progressive condition in children.
There are some new medications available that are changing the game for kids with SMA, but those children will typically still require some seating and mobility equipment. Some of these kids are actually making improvements instead of regressing, which is amazing.
With progressive conditions, we need to look at seating that supports the client's current needs and body dimensions and shape but also can change as the client changes.
There are some genetic and metabolic conditions where we can see a change in condition as well.
- Surgeries
- Orthopedic:
- Tendon releases – affect the range of motion (ROM)
- Varus Derotation Osteotomy (VDRO) or other hip surgeries
- Spinal fusion – change in shape and height
- G-tubes
- Sudden weight gain and, often, growth
- Orthopedic:
In more complex clients, they may have orthopedic surgeries such as tendon releases to gain some more range of motion, VDROs, or other hip surgeries. Many children have subluxed or dislocated hips because they are not weight-bearing and their hip sockets are shallow.
A spinal fusion, which is a little further down the line, like in the teen years, can result in a dramatic change in the body shape and height of the client. For instance, if someone has a significant scoliotic curve, they may suddenly "grow" four inches or even more after the procedure. They will then not fit their current seating system. Any orthopedic changes can mean that we need to make a change to the seating system.
Many children have a G-tube because they are unsafe eating by mouth or cannot get enough liquid or food orally. When a child first gets this tube, they may gain five or 10 pounds. While it may not create a huge problem with their wardrobe, it may affect their seating. For example, when you are only 20 pounds, to begin with, and gain 5 or 10 pounds, that is a significant percentage of the client's weight. As a result of the sudden weight gain, we may also see resultant growth, necessitating a seating intervention.
- Tone management
- Oral medications
- Botox and Phenol injections
- Baclofen pump
- Dorsal Rhizotomy
- Can change tone, ROM, strength, and support required
I work with many children who have abnormal muscle tone, like those with cerebral palsy and related conditions. Tone management can be anywhere from oral medications to injections into muscles to try to reduce the tone in that particular muscle. Interventions include baclofen pumps and dorsal rhizotomies, which can change a client's tone, range of motion, and even strength. All of this can impact the amount of support that someone requires within their seating system.
With some of these tone management strategies, we can also see a bit of a roller coaster. For example, we may see more available range, but as the injection wears off, we can see changes in the amount of support a client needs.
- Orthopedic changes
- Spinal curvature development due to:
- Sudden growth spurts
- Muscle imbalance
- Muscle weakness
- Lack of weight-bearing and muscle imbalances can lead to hip subluxation or dislocation.
- Spinal curvature development due to:
We also need to be able to accommodate orthopedic changes. Despite therapy, surgeries, and tone management, we often still see changes in their spine and hips. Spinal curvature can develop because there is an imbalance of muscle strength or tone on either side of the spine.
Additionally, gravity is not always our friend. If someone is attempting to sit upright, even with postural support from a seating system, gravity can pull down on one side of the spine, causing issues.
A child's preferred sleeping position can also impact the shape of their spine and their hip integrity.
With all of these orthopedic concerns, we have to make sure the seating system is addressing changes to the spine in terms of curvature and then what subsequently happens to the rib cage as each of our ribs is connected to a vertebra. If those vertebrae start curving or rotating, we will see a difference in the shape of the trunk.
Figure 1 shows a young man who has prominence on the right side of his trunk. He also has some kyphosis and lateral scoliosis. All of these needs will need to be managed within his seating system.

Figure 1. Example of right side ribcage changes due to kyphosis and lateral scoliosis.
- Changes in the environment
- Home-based use
- Daycare and Preschool
- Elementary and beyond
- Community needs
We also need to keep in mind flexibility to accommodate changes in the environment. If we are working with a very young child, they are most likely at home and only going to doctor's appointments or a few other trips around the community. As a child gets a little older, they might be attending daycare or preschool. Now their seating and mobility base need to be able to manage more frequent trips in various environments. Once kids get into elementary school and beyond, we need to keep in mind how much travel perhaps is required within that school and how long they will be sitting, which will probably be for longer and longer periods of time. We also have to address if they have enough support for function and if they can tolerate the seating system for those time periods.
Seating Varies With The Mobility Base
- Dependent mobility
- Dependent mobility base (aka adaptive strollers)
- Manual wheelchair
- Independent mobility
- Manual wheelchair
- Power wheelchair
Kids can have a dependent mobility base, meaning they cannot independently move it around, and somebody else has to do it for them. This category includes adaptive strollers, as we see here on top and manual wheelchairs as we see down below in Figure 2.
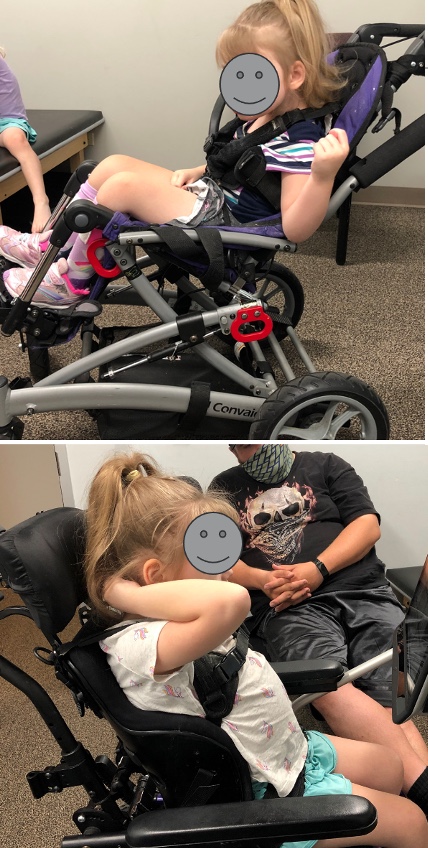
Figure 2. Adapted stroller on the top and manual wheelchair on the bottom.
In these pictures, you can see my little friend is not well positioned in the adaptive stroller. It does not mean it is a bad mobility base, but it is not meeting her needs. In the picture below, she is in a molded seating system in a manual wheelchair that holds her trunk upright and allows better head control. She also can access her communication device using her eyes more readily due to this better position.
Independent mobility is where they can control their mobility themselves, either with a manual or power wheelchair. It is not uncommon for a child, depending on funding sources, to have more than one type of base. A child may have a manual chair and a stroller. The stroller might be used because it is easier to transport and fold, and it is lighter for the family, so they can make quick trips. They may also have an individualized seating system and mobility base, such as that manual chair in Figure 2, that can be used for functional activities.
Pediatric Considerations Summary
- Pediatric Seating has unique challenges, primarily change:
- Physical growth
- Developmental changes
- Medical changes
- Environmental need
- Pediatric seating is very dependent upon the mobility base, as well
In summary, what do we need to keep in mind? We need to keep the seating system flexible to accommodate physical growth, developmental and medical changes, and respect the need of individuals in their various environments. Pediatric seating is also dependent upon the mobility base.
How Do I Know If a Child Is Positioned Adequately in Their Current Seating?
We are now going to now turn our attention to how we can determine if a child is positioned adequately.
- We will systematically review key points to check
- This is a screening tool to determine if formal seating evaluation is required.
- If an evaluation is required, refer to a qualified team if you do not perform these evaluations.
- Provide information from your screening.
We are going to use a checklist and go systematically through each of those points to determine if someone is well-positioned. It is a screening tool, not an evaluation, but it might help determine if that formal seating evaluation is required.
If you do not complete seating evaluations on a regular basis, you can refer to a qualified team in your area that does seating and wheeled mobility evaluations. You can provide the information that you have already determined from your screening. You can also work with a complex rehab supplier to help you with the evaluation. When there is a team approach in a wheelchair seating clinic, there is going to also be a complex rehab supplier involved along with the clinicians.
Formal Evaluation
- Formal Evaluation typically includes:
- A mat assessment in supine and sitting on the edge of a mat table
- Seating simulation
- Product trials
- Documentation
A formal evaluation usually includes a mat assessment where the client is examined supine and sitting on the edge of the mat table, like my little friend here in Figure 3.
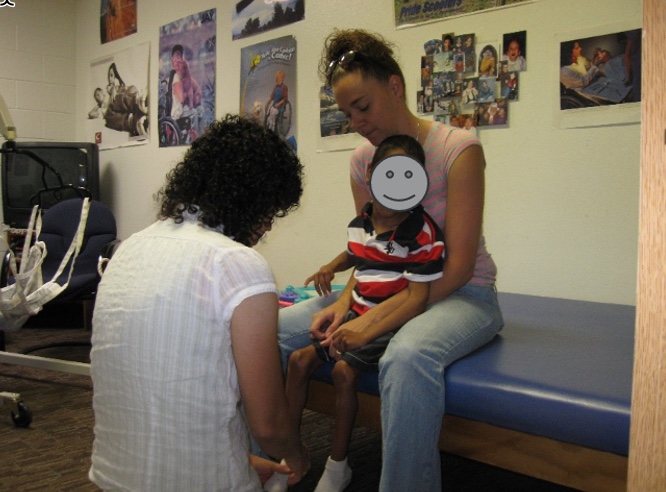
Figure 3. Working with a child and mom using a mat table.
A mat evaluation helps to determine the available range, the person's postural tendencies, and what the seating system needs to be.
Seating is often simulated, and there may be a trial with certain products to see if it works.
Lastly, we have to complete documentation. We need to supply the justification for the equipment so that this can be successfully funded.
Referrals
- First, someone must identify the need for seating evaluation and refer!
- Otherwise, a client will continue to use suboptimal positioning
A child will never get an evaluation unless somebody recognizes a need and refers them. If no referral occurs, the client will be stuck with sub-optimal positioning that could impact their function and lead to further orthopedic changes or loss of range.
Poor Positioning
- Poor positioning impacts:
- Range of motion
- Orthopedic symmetry
- Function
- Including Access to Assistive Technology (AT)
- Breathing
- Swallow
- Vision
Poor positioning is a big deal and needs to be included in our justification. The funding source may not be familiar with this client's diagnosis or what we are recommending. We need to paint a picture for them.
Poor positioning can lead to a loss of range of motion and orthopedic changes if they are not symmetrically positioned. Their ability to function may also be impacted. The position of the trunk and the neck can impact breathing, swallowing, and visual regard of my environment.
An Example
Let's look at a quick example, as shown in Figure 4.
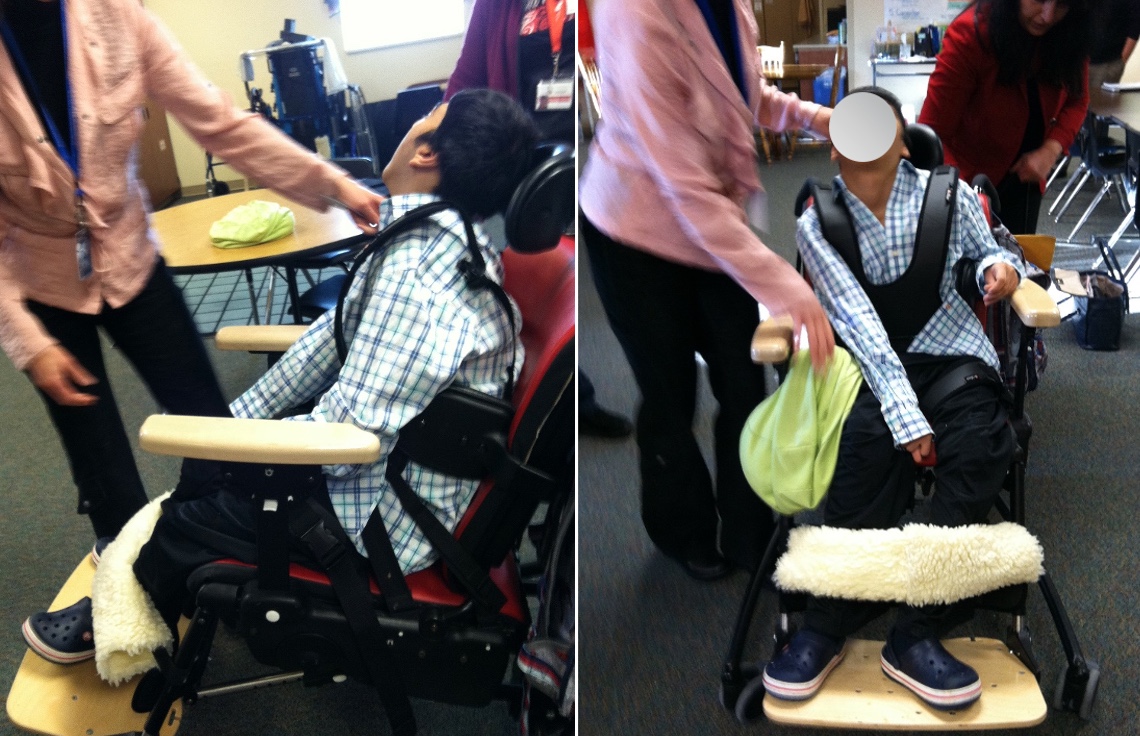
Figure 4. An example of poor positioning with an extended neck in an activity chair.
This young man here I saw at his high school. He is in an activity chair that is not designed specifically for him, and it is something that numerous students could use. Take a look at his positioning from the side and the front. Think about how his position is going to impact his function, vision, breathing, and his swallow. His trunk is in flexion, and his pelvis has slid forward into a posterior tilt. He is being held by a strap in front of his lower legs. His neck is very hyperextended and turned to the side because of the position of his trunk. You can see he also has increased tone in his legs and arms as he is trying to hold on.
- Optimal positioning
- Think of the change to function, vision, breathing, and swallow
Figure 5 shows him in a manual wheelchair seating system.
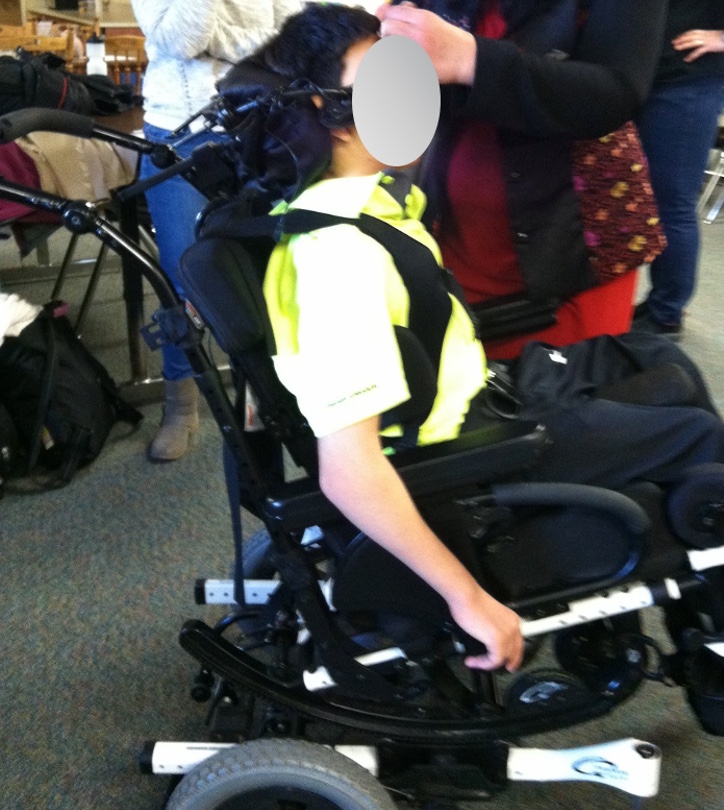
Figure 5. An example of the client in a manual wheelchair.
He was not using the manual wheelchair at school because the school team said he did not look very good in it. The supplier and I adjusted a number of things, and he was in a much better position. We recommended a few changes to his seating system and had to wait for those products to come. In the meantime, he was already in a much better position.
Think about the improved alignment of his trunk and neck. His vision, breathing, and swallowing are all optimized in this position. He was also able to utilize a switch by the side of his head to access his communication device with good control, where before he was unable.
Checklist
- In your handout
One of your handouts is a positioning checklist (Figure 6).
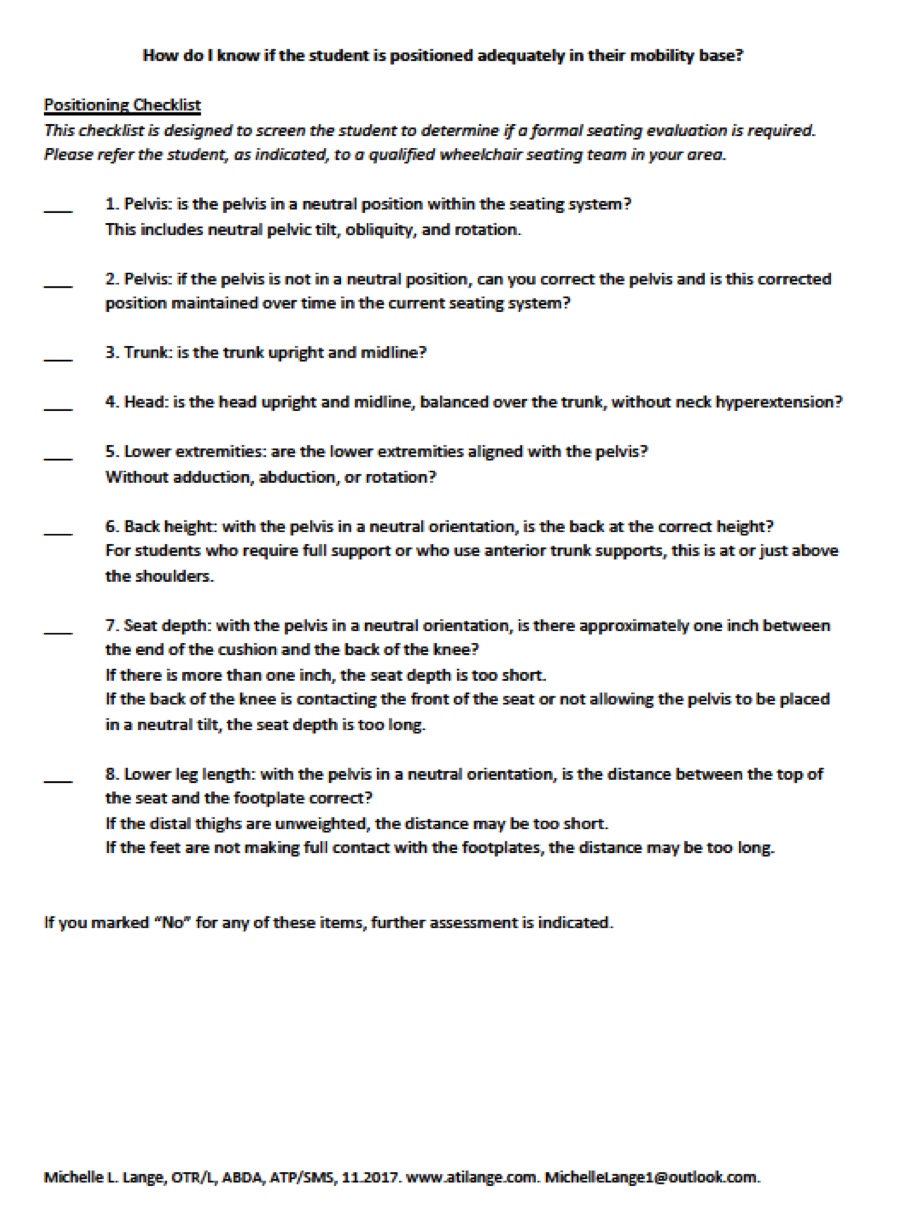
Figure 6. Positioning checklist by Michelle Lange.
You can also access it after the course. If it is helpful for you to make copies of it, you are absolutely free to use it as a tool when you're working with clients to see if they are positioned correctly.
Let's Start
- Look at the client and how they typically sit in their seating system on the mobility base.
The young man here in Figure 7 is in his current seating system.
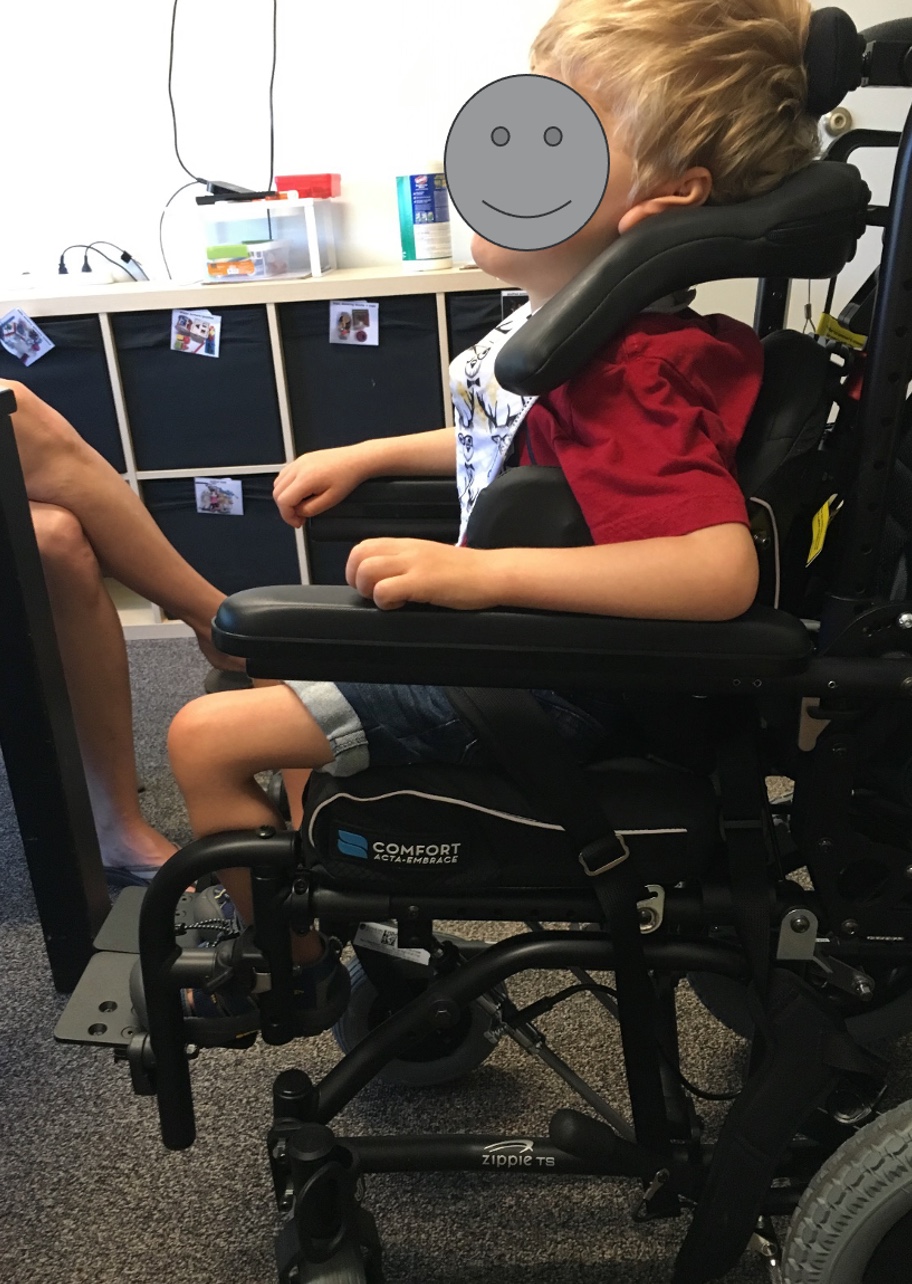
Figure 7. Young client in his current seating system.
When I first see a client, it is tempting to reposition them so they are positioned as optimally as possible. However, what I try to do first is look at how they are positioned right now before anyone has gotten in there. Perhaps, they were positioned better when mom or dad first put them into that chair, but something has moved them out of position.
Pelvis
- We start with the pelvis, as the rest of the body’s posture depends on the position of the pelvis.
1) Is the pelvis in a neutral position within the seating system?
- Neutral tilt
- Neutral obliquity
- Neutral rotation
- Find those Anterior Superior Iliac Spines (ASIS)
We start with the pelvis because the pelvis is the cornerstone of positioning, as it impacts the position of the trunk and the head and down below the position of the legs. We start with the pelvis to see if it is in a neutral position within the seating system, as far as tilt, obliquity, and rotation.
To do so, we need to find bony landmarks on the front of the pelvis called the anterior superior iliac spines, or ASIS. These are two bony areas we can palpate with our thumbs to get an idea if the pelvis is in a neutral position.
- Reducible vs. Non-Reducible
- If an asymmetry is flexible (reducible), we reduce this to a neutral position.
- If an asymmetry is fixed (non-reducible), we reduce this as much as possible and accommodate the residual asymmetry.
There are a couple of terms that are important to keep in mind when we are looking at wheelchair positioning. An asymmetry in their spine may be referred to as flexible or reducible. I may see a client that tends to lean to one side, but with my hands, I can correct that and get them into a neutral upright position.
However, the asymmetry can also be fixed or non-reducible. We reduce the deformity as much as possible if there is flexibility. If the asymmetry is stuck, we need to accommodate that. This is important to note because funding sources will want to know why the child needs new seating. "You said their spine was fixed." Fixed means it is not getting better without surgery, but it does not mean it cannot get worse. The terminology we use is it is not reducible, but that curve certainly can worsen despite our best efforts.
- Screening goal:
- Ensure that what is flexible is reduced as much as possible
- Without excessive pressure or discomfort
- Clients with non-reducible orthopedic asymmetries should have routine formal seating evaluations
During the screening, we must ensure that what is flexible is reduced as much as possible without excessive pressure or discomfort. Clients with a non-reducible orthopedic asymmetry should have routine formal seating evaluations, as their postural support and pressure distribution needs are more complex.
Pelvic Tilt
- Posterior Pelvic Tilt
- Leads to trunk kyphosis
- Anterior Pelvic Tilt
- Leads to trunk lordosis
We can see a posterior pelvic tilt or an anterior pelvic tilt. A posterior pelvic tilt is when the pelvis rotates rearward and can be seen in Figure 8.
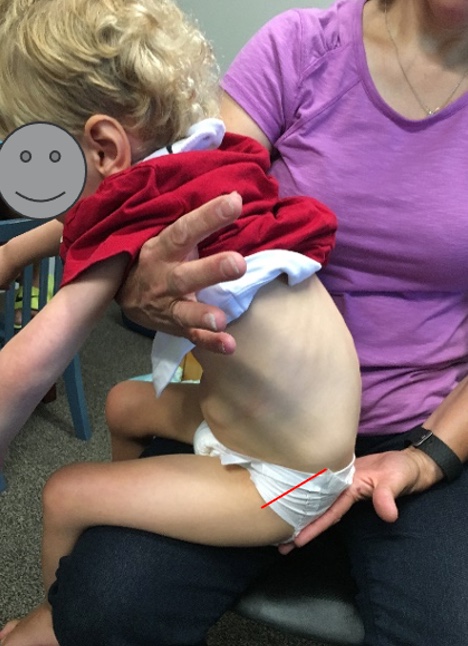
Figure 8. The client is being held on a caregiver's lap with a posterior pelvic tilt and kyphosis.
Figure 9 shows an anterior tilt where there is an extension in the lower spine.

Figure 9. The client is in a manual wheelchair with an anterior tilt.
An anterior tilt is often seen with lordosis.
Tip Time!
- Determining Pelvic Posterior Tilt
- Lean the client forward in their seat.
- See daylight?
- Pull the client back to correct
- Grab that waistband and give a pull up and back
Sometimes it is hard to tell if someone is all the way back in their seating system. One of my favorite tools is to simply look at the child in their seating system, support their trunk, and lean them forward. If you see daylight between the back of their pelvis and their seating system, this means that either the seat depth is too long or the client is in a posterior pelvic tilt. An example of this can be seen in Figure 10.
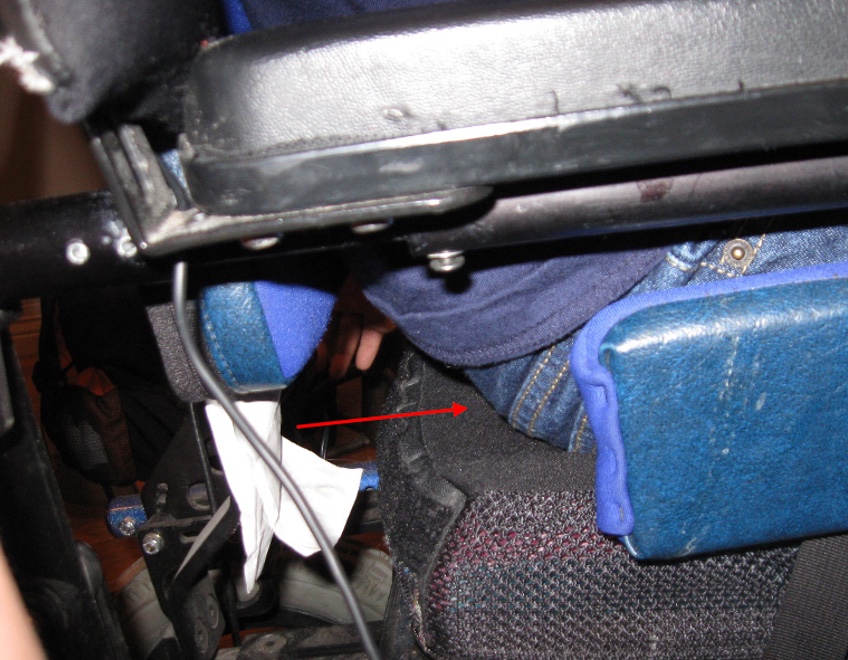
Figure 10. Space between a client's pelvis and the back of the seating system.
While the client is leaning forward, I grab their waistband and pull them back. Once they are against the back of the seating system, I cinch the pelvic belt if available to reduce the posterior pelvic tilt.
Pelvic Obliquity
- One side of the pelvis is higher than the other
- Often seen in conjunction with a lateral scoliosis
Pelvic obliquity is when one side of the pelvis is higher than the other and is often seen in conjunction with a lateral curvature of the spine. One of the challenges with an obliquity is that there is more pressure on one of the ischial tuberosities (ITs) than the other. This is especially problematic in clients who are at more risk for pressure injuries.
Pelvic Rotation
- One ASIS is forward of the other
- May look like a leg length discrepancy
In pelvic rotation, one side of the pelvis is further forward than the other. When using your thumbs to find those bony areas in the front of the pelvis, you may notice that one is further forward than the other. It may also look like a leg length discrepancy. This young lady here is showing a very significant leg length discrepancy, but it is almost all pelvic rotation (Figure 11).
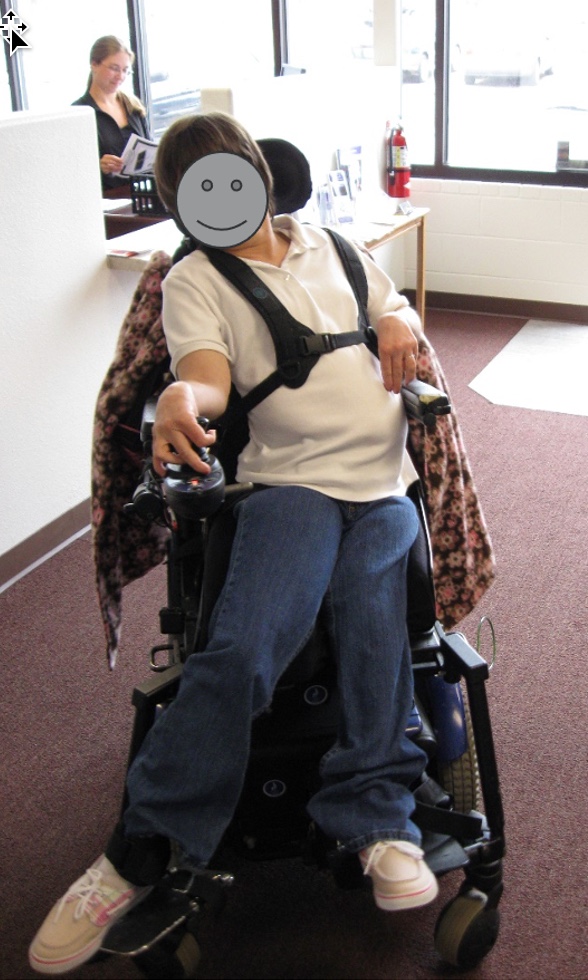
Figure 11. Client with pelvic rotation, which looks like a leg length discrepancy.
2) If the pelvis is not in a neutral position, can you correct the pelvis, and is the corrected position maintained over time in the current seating system?
Our first step is to see if the pelvis is neutral. If the pelvis is not in a neutral position, we have to determine if we can correct it or if the position is maintained over time. This is the tricky part. I see many children where we can correct their position but cannot sustain it within their current seating system. If they cannot sustain it, this may indicate that a different seating system is required or at least some sort of change.
Let's take another look at my friend Brett in Figure 12.
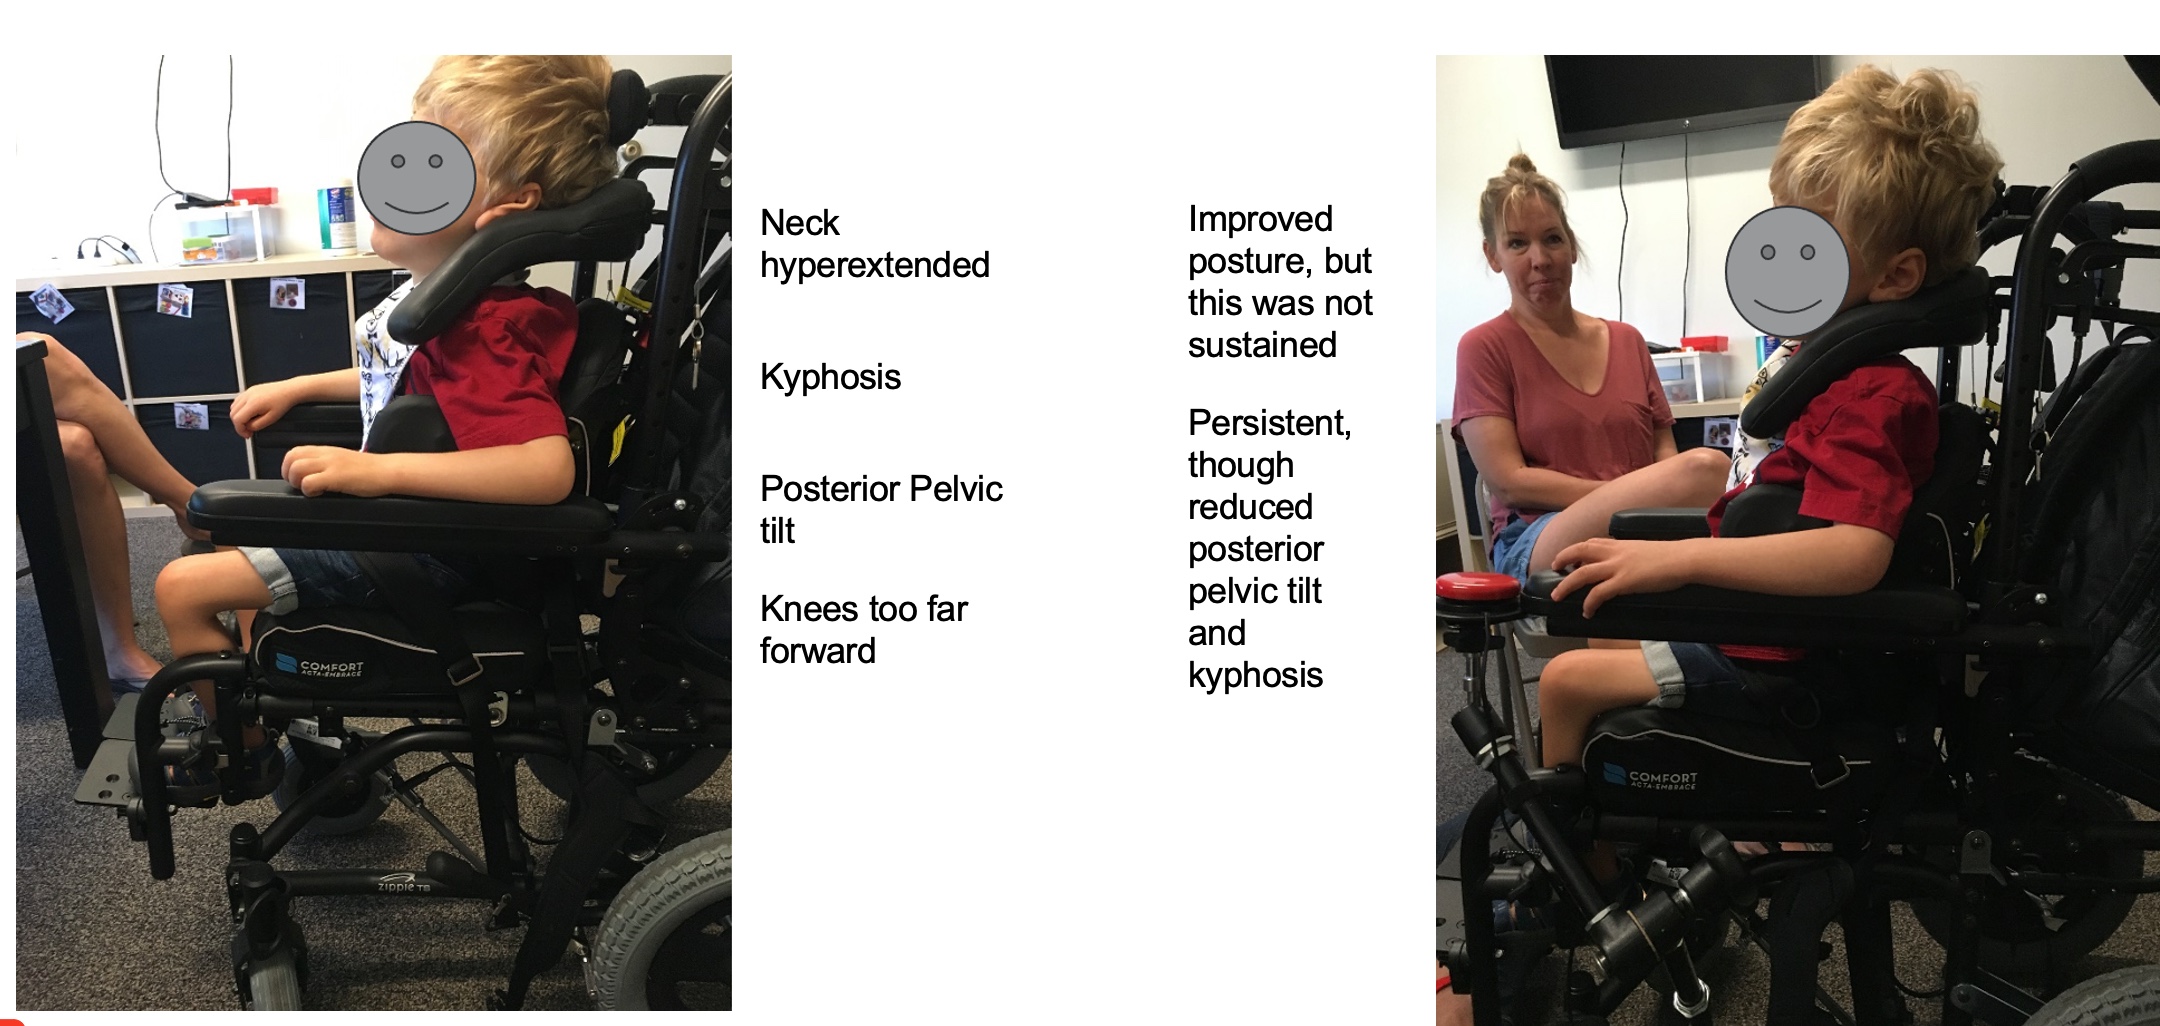
Figure 12. A child is in a manual wheelchair with poor posture on the left and improved on the right.
The left picture is how he first came into the clinic. You can see that his knees are far forward, and it looks like he has outgrown his seat. He is also quite a bit away from the edge of the cushion edge. It is hard to see in this picture, but he is definitely in a posterior pelvic tilt and has some forward flexion to his trunk. Secondary to the flexion in his trunk, he has a hyperextended neck position. At first glance, you may think that he does not look too bad. However, when we correct everything (on the right side), you can see what a difference it makes.
After we corrected his posture and the posterior pelvic tilt, we saw that he had not outgrown his seat after all. If anything, the seat length was a little too long. You can see how his calf is compressed in the image. We had to move his seat rearward.
Now that his pelvis is in a neutral position and not posteriorly tilted, his trunk is more extended. He has an upright trunk and head position. We have also added a switch so that he can control a communication device. Brett looked a whole lot better once we made these changes. However, even with correcting his position, correcting the seat depth, and making sure that things like pelvic belts were at the right angle and snug down, this was not enough to keep him in this position; he would quickly collapse into this. This tells us the seating system is not capable of maintaining his position and that he needs something different.
Trunk
3) Is the trunk upright and midline?
- Is the trunk upright and midline?
- Sagittal plane – is the client leaning laterally to the side?
- Frontal plane – is the client demonstrating kyphosis or lordosis?
- Transverse plane – is the spine rotated?
- An upright trunk is critical for head balance
If we correct the pelvis, can we sustain it? Next, we look at the trunk to see if it is upright and in the midline. We have to look at this from different planes. For example, the client may be leaning to one side, such as this young lady in Figure 13.
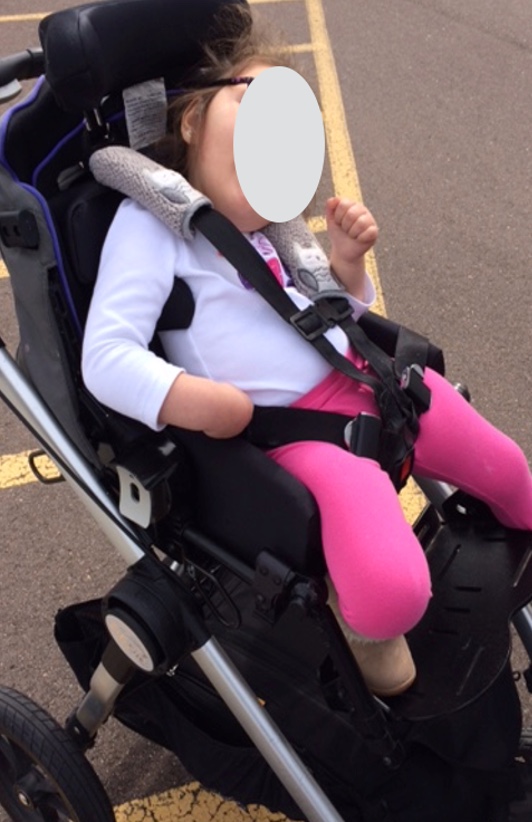
Figure 13. Child leaning to the right in a custom stroller.
The client may collapse forward into trunk flexion or kyphosis or might have excessive extension in the spine with lordosis or rotation. An upright trunk is critical for head balance. Many kids have poorly positioned heads. Until we get the pelvis and trunk in a good position, we cannot address the head position.
Figure 13 is a young lady in an adaptive stroller. The adaptive stroller has more than one option for positioning, but the option in the image connects the pelvic belt to the anterior trunk supports. You can see it is loosely connected right now, but unfortunately, by connecting the two, neither of them can do their job. Usually, we want to use separate pelvic belts and trunk supports. She is sliding forward and hanging on the support.
Lateral Asymmetry
- One shoulder is often higher than the other
- Check the pelvis for obliquity
We want lateral symmetry from side to side. Figure 14 shows a young lady that is leaning to one side.
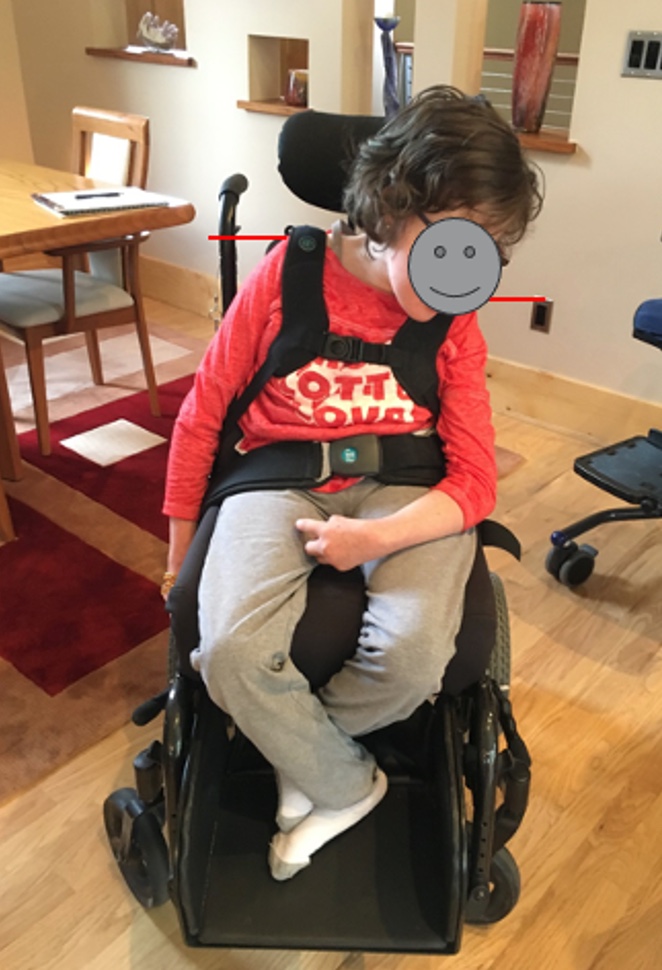
Figure 14. The client is leaning to the left side in her wheelchair.
You can see one shoulder is higher than the other. Before we try to correct the position of the truck, we must ensure the pelvis is not higher on one side. Once we have corrected the position of the pelvis, if we still see that one shoulder is higher than the other, then we know that some intervention is required.
Kyphosis or Trunk Flexion
- Often seen in conjunction with posterior pelvic tilt
- Vertebrae may be prominent
- Clients who were never ambulatory may not have a natural lumbar curve
Now, kyphosis or trunk flexion likes to hang out with a posterior pelvic tilt. It is nearly impossible to keep your trunk and neck extended when your pelvis has collapsed into a posterior tilt.
Many children have prominent vertebrae like Brett seen in Figure 15.
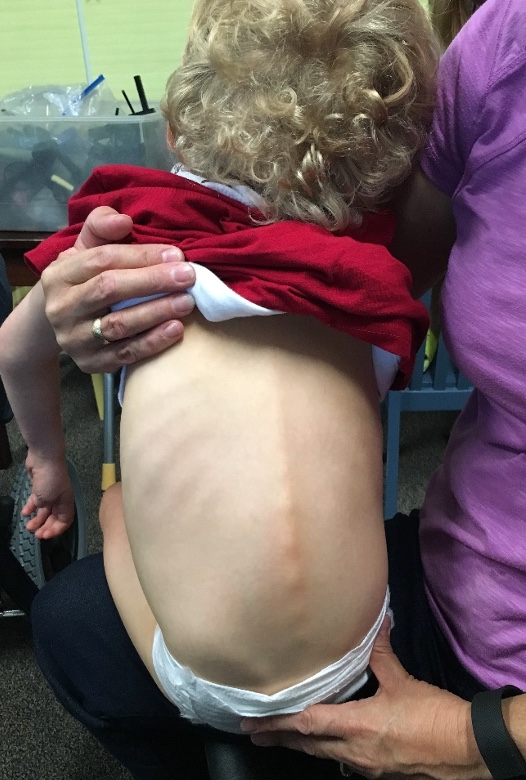
Figure 15. Prominent vertebrae are seen on a client with increased kyphosis.
Children who are not ambulatory or have upright weight bearing may not have a natural lordotic curve. In these children, we may notice a very flat spine. In these cases, we rarely would use something like a lumbar roll or pad because there is no curve there. If we use these things with a flat spine, we are only going to push their pelvis forward.
Lordosis or Trunk Extension
- Often seen in conjunction with anterior pelvic tilt
- Typically, hyperextension in the lumbar area
- Can be seen with kyphosis, as well
Figure 16 shows an example of a more lordotic position.
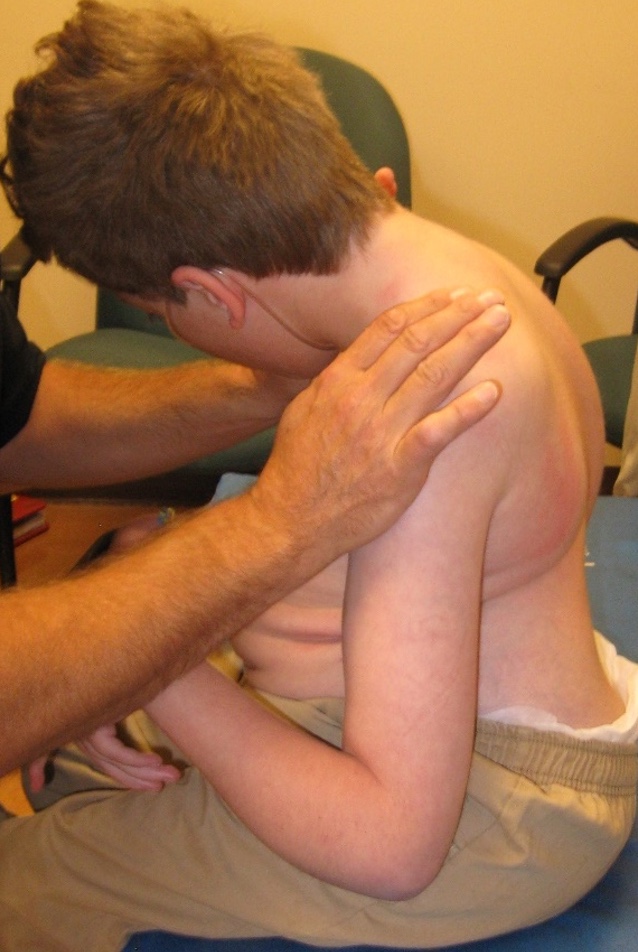
Figure 16. A client with increased lordosis.
We can see trunk extension in the lumbar area of the spine. This is seen in conjunction with an anterior pelvic tilt and other spinal asymmetries like kyphosis. Again, this young man has both lordosis and kyphosis.
Seat-to-Back Angle
- This is a critical measurement and can impact the position of the pelvis, trunk, and head
- This is typically determined at the Mat Assessment during a seating evaluation.
An important measure to keep in mind is the seat-to-back angle, specifically the angle between the upper leg and the trunk. If this angle is closed at 90 degrees or less, it is difficult for someone to maintain an upright posture.
Let's try this. Sit as upright as you possibly can. Imagine that there is a line between your trunk and your upper leg, and that reading is about 90 degrees. You can sit there for a while, but you are not going to be very happy to sit that way for hours and hours. Thus, we often allow a client to sit back just a little, sometimes five to ten degrees, to help the client to be more functional and have a position of rest.
This is a very important measurement, and it is going to be different for each person. It is typically determined during the mat assessment portion of the seating evaluation.
Head
- An upright head is critical for vision, breathing, and swallowing
- Head position is very dependent upon the position of the pelvis and trunk
- Lordosis leads to a hyperextended neck
- Kyphosis leads to a forward head position
An upright head is critical for vision, breathing, and swallowing. Head position, as I have mentioned before, is dependent upon the position of the pelvis and the trunk.
If someone has a lordotic position in their lower trunk, that can result in a hyperextended neck. Kyphosis and forward trunk flexion lead to a forward head position. And if the client attempts to lift their head, they often end up with neck hyperextension.
4) Is the head upright and midline, balanced over the trunk, without neck hyperextension?
- Sagittal plane – is there lateral flexion?
- Frontal plane – is the head forward or the neck hyperextended?
- Transverse plane – is the neck rotated?
The fourth on our checklist is the position of the head. Is the head upright? Is it midline? Is it balanced over the trunk without neck hyperextension? We have to look at the planes to see if there is lateral, forward, or backward (hyperextended).
Is there any rotation in the neck?
Lateral Flexion
- May be seen in conjunction with lateral trunk lean
This young lady here is showing quite a bit of lateral flexion, and it is in combination with a lateral lean to her trunk (Figure 17).
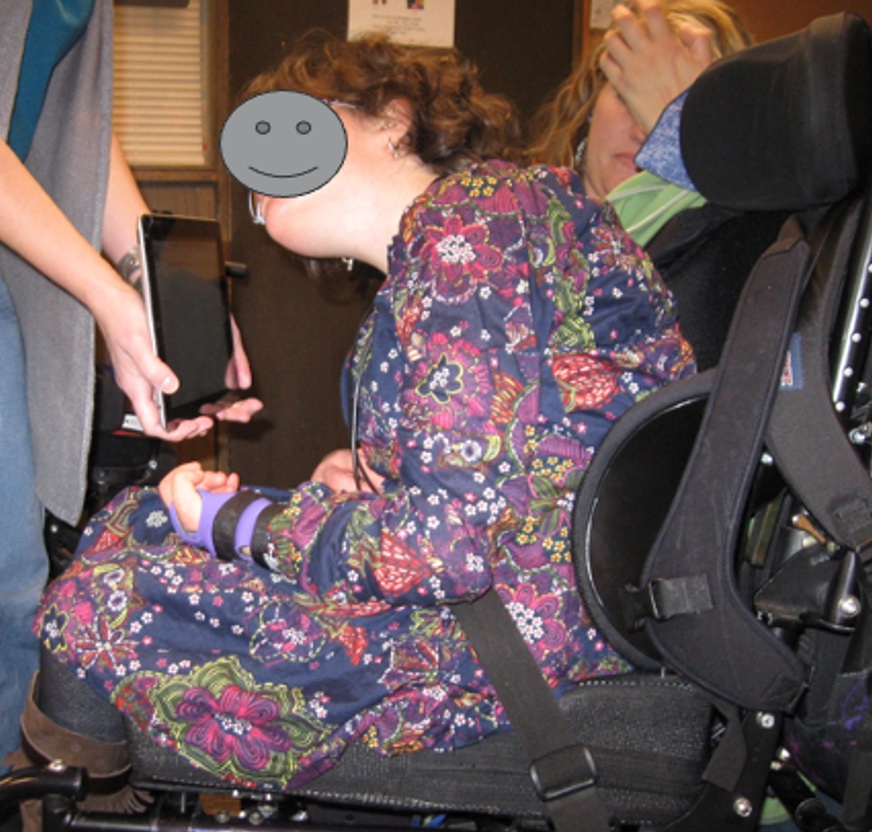
Figure 17. Client with extreme lateral trunk and head flexion.
She needs more support to her trunk to help her optimize her head position.
Forward Head
- Head forward
- Often seen with trunk kyphosis
You may often see a head forward position in individuals due to a posterior pelvic tilt. We want to correct this within the seating system.
Neck Hyperextension
This young man uses a unique head support called the i2i (Figure 18).
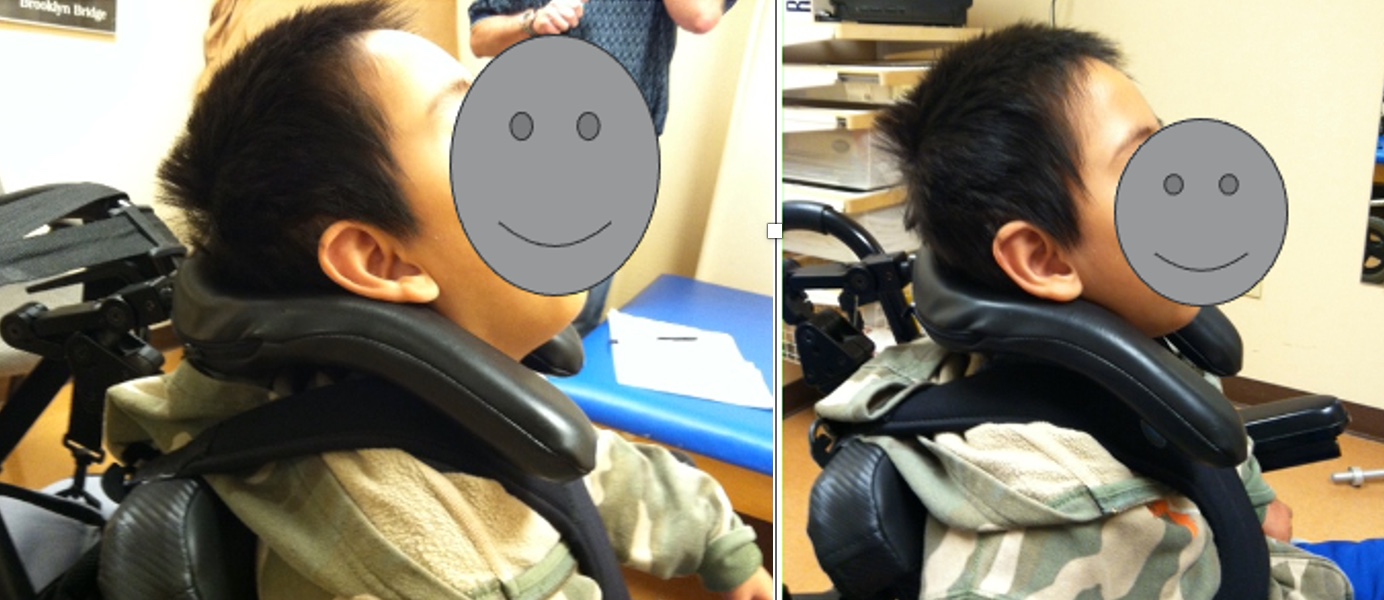
Figure 18. The client shows hyperextension in a wheelchair, and then a second image shows a corrected position.
He is hyperextended and looking up at the ceiling. The only reason he is hyperextended is because the head support that he is using in the i2i is in the wrong position. Someone had attempted to adjust it but did not realize they had adjusted it in a way that resulted in neck hyperextension. After a couple of turns of an Allen wrench, he is once again aligned. This was particularly important for this young guy because he uses eye gaze with a communication device. Obviously, he cannot use it when he is looking at the ceiling.
Neck Rotation
- Neck rotation
- May be seen in conjunction with spinal rotation
Neck rotation is sometimes seen with spinal rotation. We can also see a combination of these issues, like lateral flexion, rotation, and hyperextension all in one particular child. All of these issues can be addressed with a number of different head supports, but again, it is critical to look at the client's overall position first.
Lower Extremities
5)Are the lower extremities aligned with the pelvis?
- No adduction
- No abduction
- No internal rotation
- No external rotation
Further down our checklist are the lower extremities. Are the lower extremities aligned with the pelvis without more than a neutral amount of adduction, abduction, or internal and external rotation?
Adduction
- Adduction and internal rotation are often seen as components of extension.
Children who have a lot of extension or increased muscle tone can also have hip adduction and internal rotation as well. They like to hang out in an extended position. If a client gets excited, frustrated, or in pain, they can extend the hips as well as adduct and internally rotate. Unfortunately, this is the worst position in the world for developing hips, and it can lead to hip dislocation. Thus, we must keep the hips and the lower extremities in a more neutral position.
Abduction
Some clients have excessive abduction, as seen in Figure 19.
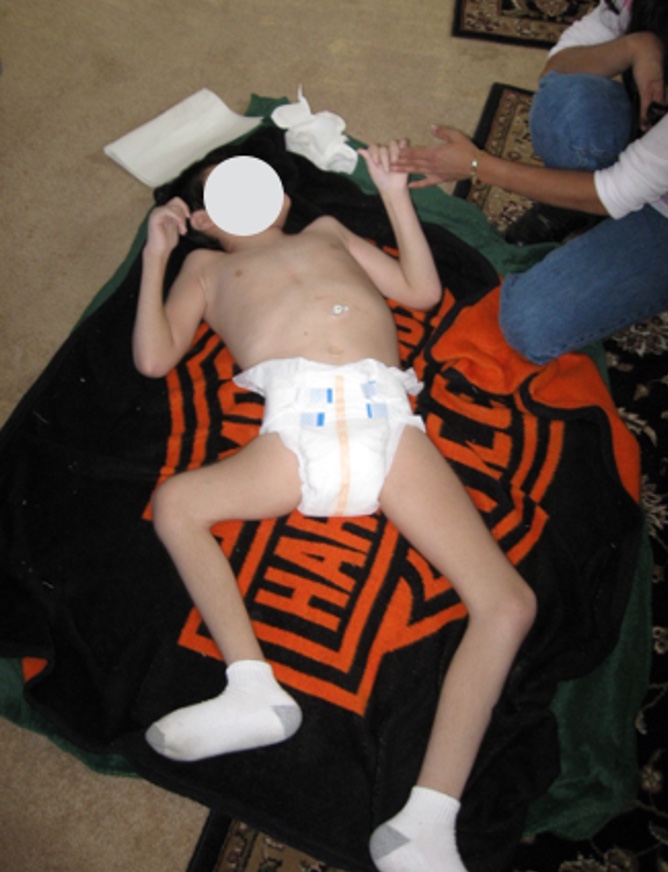
Figure 19. A child with excessive hip abduction while lying on the floor
The reason this young man's legs are in this position is due to a range loss. He outgrew his seating system, and when the team recommended new seating, it was denied by insurance. A denial does not mean no, but it means they want more information. Unfortunately, the team did not provide additional support after receiving the denial, and this young man ended up on the floor on a blanket. By the time we saw him, he had lost a tremendous amount of range.
Internal Rotation
Figure 20 shows an example of internal rotation.
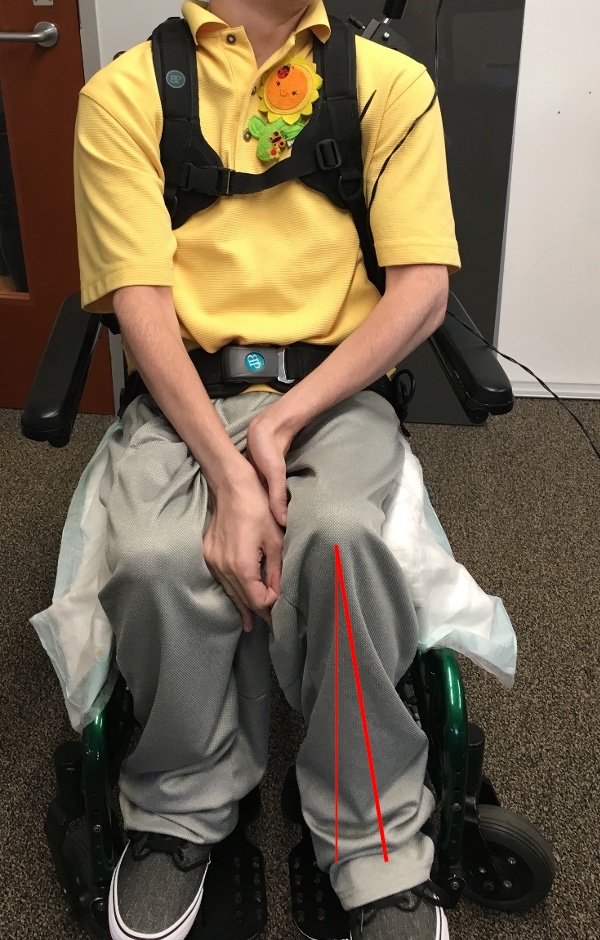
Figure 20. A client demonstrating internal rotation of his left leg in a manual wheelchair.
External Rotation
Here is an example of external rotation in Figure 21.
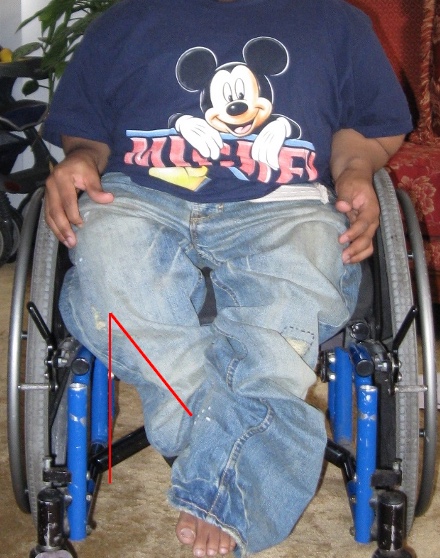
Figure 21. An example of external rotation.
Windswept Tendency
- One leg adducted and internally rotated
- One leg abducted and externally rotated
- If this is ‘corrected’, the pelvis will be pulled into rotation
Some of our clients might demonstrate a windswept tendency where one leg is more adducted and internally rotated. In this picture, that would be the left leg, and the other leg is abducted and externally rotated (Figure 22).
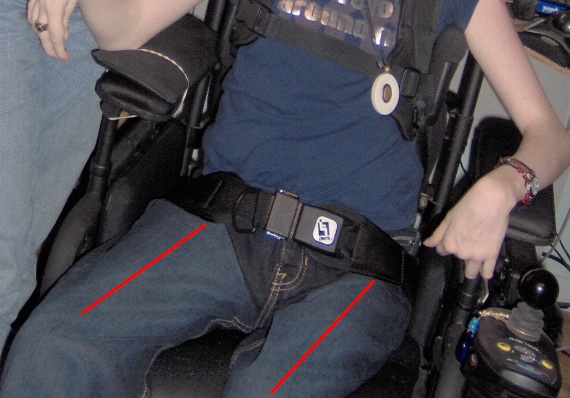
Figure 22. An example of a windswept deformity.
If I grab a person's legs and swing them in front of their pelvis, their legs may now look aligned, but now all I have done is pull their pelvis into rotation. It is important to determine if we can correct the position of the legs and still keep the pelvis in a neutral position, and this is determined during the mat assessment. A windswept deformity is commonly the result of poor positioning in sleep.
This is what we are screening in terms of the client's position. Now you might be thinking to yourself, that is great, but how do we fix all these issues? It requires a more formal seating evaluation. First, we have to determine if there is an issue, and there are many courses in the Continued library if you would like to get more information about specific positioning strategies. For example, we have a course on just positioning the pelvis or head.
Seating Dimensions
- The dimensions of the seating system may not fit your client correctly, impacting their posture. The client may have outgrown the seat. How do you know?
- Key measurements include:
- Back height
- Seat depth
- Lower leg length
Next on our checklist are seating dimensions. The dimensions of the seating system may not fit your client correctly, which will impact their position. The most likely reason is that they have outgrown their seat, especially children.
The key measurements are back height, seat depth, and lower leg length.
6) Back Height: With the pelvis in a neutral orientation, is the back at the correct height?
With the pelvis in a neutral orientation, we want to know if the back is at the correct height. This can be a judgment call because different people require different height backs depending on the tasks and/or the amount of postural support required.
- If the client is in a posterior pelvic tilt, they have slid down and forward, and the back height may appear too high.
- Back height is determined during the seating evaluation and is based on the amount of support required.
- Self-propulsion: usually placed under the scapulae
Let's first ensure that the pelvis is in a neutral spot because if the client has slid down into that posterior pelvic tilt, the back height may appear to be higher than it actually is. If your client's head is below their head support, this is a good indication that they are in a posterior pelvic tilt.
The back height for that individual is determined during the seating evaluation. Usually, if somebody is self-propelling their manual wheelchair, we want that back height placed underneath the scapula to allow them to get their arms back behind them for a nice long stroke. It also means they can move their shoulder blades freely. Again, this depends on the individual.
- If the client uses anterior trunk supports, the height of the back should be at or just above the level of the shoulders
- Otherwise, the support pulls down the shoulders.
Postural support needs are determined during the evaluation. Now, if the client is using anterior trunk supports like shoulder straps, then the height of the back should be about even with the shoulders if not a little higher. Otherwise, when somebody tightens those shoulder straps, we are only pushing down on the shoulders instead of extending the trunk and retracting the scapulas.
In Figure 23, this teenager has grown, and there is a height difference between the back of the seating system, which is hiding under his sling. This is also where the shoulder straps are.
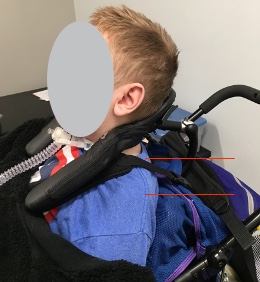
Figure 23. Example of a back height difference in an individual in his wheelchair seating.
The straps are pulling down, so he needs a taller back.
7) Seat depth: With the pelvis in a neutral orientation, is there approximately 1” between the end of the cushion and the back of the knee?
We want to assess seat depth with the pelvis in a neutral position. Our friend Brett earlier looked like he had outgrown his seat depth, but it was actually a little too long, as seen in Figure 24. There is about an inch between the end of the cushion and the back of the calf.
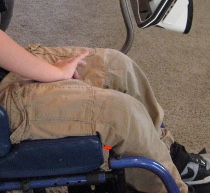
Figure 24. An example of a client with their seat depth too long.
We do not want to compress the calf. I saw a client last week with extremely tight hamstrings who needed a little more room between the back of the knee and the front of the cushion; otherwise, the pressure on her tendon made her hamstring tighter. This is determined during an evaluation.
- If there is more than 1”, the seat depth is too short
- If the back of the knee or calf is contacting the front of the seat, the seat depth is too long
- If you are trying to pull the client into a neutral tilt and the front of the seat is blocking you, the seat depth is too long
Generally, if there is more than an inch, the seat depth is getting too short. Depending on the seating system, the seat may be able to be pulled forward or a new seat may be required. If the back of the knee or calf is contacting the front of the seat, the seat depth is most likely too long. If you are trying to pull that client back into a neutral tilt and you cannot get them there, it is often because the seat depth is too long and is moving into a posterior pelvic tilt as a result.
- The seat depth looks too long, but the client was in posterior pelvic tilt
Here are earlier pictures of Brett. On the left, it looks like he is outgrowing his system. When he first came in, that is what his mom said. However, when we corrected his positioning, the seat depth was actually a little too long.
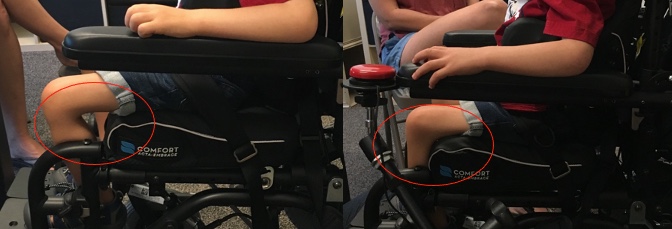
Figure 25. Example of a posterior pelvic tilt in a client, making it appear like the seating depth was too short.
8)Lower leg length: With the pelvis in a neutral orientation, is the distance between the top of the seat and the footplate correct?
We then look at the seating dimensions of the lower leg. We want to know the distance between the top of the cushion and the footplate on the mobility base. With the pelvis in a neutral orientation, is the distance between the top of the seat and the footplate correct? If the distal thighs are unweighted, the distance might be too short. The problem with this scenario is by lifting up the thigh off of the support surface of the seat, we have put more pressure underneath the pelvis. Thus, it is very important to distribute the weight well between the bottom of the pelvis and the bottom of the thigh.
And if the thigh is unweighted, there is too much weight on that IT, as noted in Figure 26. In this young man's case, there was way too much weight on his left ischial tuberosity.
Figure 26. Client with increased weight on his left ischial tuberosity.
- If the distal thighs are unweighted, the distance may be too short.
- Too much pressure is now under the pelvis
- The footplates need to be lowered
This young man has spina bifida and a leg length difference, but his foot plates are even (Figure 27).
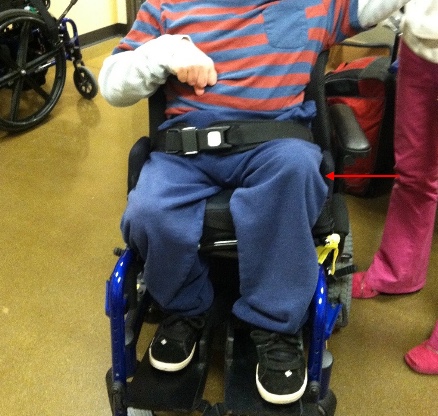
Figure 27. Client with a leg length difference in a manual wheelchair.
We needed to lower the one on the left so that he had better pressure distribution.
- If the feet are not making full contact with the footplates, the distance may be too long, and the footplates may need to be raised.
Sometimes the feet do not make full contact with the footplates. It is a little hard to tell with this young lady here, but her heel is off of that pad, and that means that there is too much weight on the posterior thigh, which can lead to circulation issues (Figure 28).
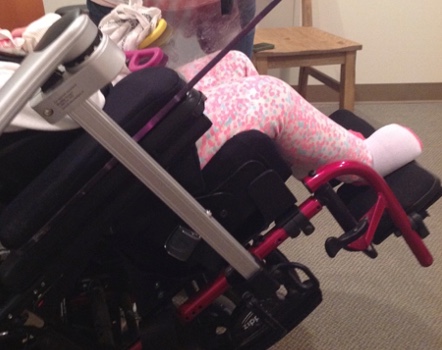
Figure 28. Client with poor weight distribution on her right foot.
This could also lead to that feeling of pins and needles in the lower leg and the foot.
One thing I struggle with when I am working with kids is that often they are barefoot or in socks. They may also be wearing AFOs and shoes. This can cause an inch difference between the two.
Sometimes we add a soft pad to the footplate with Velcro so they are not resting against a very hard surface. This can then be easily removed when the client is wearing shoes and an AFO. This adjustment can accommodate the difference in lower leg lengths.
Lower Leg Angle
- Another important seating angle is upper to lower leg.
- This is determined at the seating evaluation.
- This is often determined by hamstring length.
- Tighter angles may result in front caster interference with the footplates.
We also need to keep in mind angles. We talked a little bit about the seat-to-back angle or trunk-to-upper leg angle earlier, but the lower leg angle is also important. The seating evaluation is often dependent upon the hamstring and the available hamstring range.
When the hamstring is tight, it is sometimes difficult to open this angle very much. If the angle is closed, this brings the footplate closer to those front casters, causing interference between the two. With smaller children, this is not a problem. Even if they have a 90-degree footrest angle, this is rarely going to interfere with the casters because the footplates are well above the casters. However, as the children we work with get taller, we have to use other strategies to prevent the casters from hitting any part of the footrest and getting stuck.
Summary
- It is critical to determine if a client is positioned adequately or requires intervention.
- The optimal position is key to limiting the loss of range and orthopedic changes, facilitating function and access to Assistive Technology, and optimizing vision, breathing, and swallowing.
- Someone needs to identify the need … YOU!
In summary, it is critical to determine if a client is positioned adequately or if they require intervention. An optimal position can limit the loss of range, prevent orthopedic changes, and facilitate function, including access to assistive technology. It can also optimize vision, breathing, and swallowing. These all become part of our justifications for why seating is important.
Next Steps
- Take a look at the clients you work with.
- Ask caregivers to bring the seating system and mobility base to your setting so you can check it out.
- Use the checklist to determine if a formal seating evaluation is required.
- Find out who performs these evaluations in your area.
- Collaborate!
I would encourage you to take a look at your clients, as they may often come in a stroller or other seating for the appointment. If you do not see their seating system and mobility base very often, ask them to bring it in periodically so you can give it a look over and make sure it is meeting the client's needs. Use the checklist to determine if a formal seating evaluation is required. You can also find out who does those evals in your area and then collaborate with them.
You can also go to the RESNA website and look up which assistive technology professionals are in your area, both suppliers and clinicians. You could also Google "wheelchair clinics near me" and see what shows up. They may be more difficult in more rural areas. Chances are that a family is used to a longer trip if they are seeing medical specialists, like a neurologist or orthopedic surgeon. However, they need to be seen periodically to make sure their needs for positioning are being met.
Alternative Positioning
Now we are going to turn our attention to alternative positioning systems. Most kids, especially those with very complex needs, have more than one mobility base and seating system. In fact, they might have quite a bit of positioning equipment, filling up their home and garage.
- When working with young students, children may spend time outside of the wheelchair and in other positions. This section will discuss simple tips for providing a variety of appropriate positions outside the wheelchair in the classroom or at home.
When we are looking at positioning with children, it is very important to look at their seating over the course of 24 hours. I can, along with a team, come up with an ideal seating system for a child, but they may only be in it for two or three hours a day. There are many hours that they may be in a very destructive posture. We do not want that to happen. I need to go through all the equipment they have, make sure it is appropriate, and make sure that for the majority of their day and night, they are in a good position.
I mentioned nighttime positioning earlier. We have a course on that topic in the Continued library that you can check out.
Classrooms may have some positioning equipment, but it is rather generic because it is used with multiple children. We are going to do is talk about some tips for providing appropriate positions outside the wheelchair in the classroom or at home.
Goals
- Why?
- Goals of taking the student out of their primary seating system
- To provide an alternative position to the wheelchair seating system
- To prevent range of motion losses
- From sustained seated positions
- To provide a position that places the student at a height for peer activities
- i.e. lower height
- To provide a "more comfortable" position
Why is this important? The goal of taking a child out of their primary seating system is to provide an alternative position to the wheelchair seating system to prevent range of motion losses from those sustained seated positions, to provide a position that perhaps places a child at a height for peer activities, or to promote more comfortable position.
Many alternative positions are not that different than the wheelchair seating system. For example, the child's hips and knees are still bent in an alternative seat, and it is not going to prevent range losses in the hips and knees that are so common. Unfortunately, many wheelchair users begin to look more and more like their seated position in a wheelchair and lose hip extension.
Disadvantages of Alternative Positions
- No generic positioning system will ever provide as much support as a custom seating system designed for an individual.
- An alternative seating system will not prevent range losses seen from prolonged seating in the wheelchair seating system.
- Less support = less function.
- Less support = less postural support and can possibly lead to destructive postures.
A disadvantage of alternative positioning systems is that no generic positioning system is ever going to provide as much support as a seating system that was custom-made to meet an individual's specific needs. Less support can mean less function for a client, and less support may mean less postural support to keep someone aligned, and that can lead to someone assuming and maintaining more destructive postures.
What About Students That Don’t Have a Wheelchair?
- Some students use an alternative seating system in the classroom because they do not have a mobility base.
- In this case, a typical classroom chair does not provide adequate support.
- Other alternative positions may not be needed.
- The student is typically ambulatory.
What about students that do not have a wheelchair, adaptive stroller, or custom seating system? Some students use an alternative seating system in the classroom because they do not have anything else. This is because a typical classroom chair does not provide enough support, or a little more support is required.
Other alternative positions may not be needed if the seat gives them a little more support and the student is often ambulatory.
However, many students need a great deal of support and are ready for their own individual equipment that can be used outside of school. In that case, it is important to work with the seating and mobility team to start recommending that first equipment.
Alternative Seating Systems
- There are a wide variety of alternative seating systems.
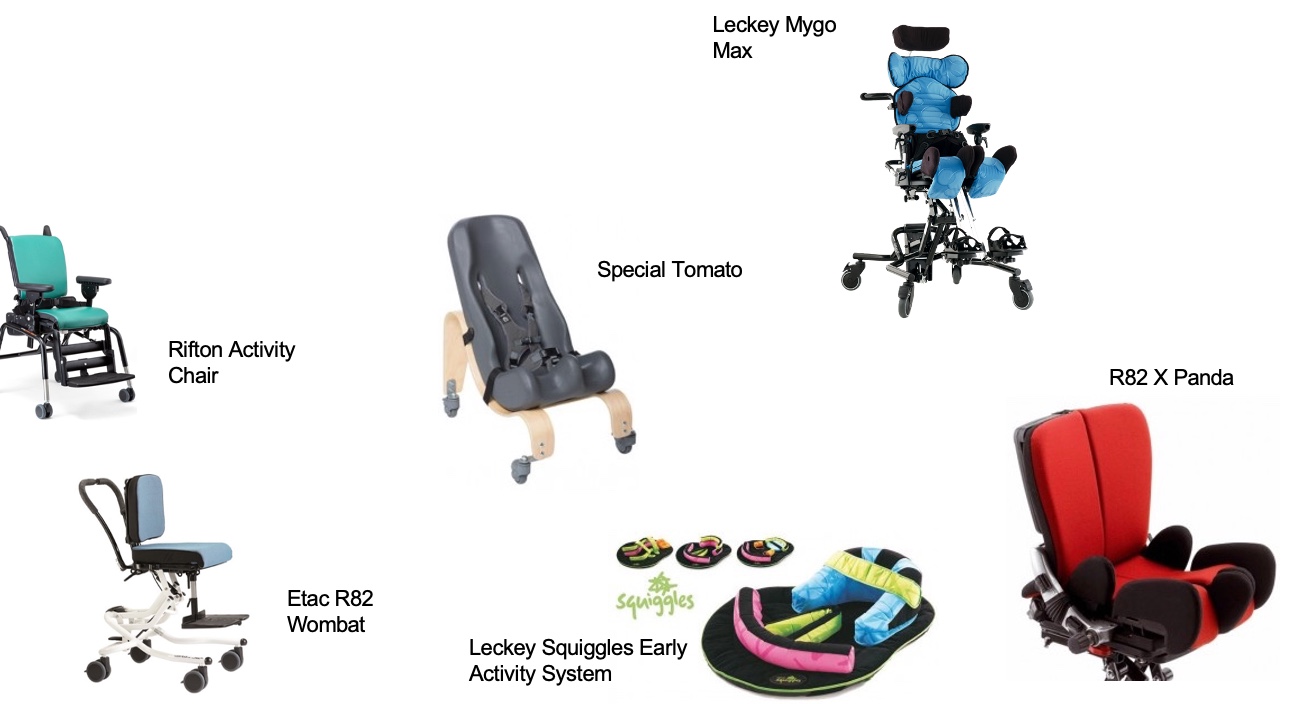
Figure 29. Examples of alternative seating positions.
This is not all, but some examples of equipment that provide an alternative to an adaptive stroller or wheelchair seating system. The client is still seated in each of these, and the hips and knees are still flexed. The Rifton Activity Chair in the upper left is commonly used. It might look different depending on what features are ordered. The Special Tomato is in the center, and the X Panda is on the right side. The Squiggles Early Activity System can be used for multiple positions, including sitting. The Wombat and the Mygo Max are other examples.
Alternative Seating Systems Pros
- May provide a different position
- May provide better and/or adjustable height for better access in the classroom
What are the advantages of providing an alternative seating system when somebody has a customized seating system? Alternative seating systems may provide a slightly different position for the client, and many of these provide adjustable heights allowing the person to complete certain tasks like eating with their family or completing art projects at school. Lower positions can allow activities at peer or floor height.
This young lady here is in a Leckey Mygo alternative seating system, and it is on a Hi-Loww base.
Figure 30. Client on a Leckey Mygo on a Hi-Loww base in a classroom.
She is in a high position right now, but it can go quite low to where those footplates are just a little bit off of the floor.
Alternative Seating Systems Cons
- Often this “alternative” position is very similar to the primary seated position.
- Positioning is generic and may not provide adequate support and stability.
The main disadvantage of these alternative seating systems is that they are very similar to the primary seated position. The hips and knees are still flexed, the positioning is rather generic, and it may not provide adequate support and stability depending on the child.
Figure 31 shows a young man in a reclined alternative seating system.
Figure 31. Client in a reclined alternative seating system.
It is something that helps him to sit and relax because he does not have to work very hard, as gravity is doing all the work for him. However, it is not a terribly functional position.
If you look carefully, you can see that he has two switches attached to his shirt. We were trying to figure out a way for him to control his assistive technology, even from this very reclined position, and he was able to do so.
Alternative Seating Systems- Special Tomato
- Common alternative seat
- Pros:
- Looks comfortable
- The child is typically leaned back, improving head and trunk control
- Rolling base
This is the Special Tomato in Figure 32.

Figure 32. Example of the Special Tomato.
It is very popular because it is on the softer side and comes with a mobile base. While there is no separate head support, a component can keep the head a little more midline. The seat simply extends high enough to also encompass the head. This can lead to a little bit of neck hyperextension. However, as the child is leaning back in this position, gravity can help with trunk and head control.
- Cons:
- Encourages posterior pelvic tilt
- The child is typically leaned back, in a less functional position
- The base is too low for all applications
One drawback is the shape of this Special Tomato, which is very similar to the Tumble Forms Feeder Seat. It encourages a posterior pelvic tilt and a flexed trunk, and that can be a challenge as we do not want kids spending a lot of time like this. It is fine for some activities, but not all.
Rifton Activity Chair
The Rifton Activity Chair is a very common alternative seat that is found in a lot of schools (Figure 33).
Figure 33. Example of the Rifton Activity Chair.
We have one in our clinic that we use all the time as it is a nice option that is very adjustable. It works well for a wide variety of children, and I think that is why it is often used in schools. It is very easy to adjust by simply pushing buttons and sliding things around, and there are many different postural support options. You can use this with a very simple back and seat, or you can add additional supports at the sides of the knees, trunk, pelvis, head, et cetera.
It also has a dynamic back option so that if a client needs to move, they can rock a little bit or extend against the back. It will move back and then bring them back upright. You can see it includes a tilt, and it is available on a Hi-Loww base depending on a child's height or activity.
- Cons:
- Less adjustability and growth than a wheelchair seating system
- Positioning is still rather generic
- The child cannot be transported in this base
There are some drawbacks. It is less adjustable, provides less growth than a wheelchair seating system, has generic positioning, and the child cannot be transported in this base. It is also not crash-tested like an adaptive stroller or a wheelchair.
Overall, it is not designed to be a primary base. The materials that comprise this are rather firm so it is fine for sitting for a while, but it is not designed to be the primary seating system.
Alternative Seating Systems- When to Use?
- When should I use this in the classroom?
- These systems can be useful during group activities where the seat-to-floor height needs to be lower and the child doesn’t have to engage in demanding motor activities.
I am assuming a lot of you work in the school systems if you are interested in pediatric seating. These types of seating systems can be useful during group activities where the seat-to-floor height needs to be lower because the other children are either sitting on the floor or sitting on low little chairs that you find in kindergarten and first grade.
The child might use this when the functional requirements are not really high. However, most children will not be able to function to their full potential in these alternative seating systems. If you are working with a child who has better function in their primary seating system, then this is good to use during activities where there is not as high of a motor requirement.
Standers
- Supine
- Prone
- Upright
- Multi-position
- Sit to Stand
- Mobile
There are many standers that are available out there for children, as seen in Figure 34.
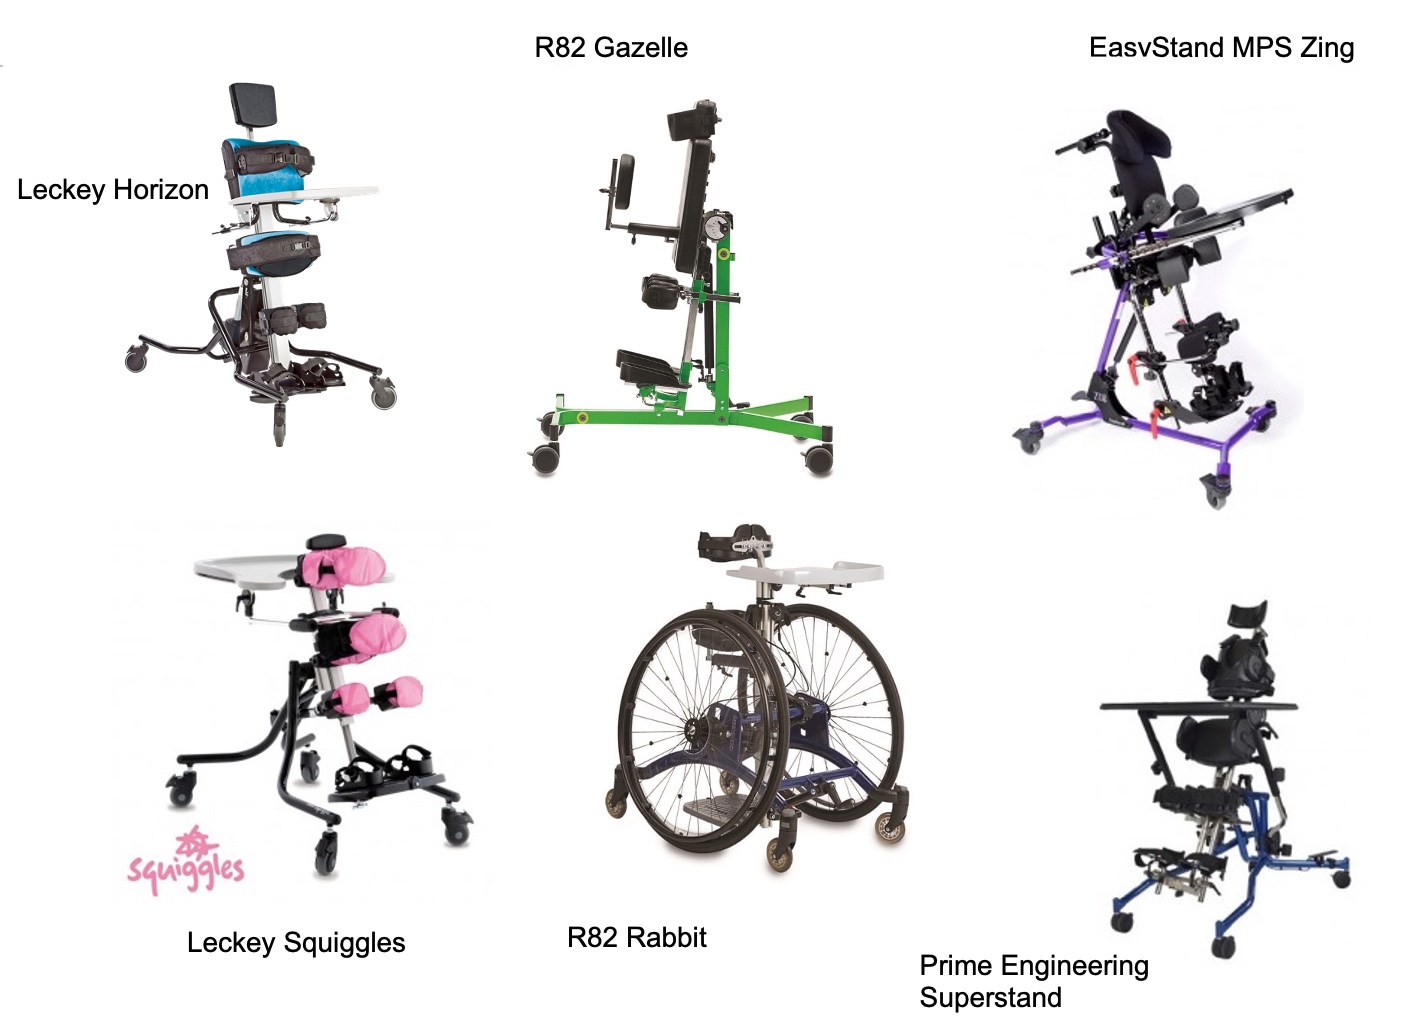
Figure 34. Examples of standers.
There are many different styles because they meet individual needs. A child may use a stander at home, in the classroom, or both.
There are supine standers where the main support surfaces are behind the client. One nice thing about supine standers is most of them tilt so that you have a flat surface to place the child on, attach everything, and then you bring them into an upright position.
Prone standers require a little more active control from the client. They have most of the support in front of the client.
Upright standers place the client in an upright position. They do not cost as much because there is not as much adjustment, but most prone and supine standers have a range of movement, so the client does not have to be completely upright. These are sometimes referred to as multi-position standers. Some will allow the child to stand in the stander with a supine or prone configuration. This can be nice for a client who has changing needs.
There are also some sit-to-stand options. These are harder to justify for smaller children because a lightweight child is not as difficult to get into a stander as an adult. Adults are more likely to use sit-to-stand, where they can transfer to a seated position and then assume a standing position from there. However, they may get to a certain size where you just cannot get them into a stander by yourself.
Finally, there are mobile standers. An example of that is the Rabbit in Figure 34. This allows the client to grab the wheels and push so that they are not stuck in one position.
Pros
- We have an abundance of research supporting the use of standing.
- Truly provides an alternative position
- Hip and knee extension vs. hip and knee flexion in the seating system
Standers have many advantages. There is so much research out there that supports the use of standing, including the medical benefits that are connected with that.
Standers truly provide an alternative position. It keeps the hips and knees in a more extended position. If the client lacks full hip and knee extension, many of these standers can still accommodate them. Even a partially standing position provides a prolonged stretch, a truly alternative position to help maintain range of motion.
There is also much research about how these also allow weight-bearing.
Figure 35 shows an example of a supine stander that is parallel to the floor.
Figure 35. Example of a supine stander.
As stated earlier, you can easily put the child in here, adjust everything, and then slowly bring them up to a standing position, as much as tolerated by that individual.
Cons
- This needs to be adjusted properly
- A tray can support the arms and provide a place for activities
- Access may be difficult from this position
These need to be adjusted properly. If they are not, there can be some serious consequences. We want to respect the client's range, and we do not want to put too much pressure on certain areas like the patellar tendon.
A tray is often added to standers because they give you a surface for activities and support the arms. Supporting the arms can complement the standing position. In fact, often a tray is placed higher on a stander than it would be on a wheelchair to promote an extended position.
Stationary Standers: Classroom Use
- When should I use this in the classroom?
- These systems are most appropriate for use during passive activities, like storytime. The student’s head is way above peers and function is usually very different than in the seated position.
Depending on the client, they may not be as functional or have the ability to access their assistive technology from a standing position. The student's head is going to typically be way above their peers and that can affect vision and their ability to participate in activities as well. They might do better in their wheelchair for these activities. The standers may be more appropriate during passive times of the day, like storytime.
Common Concerns
- “I don’t know how to adjust this stander. Whose job is it?”
- Clinician
- Supplier
- Manufacturer
The clinician that is familiar with a particular stander can adjust it correctly and safely.
The supplier is usually familiar with how to grow or adjust the standers, as they have those options built into them, but they may need some guidance from the clinician on the goal of the stander.
You may also be able to contact the manufacturer. If they have a representative in your area, they may be able to help you as well. However, not all of this equipment has regional representation.
- “It is very difficult to transfer the student in and out of their stander.”
- Many students who can be transferred in and out of their wheelchair by one person require two people for a transfer in and out of a stander.
- Supine is easier, and the client can then be brought upright.
It can be hard to transfer kids in and out of standers, especially as they get bigger. Some students can be managed with one person, but sometimes more than one is required to transfer them in and out. Again, if this is a supine stander, you can often lay it flat, lay the client on there, make your adjustments, tighten everything down, and then bring them upright. It is important not to attempt to transfer a child in or out of a stander if you are not familiar with how that particular one works or if you think that you might lose control of the client.
Lyer Systems
- Side-lying
- Supine
There are side-lying and supine systems. Some examples are shown in Figure 36.
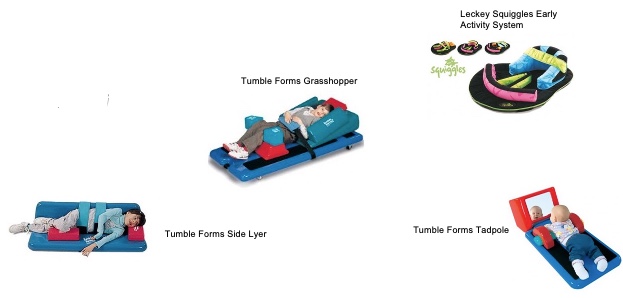
Figure 36. Examples of lyer systems.
The Grasshopper is in the middle and can help someone be positioned in a semi-reclined position. The Tadpole shows a child positioned prone, the Squiggles Early Activity System can provide multiple positions, including prone and supine, and the Tumble Forms Side Lyer positions on either side. These systems can help provide alternative positions.
Pros
- Typically, a very different position than sitting
- Hip and knee partial or full extension vs. hip and knee flexion in the seating system
- Gravity eliminated
- Supports posture
Another option is the Unishape, in Figure 37.

Figure 37. Example of the Unishape.
It is a modular system with many components to meet an individual's needs. Typically, this is a different position than sitting with the hips and knees partially or fully extended. Gravity is mostly eliminated because of the reclined position, which can support posture. As such, these are often used to provide an alternative position of rest for someone rather than a functional position.
Cons
- Often a more passive / less functional position
- Good for resting times
- Access to AT is rarely possible
The disadvantages of all these systems are that they tend to be more passive and less functional, but they can be good for resting. Some clients need to be more in an open position for certain things, like respiratory care or feeding with a G-tube, so these may be a good option for those activities. Access to assistive technology or other functional activities is usually limited. This side lyer from Jenx is a raised example.
Figure 38. An example from Jenx.
As this is raised, it is easier to care for a child.
Lyer Systems: Classroom Use
- When should I use this in the classroom?
- When prone, supine, or on the side, the student cannot see well, and function is usually very limited. This should be used for quiet times, not during any activity.
When should these be used in the classroom? A student may need to be in a prone, supine, or in a sidelying position for part of their day for various medical reasons or to provide rest or stretch. However, it is important to remember that the student is going to have difficulty seeing and doing functional activities from this position. It looks comfortable, but trying to interact with others from this type of position can be quite fatiguing. This is a nice option for quiet, passive time.
Other Alternative Systems
- The Bean Bag
- Lying on the floor on a mat
- Lying on a wedge on the floor
- Safety
- Function
- Length of use
There are other alternative systems that are available. Lying on the floor on a mat or wedge is always an option. Some people like using a commercially available bean bag, but it is important to keep in mind safety. A child might be able to fall from a bean bag or move into a position where their face could be in the material. We also have to keep in mind how much time a person is going to spend in this position and what functional activities they are meant to do during this time.
Another kind of chair is the P Pod from Inspired by Drive. It includes some partial supports to keep a client from falling out and provides a more structured, firmer base than a bean bag.
Common Barriers
- “The parents want the child in the alternative positioning system and
- the child isn’t positioned well”
- the child can’t participate in the classroom”
- What to do?
- Review goals
- Build consensus
- Come up with a plan
Let's discuss common barriers that may arise with alternative positioning systems. Consider a scenario where a parent wants the child to use an alternative positioning system instead of a wheelchair or adaptive stroller in a school setting. However, upon assessing the child, it becomes apparent that they are not well positioned and are unable to actively participate in the classroom.
In such situations, it is crucial to focus on building consensus among team members, including the client and their caregivers. Despite potential disagreements, shared goals are essential. In this case, our shared goals likely revolve around maximizing the child's functionality and comfort, which necessitates proper positioning. The alternative positioning system and dedicated seating system are tools intended to help achieve these goals. By reassessing the objectives, a plan can be developed. For instance, if the child is better positioned in their primary seating system, it may be beneficial for them to spend more time in it.
Additionally, it is important to communicate with the parents to understand their preference for the alternative seating system. Parents often mention comfort as a reason, although it may not always be accurate. Typically, a seating system customized to meet the child's needs offers greater comfort. Educating team members about why the primary seating system should not cause discomfort is essential. If discomfort persists, a reevaluation is necessary.
Ultimately, it is crucial to determine how much time the child should spend in various positions throughout the school day as part of the plan.
Common Concerns
- “I’m being asked to find a way for the student to access their AT from multiple positions. It isn’t working!”
- Discuss using alternative positioning during times the client doesn’t have to use their AT
- i.e., I don’t usually type reports from sidelying
I am asked all the time to find a way for the student to be functional. For example, a caregiver may want them to access their assistive technology from multiple positions, and sometimes it just does not work. Children with complex needs are typically able to better control their assistive technology and participate using their primary positioning system. If they are changed over to a stander, lyer system, or recliner, or are in a kicked-back position like this young man in Figure 39, they may not be able to use their body in a functional way.
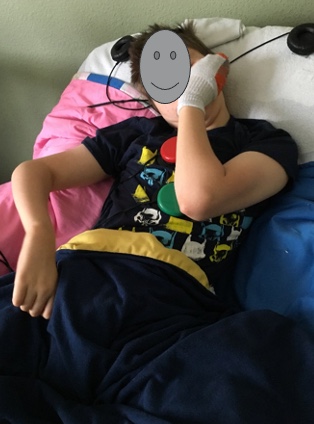
Figure 39. The client is in a relaxed position with access to switches still available.
We must discuss what the shared goals are so we can build consensus and talk about how the primary seating system is probably the best position for the functional times of the day at school and home, and alternative positions are best for more passive activities.
Sometimes examples are good too. I do not type my reports when I am side-lying; I type them when I am sitting at my desk with my feet on the floor and my arms in a good position. In this optimal position, I can type better and for longer periods of time.
- At what point should this positioning device be used at home vs. school?
- If a preschooler spends all of his limited classroom hours in various positions with therapeutic goals, educational goals will not be met.
- Discuss the goals of the school day and develop a plan.
- Keep in mind a young child’s endurance, as well.
At what point should an alternative positioning device be used at home compared to school? Let's consider a preschooler as an example. They have limited classroom hours and may not attend school every day, perhaps only for three hours. If they spend all their time in various positions primarily focused on therapeutic goals, it becomes challenging for them to participate in the classroom. This situation can be difficult. Some team members may insist on keeping them in therapeutic positions all day, while others emphasize the importance of teaching and active participation. Therefore, it is essential to build consensus, bring the team together, discuss our goals, and strive for a better balance. Ideally, the child should spend some time at school, participating and interacting with peers, while also having designated periods with more therapeutic goals. It may be necessary for therapies to primarily occur outside the classroom, allowing the child to have limited classroom time for learning, participation, and socialization, with therapies scheduled afterward. Additionally, we must consider a young child's endurance. Placing them in a position that requires continuous effort to maintain may result in them being too tired to engage effectively in school.
- Who has to pay for this equipment?
- Traditional funding sources if this has a medical purpose
- School- is this part of classroom activities and in the IEP?
Another common concern is the financial responsibility for acquiring the necessary equipment. Traditional funding sources may cover the cost of alternative positioning systems if there is a valid medical purpose, but it is crucial to provide comprehensive documentation explaining the purpose.
In certain cases, the school may be responsible for funding the equipment, especially if it will remain on school premises and is essential for facilitating classroom activities as specified in the Individualized Education Program (IEP). We must engage in open discussions with families about this matter to ensure a clear understanding of the financial implications.
Alternative Positioning Summary
- There are advantages to alternative positions.
- It is important to analyze if the alternative position is doing more harm than good.
- Remember, the student may not be able to function/access as well in the alternative system. It may be best to use this during more passive activities.
- An optimal position is key to limiting the loss of range and orthopedic changes, facilitating function and access to AT, and optimizing vision, breathing, and swallowing.
- Someone needs to identify the need … YOU!
To summarize, when discussing alternative positions, there are numerous advantages. It is critical to evaluate our client's positional needs at all times. We must assess whether the alternative position effectively fulfills its intended purpose. If it has a negative impact, a reevaluation becomes necessary.
It is important to bear in mind that students may not attain the same level of functionality in alternative positions as they do in their primary position or mobility base. When standing is preferred, utilizing it during passive activities like story time proves beneficial. Attaining an optimal position is vital for minimizing the range of motion loss, orthopedic changes and enhancing function and access to assistive technology. It also contributes to optimizing vision, breathing, and swallowing. However, it is crucial for someone to identify the specific needs and requirements in each case.
Next Steps
- Take a look at the clients you work with
- Check the student’s position in all positioning equipment
- Ensure the position is adequate, and work with the equipment supplier if needed to check this out
- Keep expectations realistic while the student is in the alternative position
It is recommended that you revisit and ensure the effectiveness of a child's primary position.
Additionally, it is important to assess their positioning in alternative postures. Periodically examine their alignment in all positioning equipment. Rather than following your usual therapy routine, consider introducing a different approach.
Ensure that everything fits appropriately and meets their needs. Verify that the positioning is adequate for each piece of equipment. If necessary, collaborate with the equipment supplier to address any concerns. If the client already has this equipment and is working with a supplier, you can likely invite them to visit your facility and assist with adjustments.
Lastly, maintain realistic expectations when the client assumes alternative positions.
Case Study
- Let’s pull this all together with a Case Study
- Positioning
- Access
- Communication
- Play
- Mobility
It helps to put a face on all this information and illustrate what we have been discussing. We are going to look at his positioning, access, communication, play, and mobility needs.
Gabriel
- Age at initial evaluation: 15 months
- Diagnoses:
- Encephalopathy
- Seizures
- Later diagnosed with Lennox Gasteau syndrome
- CVI
- Developmental delays
This is Gabriel in Figure 40.
Figure 40. Gabriel.
When I first started working with Gabriel, he was only 15 months old, so he was very young. I often do not have children referred to me that young, but in Gabriel's case, we started working very, very early. He did not have any equipment yet due to his young age. He was using a standard car seat and a standard highchair and whatever the family could make do with for floor time or holding him. It wasn't working too well for him at the time.
In terms of diagnoses, he has encephalopathy and seizures, which were later diagnosed as Lennox Gasteau syndrome, which is basically intractable seizures that do not respond well to other strategies like diet and medications. He also had cerebral visual impairment and overall developmental delays.
Functional Status
- Age 15 months:
- Gabriel displayed increased muscle tone intermittently in some areas of his body
- Hands fisted
- Often extends back and neck, arching rearward
- Unable to sit independently
- He can partially roll from side to back
When I first met him, his tone was quite high for his young age. His hands were usually fisted, and he often arched his body. He displayed increased, intermittent muscle tone with again fisted hands and extension in his back and neck, particularly if he was frustrated. He was unable to sit independently but could partially roll from his side to his back.
Initial Positioning
- Gabriel was spending most of his time being held or lying on his back on the floor
- Standard stroller
- not providing adequate support, the trunk was collapsing
- Tumble Forms feeder seat on loan from the early intervention program
- Promoting posterior pelvic tilt
- Lack of lateral trunk support and head support, arching
Gabriel was spending most of his time being held or lying on his back on the floor. He had a standard stroller, but it was not providing him enough support causing his trunk to collapse. He would end up in the bottom of his stroller in a heap. An early intervention program loaned him a Tumble Forms Feeder Seat, that you can see in Figure 41.
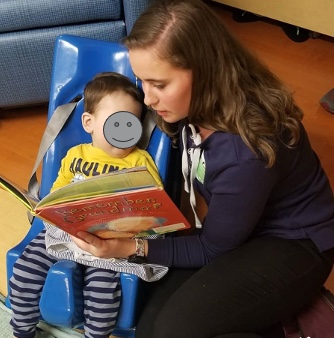
Figure 41. Gabriel is in a Tumble Forms Feeder Seat.
It gave him enough support to sit upright, but it was leading to chronic posterior pelvic tilt. He also did not have enough lateral trunk support or head support. If he arched, he would knock this over and fall out of it. The only time he was in this seat is if someone was sitting right next to him. You can see she is cradling this seat with her right arm.
Initial Recommendations
- Adaptive stroller with adequate postural support
- Hi-Loww base for use in the home
- Stroller base for use outside
- The family lived in a second-story apartment. They left the stroller base in the garage and carried the seat and Gabriel upstairs
- Bath chair
We recommended an adaptive stroller to give him adequate postural support. Even though he was small enough for a regular, commercially age-appropriate stroller, it did not provide the support he needed. One of the advantages of the adaptive stroller is a Hi-Low base. It could be placed on this base inside the home and on the stroller base outside.
The family lived in a second-story apartment at the time. They had a long flight of stairs to get to their door, and it was too difficult and unsafe to move the entire stroller. They would park downstairs and leave the stroller base in the garage. They then carried Gabriel upstairs in the seat. This was still difficult.
We also recommended a bath chair because they were having a very difficult time safely bathing Gabriel.
- Referred to Physiatrist at Children’s Hospital
- Recommended further evaluation to develop access for play and communication
- Recommended considering a stationary stander in the future
At this point, he was only seeing his pediatrician and a neurologist due to his seizures. We also referred him to rehab at Children's Hospital in Denver so they could start getting to know him because we knew this would be a long-term relationship. We also recommended that we see him for further evaluation to develop some access so that he could play and communicate. Even though he was quite young, he was very frustrated, and we knew we needed to give him some control and some basic communication.
We also recommended a stander in the future for weight bearing, as we knew he most likely was not going to be ambulatory.
- Gabriel in his adaptive stroller with Dad!
- Stroller base used outside
- Hi-Loww base used inside
- Bath chair was, according to Mom, “A life-changing bath experience!”
Gabriel eventually received his equipment, and in this picture, here he is in his adaptive seating system on the Hi-Low base.
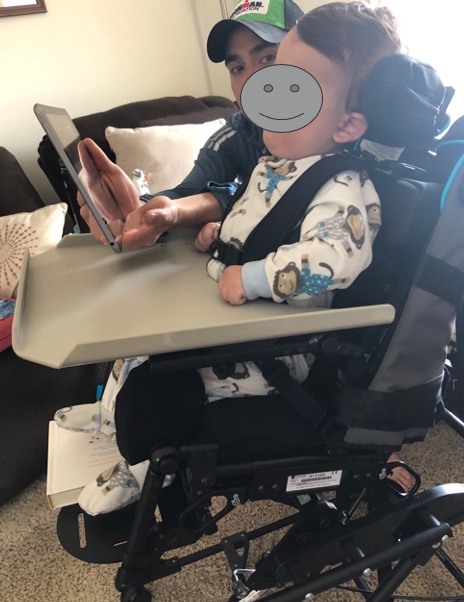
Figure 42. Gabriel in his custom seating on a Hi-Loww base.
Dad is reading to him. The foot support was still a little low and needed to be adjusted, so the parents put a book in there to support his feet, as they are very savvy. Gabriel was having a blast because he was upright, better supported, and could see what was going on with the family. The family also enjoyed this seat because they were freed up to take care of other things and interact with him without holding him.
The bath chair in Figure 43, was a life-changing bath experience.
Figure 43. Leckey advanced bath chair.
He used a bath chair like the one pictured, except that the legs were adjusted so they were in the water. Before getting this bath chair, his mom or dad had to take a bath with Gabriel, and even then, it was difficult with him arching and slipping down into the water if he had a seizure. With the chair, he was well supported, and they were freed up to bathe him and wash his hair. He liked it.
New Positioning
- Gabriel has the stability and postural support he needs to be functional.
Figure 44 shows his positioning.
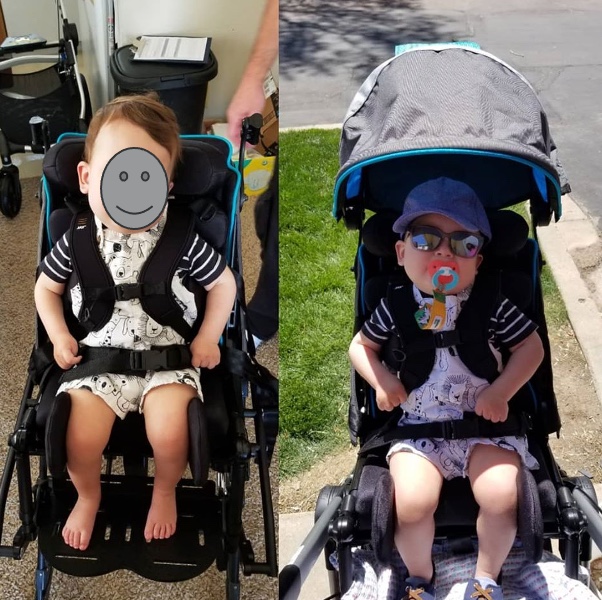
Figure 44. Gabriel is in better seating.
On the left, you can see him in his seating system on the Hi-Low Base, and on the right, he is outside in the stroller base, which includes a canopy. The canopies are important for him because he is on seizure meds and at high risk for sunburn. He had the stability he needed to be functional.
Stander
- Gabriel eventually received a stander.
- Important for weight bearing, hip development, and just being upright!
- Gabriel’s parents had larger wheels and a push handle added so they can more readily take this outside. Great idea!
He eventually did receive a stander for weight bearing, hip development, and being in an upright position (Figure 45).
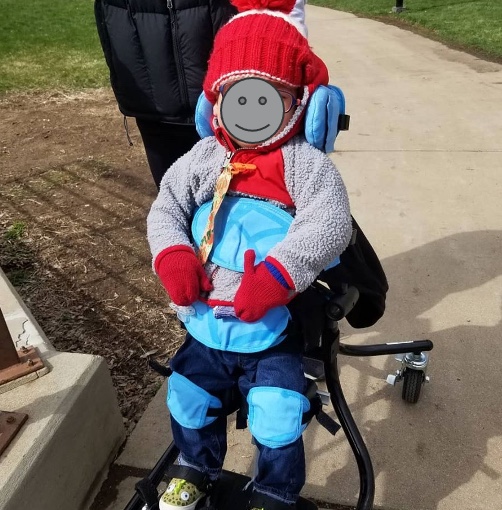
Figure 45. Gabriel in his stander.
His parents are very creative. They decided to take the very little wheels that were on the stander to allow it to be moved within the house a little bit and replaced them with larger wheels and added a push handle so they could take the whole stander outside. So they would literally bundle him up on a cool Colorado day and walk around the park in this standing position. And that was something they all enjoyed.
Alternative Seating
- While Gabriel is well supported in his adaptive stroller, it is surely hard to push a shopping cart and the stroller at the same time!
- He now has a Firefly GoToSeat that fits in the shopping cart! Not much room for groceries, but participation is important!
Even though Gabriel was very well supported in his adaptive stroller, it was hard for Mom to push the stroller and the grocery cart at the same time. Instead, Mom used the GoToSeat from Firefly, as seen in Figure 46.
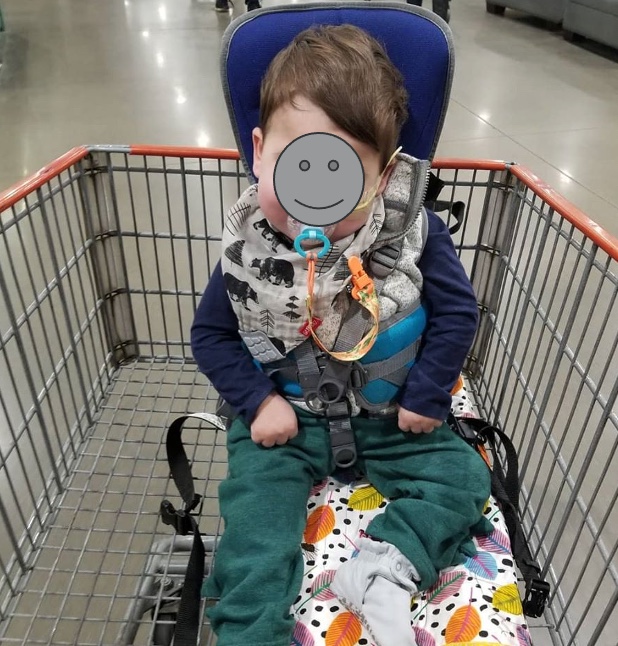
Figure 46. Gabriel in the GoToSeat from Firefly in the back of a grocery cart.
There was no way Gabriel could sit in the front of the shopping cart, but he could sit in the back. Although Mom did not have a lot of room for groceries, he could go grocery shopping with her, which he enjoyed.
Back to Positioning
- Gabriel is well-positioned in his adaptive stroller
- He has alternative positioning options, including a stander and GoToSeat
- But he spends a great deal of time in bed…
Gabriel is well-positioned in his adaptive stroller (Figure 47); he has alternative positioning options, including the stander and the go-to seat.
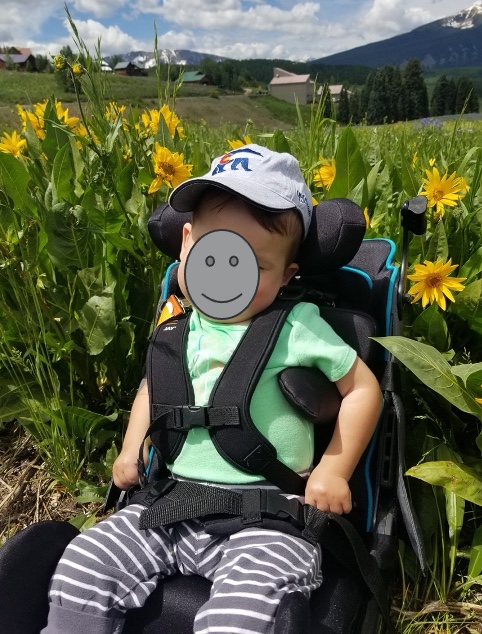
Figure 47. Gabriel in his adaptive stroller.
Sleep Positioning
- Sleep Positioning is critical to maintain postural alignment, preserve the range of motion, and limit the development of orthopedic asymmetries.
- Hip integrity
- Spinal alignment
- See related course
He also spends a lot of time in bed because he is little. Between naps, nighttime sleep, and care time, he is in bed for a significant time. Figure 48 shows his typical position in bed on the left and then corrected posture.
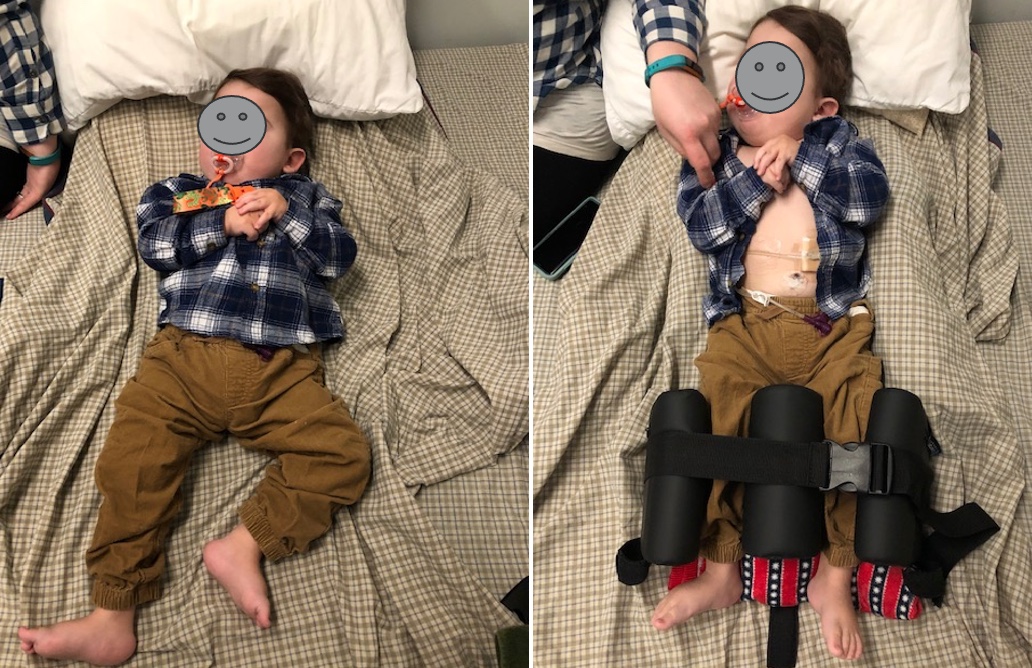
Figure 48. Typical and corrected positioning in bed.
We were seeing a few things with his posture on the left that could lead to issues with his hips. It is a little hard to tell, but he was leaning to the left, and his spine was curved. He was also keeping his left leg abducted and flexed to the side. We made some simple modifications on the right that the family still uses at home.
There are some related courses on this in the Continued library.
Accessibility
- Gabriel’s family was able to move to a home that has greatly improved accessibility.
- The family bought an accessible vehicle.
Gabriel's family was able to move to a home that had a lot more accessibility, which was great. Now, they do not need to worry about the long flight of stairs. They even did some fundraising and bought an accessible van, so now they can more readily get out and about with Gabriel's equipment. Figure 49 shows a trip to the aquarium.
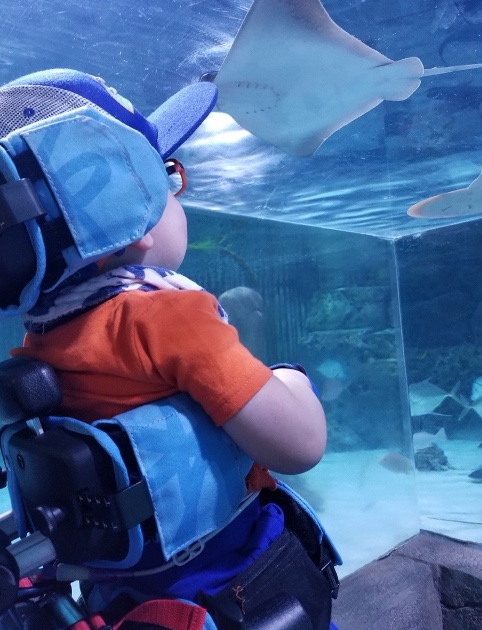
Figure 49. Gabriel in his custom seating at an aquarium.
Next Steps:
- Seated Positioning
- Monitor
- Gabriel has grown, and a taller back in is the ordering process
- Eventually, he will require different seating and a manual tilt-in-space wheelchair
We continue to monitor his seated position. He keeps growing, and since this case study, he now has a manual wheelchair. Gabriel is even able to use a power wheelchair right and is a fantastic communicator.
- Nighttime Positioning
- Monitor
- Make changes, as needed
We continue to monitor his nighttime positioning to make any changes that he needs (Figure 50).
Figure 50. Gabriel is in bed with proper alignment.
He still fists his hands, but they are a little more relaxed. He is supposed to be wearing splints at night, but that does not always happen.
He still uses the stander (Figure 51) and adjustments have had to be made to accommodate growth. He might be able to eventually use this in a prone position, but right now still needs this in supine.
Figure 51. Gabriel is outside in a stander.
- Accommodating growth and changing needs
- Gabriel is now 3 years old.
- Gabriel kept growing and needed a larger seat and mobility base.
- He was at high risk for scoliosis and starting to assume asymmetrical postures.
- A molded seating system (Aspen Seating Orthosis) was recommended.
- A manual tilt-in-space wheelchair was recommended.
At this point in the case study, he is three. He keeps growing and needed a larger seat and mobility base. We recommended a manual tilt-in-space wheelchair for him. We also recommended a molded seating system (Figure 52), the Aspen Seating Orthosis, that has a three-year warranty, meaning they can keep growing it for three years, and we do not have to get funding approval to do so.
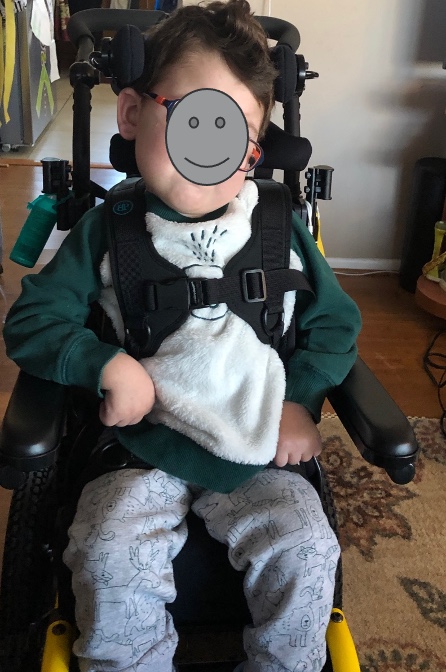
Figure 52. Gabriel in his custom seating.
It is a growable molded system, which is unique in wheelchair seating. He needed this because he was starting to develop some curvature and needed a great deal of support to keep his trunk aligned and that intimate contact provided that. We wanted to reduce the risk of scoliosis and give him enough support to be as functional as possible.
- Mobility:
- Initial evaluation with adaptive stroller and switches complete
- Evaluation with power wheelchair pending
After he received his manual wheelchair and seating, we evaluated him for power mobility. He has a ride-on car that is switch adapted. We also identified some other switch sites to allow him to use a power wheelchair. He drives with one switch by his hand for forward, and he uses his feet to hit switches for left and right and does very well. This partial setup can be seen in Figure 53.
f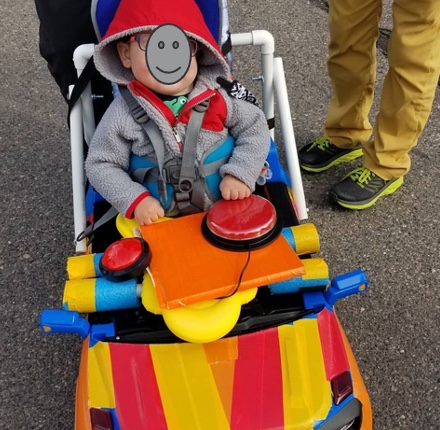
Figure 53. Assessing switches with Gabriel.
Early intervention is so important, and we should never underestimate these kids. It is easy to underestimate a child like Gabriel, but he does so many amazing things with his technology. These interventions are all interrelated.
We need to work closely with these families to show them what is possible. We provided a lot of education. In Figure 54, you can see that they are hiking with him in an adapted backpack.
Figure 54. Gabriel in an adapted backpack.
They figured out how to adapt on their own. They are doing amazing things with their little boy.
Take-home Message
Our take-home message is that positioning can optimize function, minimize loss of range, and prevent orthopedic changes. We need to be proactive and preventative and use this type of equipment if possible.
Thank you very much for joining us for this course today. I hope you find it helpful.
Questions and Answers
Can you get both a stroller base and a more fitted molded base at the same time? Any tips for justification?
It depends on funding. Each state Medicaid program, which many of these children are on, has different rules, and the client may also have insurance. A child usually has a combination of funding. Typically, the insurance plan will pay first, and Medicaid will pick up what is left as long as it is something they approve.
As I mentioned earlier, one justification may be that the family does not have an accessible vehicle. It might be difficult for them to take apart the manual chair, put it into the trunk, and then put the child into a car seat or adaptive car seat. A stroller tends to be quicker and a little easier. With that said, sometimes it is a covered item, and sometimes it is not.
Do you see coverage with wheelchairs customized for use on the sand or beach?
No, but that would be great. Fortunately, there are many beaches and national parks that have specialized beach chairs that are free to use or rent. Families can check that ahead of time. For example, in our area in Colorado, we have the Great Sand Dunes National Park. If someone with a disability is at that park, they can simply check in with the visitor station and ask to borrow a beach chair. The wheels are big to navigate in the sand, but it is not practical for someone to have all the time.
How can I get more experience and certifications?
RESNA offers the assistive technology professional (ATP) and the seating and mobility specialist (SMS) certifications. They do require quite a bit of hands-on time with people who are using this technology because it is a valuable way of gaining experience. If you do not have a lot of kids on your caseload with seating needs, you can reach out to other places that are close to you, like a wheelchair seating clinic or a large school in your area where you can work with clients who have more extensive seating needs. You also may be able to hang out with a complex rehab supplier in your area who works with kids.
There are also various articles and other written materials available. For example, there are many courses at Continued in a variety of formats including text. One textbook that you might consider is, Seating and Wheeled Mobility: A Clinical Resource Guide. The first edition is out now, and the second edition is underway, but it probably will not be available for purchase for another two years.
Some helpful articles that you can read are from NRRTS Directions magazine, which stands for the National Registry of Rehabilitation Technology Suppliers. They have very practical articles that might be helpful.
How often will wheelchairs be reimbursed for children?
Towards the beginning of this session, we mentioned that there is no time limit with sources anymore. We look at if a new seat or mobility base is justified. Even if it has been a relatively short or long time, we justify it based on need.
What is the main advantage of alternative positioning?
The main advantage is that we can provide a different position than the primary seating system. A good example of that is a stander because we are providing hip and knee extension and weight bearing, which has a lot of wonderful medical and clinical advantages.
Is there a timeframe for being in a lyer?
To my knowledge, there is currently no specific timeframe available. They are typically in an alternative device for a fairly short time, like maybe a half hour.
If you are in a rural area, what are some buzzwords to look for when searching for a seating clinic?
One tool that I often use is the RESNA website, which offers two certifications, as mentioned earlier. You can see if there are any ATPs in your vicinity.
References
Alkhateeb, A. M., Daher, N. S., Forrester, B. J., Martin, B. D., & Jaber, H. M. (2021). Effects of adjustments to wheelchair seat to back support angle on head, neck, and shoulder postures in subjects with cerebral palsy. Assistive Technology, 33(6), 326-332.
Barbier, V., Goëb, V., Klein, C., Fritot, S., Mentaverri, R., Sobhy Danial, J., ... & Le Monnier, L. (2022). Effect of standing frames used in real life on bone remodeling in non-walking children with cerebral palsy. Osteoporosis International, 1-7.
Livingstone, R., & Paleg, G. (2021). Enhancing function, fun, and participation with assistive devices, adaptive positioning, and augmented mobility for young children with infantile-onset spinal muscular atrophy: A scoping review and illustrative case report. Disabilities, 1, 1–22.
Lo, L., Hebert, D., & Colquhoun, H. (2021). Measuring practice gaps in the delivery of evidence-based seating assessments: a retrospective chart review. Disability and Rehabilitation: Assistive Technology, 16(3), 255-261.
Sarsak, H. I. (2018). Review of pressure ulcers management in pediatrics: assessment, prevention, and intervention. J Pediatr Neonatal Care, 8(5), 245-248.
Citation:
Lange, M. (2023). Wheelchair seating for the pediatric population. PhysicalTherapy.com, Article 4873. Available at www.PhysicalTherapy.com