Editor's note: This text-based course is an edited transcript of the webinar, Wheelchair Seating Interventions, presented by Michelle Lange, OTR, ABDA, ATP/SMS.
Learning Outcomes
- After this course, participants will be able to:
- Recognize Stage 1 – 4 pressure injuries during a seating evaluation.
- List three critical angles of support and clinical indicators for angle selection to facilitate function.
- List three common pelvic and trunk positioning and three common lower extremity and head positioning challenges and strategies to address each to facilitate function.
Welcome, everyone, to this course today. I do hope that it is helpful to you and to the clients that you are serving.
What We Are Covering
- Pressure
- Angles of Support
- Strategies to address common positioning challenges
What are we going to cover throughout this course here? We're going to start with pressure. Pressure concerns and mitigating those are a big part of wheelchair seating interventions. Determining at what angles the client needs to be positioned and supported is also an essential part of our seating assessment. And then, we're going to review some strategies to address common positioning challenges.
Pressure
Pressure Injury Definition
- National Pressure Ulcer Advisory Panel (NPUAP)
- International NPUAP-EPUAP Pressure Ulcer Definition
- "A pressure injury is localized damage to the skin and underlying soft tissue, usually over a bony prominence or related to a medical or other device. The injury can present as intact skin or an open ulcer and may be painful. The injury occurs as a result of intense and/or prolonged pressure or pressure in combination with shear. The tolerance of soft tissue for pressure and shear may also be affected by the microclimate, nutrition, perfusion, co-morbidities, and condition of the soft tissue."
The National Pressure Ulcer Advisory Panel has a definition for pressure injuries that is accepted in the US and internationally. Despite the name for this workgroup, a newer term is pressure injury rather than pressure ulcer or wound.
The tolerance for pressure and shear may be affected by the microclimate due to heat and moisture. Additionally, factors such as nutrition, perfusion, whether the tissues have enough oxygenated blood flow, co-morbidities, and the soft tissue condition play a role.
When I am talking about pressure injuries, it helps me to relate it to a personal experience. Our family has taken a lot of road trips over the years. Sitting in that car seat for hours and hours can get uncomfortable. Often my back is sore, and my buttocks may feel numb. My body says you need to move because you are not getting enough blood flow to these tissues. Most of us reposition in response to that. Some of our clients may be unable to feel those cues or unable to do something about it. That is why the wheelchair seating system is so crucial.
Pressure Injuries
- 450,000+ pressure-related wounds reportedly annually among wheelchair users and hospitalized patients
- $37,800 average cost of hospitalization due to pressure-related wounds
Almost a half million pressure-related wounds are reported annually among wheelchair users and hospitalized patients. I wanted to include that number as people also get pressure injuries from lying in bed or on other surfaces. The average cost of hospitalization due to a pressure-related wound is nearly $38,000. It is costly, and some people develop secondary infections and may even succumb to this injury if they become septic. Some of these cushions and seating surfaces are on the expensive side, and funding sources might push back. However, they are certainly far less than the cost of treating a wound.
Contributing Factors
- Heat
- Moisture
- Poor pressure distribution
- Lack of sensation
- Incontinence
- Poor hygiene
- Poor nutrition
- Prior pressure injuries
- Immobility
- Friction
- Shear
- Inactivity
- Decreased mental status
There are many contributing factors related to pressure, and we must keep all of these in mind. We need to look at all the surfaces the client is sitting or lying on and their transfers. For example, we might see a pressure injury on a client under one of their ischial tuberosities. It is easy to assume it might be the wheelchair seating surface, but it could be the commode chair or the way someone is transferring. It might even be someone sitting on a wrinkle in the sling of their patient lift system.
Heat and moisture cause bacteria to grow between a person's clothing and the seating surface. There could also be fluids like sweat, urine, or other bodily fluids. It could be that the pressure is poorly distributed. If I am sitting on a metal bench watching my child play in a soccer game, there is not a lot of pressure distribution there, as I am not shaped like a flat metal bench. A vehicle driver's seat has more of a contour, so it distributes pressure better, but it is a generic contour. Some of our seating surfaces are custom contoured for an individual.
There can be a lack of sensation. As I mentioned in my road trip illustration, we will move if we are not comfortable. I guarantee you that most of you will be wiggling around a lot during this presentation. A client may not recognize that they need to move.
Incontinence, as mentioned with the moisture factor, is a big deal. Urine changes the pH of the skin, particularly in adults. In children, the urine is not as strongly concentrated. Even if our clients are being changed frequently, unless their skin is clean and dry, there can be a film of dried urine on their skin, leading to a breakdown. When we add in fecal material, that changes the pH further and can lead to damage in a very short amount of time. Poor hygiene goes along with this. If a person is incontinent and not getting adequate hygiene during showering or is infrequently showering, this can put the skin at risk.
Poor nutrition and a lack of fluids also affect the integrity of the skin tissues and healing. We see this a lot in the geriatric population.
And if there has been a prior pressure injury, there is always a higher risk that that area can have further damage. If a person is immobile and unable to shift their weight, that is a significant pressure risk. They need a method of shifting their weight to address these issues.
Transfers from one surface to another can cause sheer and friction, like using a sliding board. Other issues include inactivity and decreased mental status.
Pressure Ulcer Staging
- Stage 1: Intact skin, red, non-blanchable
- Stage 2: Partial thickness loss of dermis
- Stage 3: Full thickness skin loss
- Stage 4: Full thickness tissue loss
- Unstageable / Unclassified
- Suspected Deep Tissue Injury
Pressure injury staging has changed quite a bit as more research has defined these categories better. Depending on your work setting, there may be someone in charge of wound care, and this person will stage wounds. There are four stages, and these images are from the National Pressure Ulcer Advisory Panel website. This site is an excellent resource for more information about these particular stages. Besides stages 1 through 4, some wounds are considered unstageable or unclassified. There is also a category called suspected deep tissue injury, where somebody has an injury, but their skin may be intact. Figures 1 through 4 show the different stages.
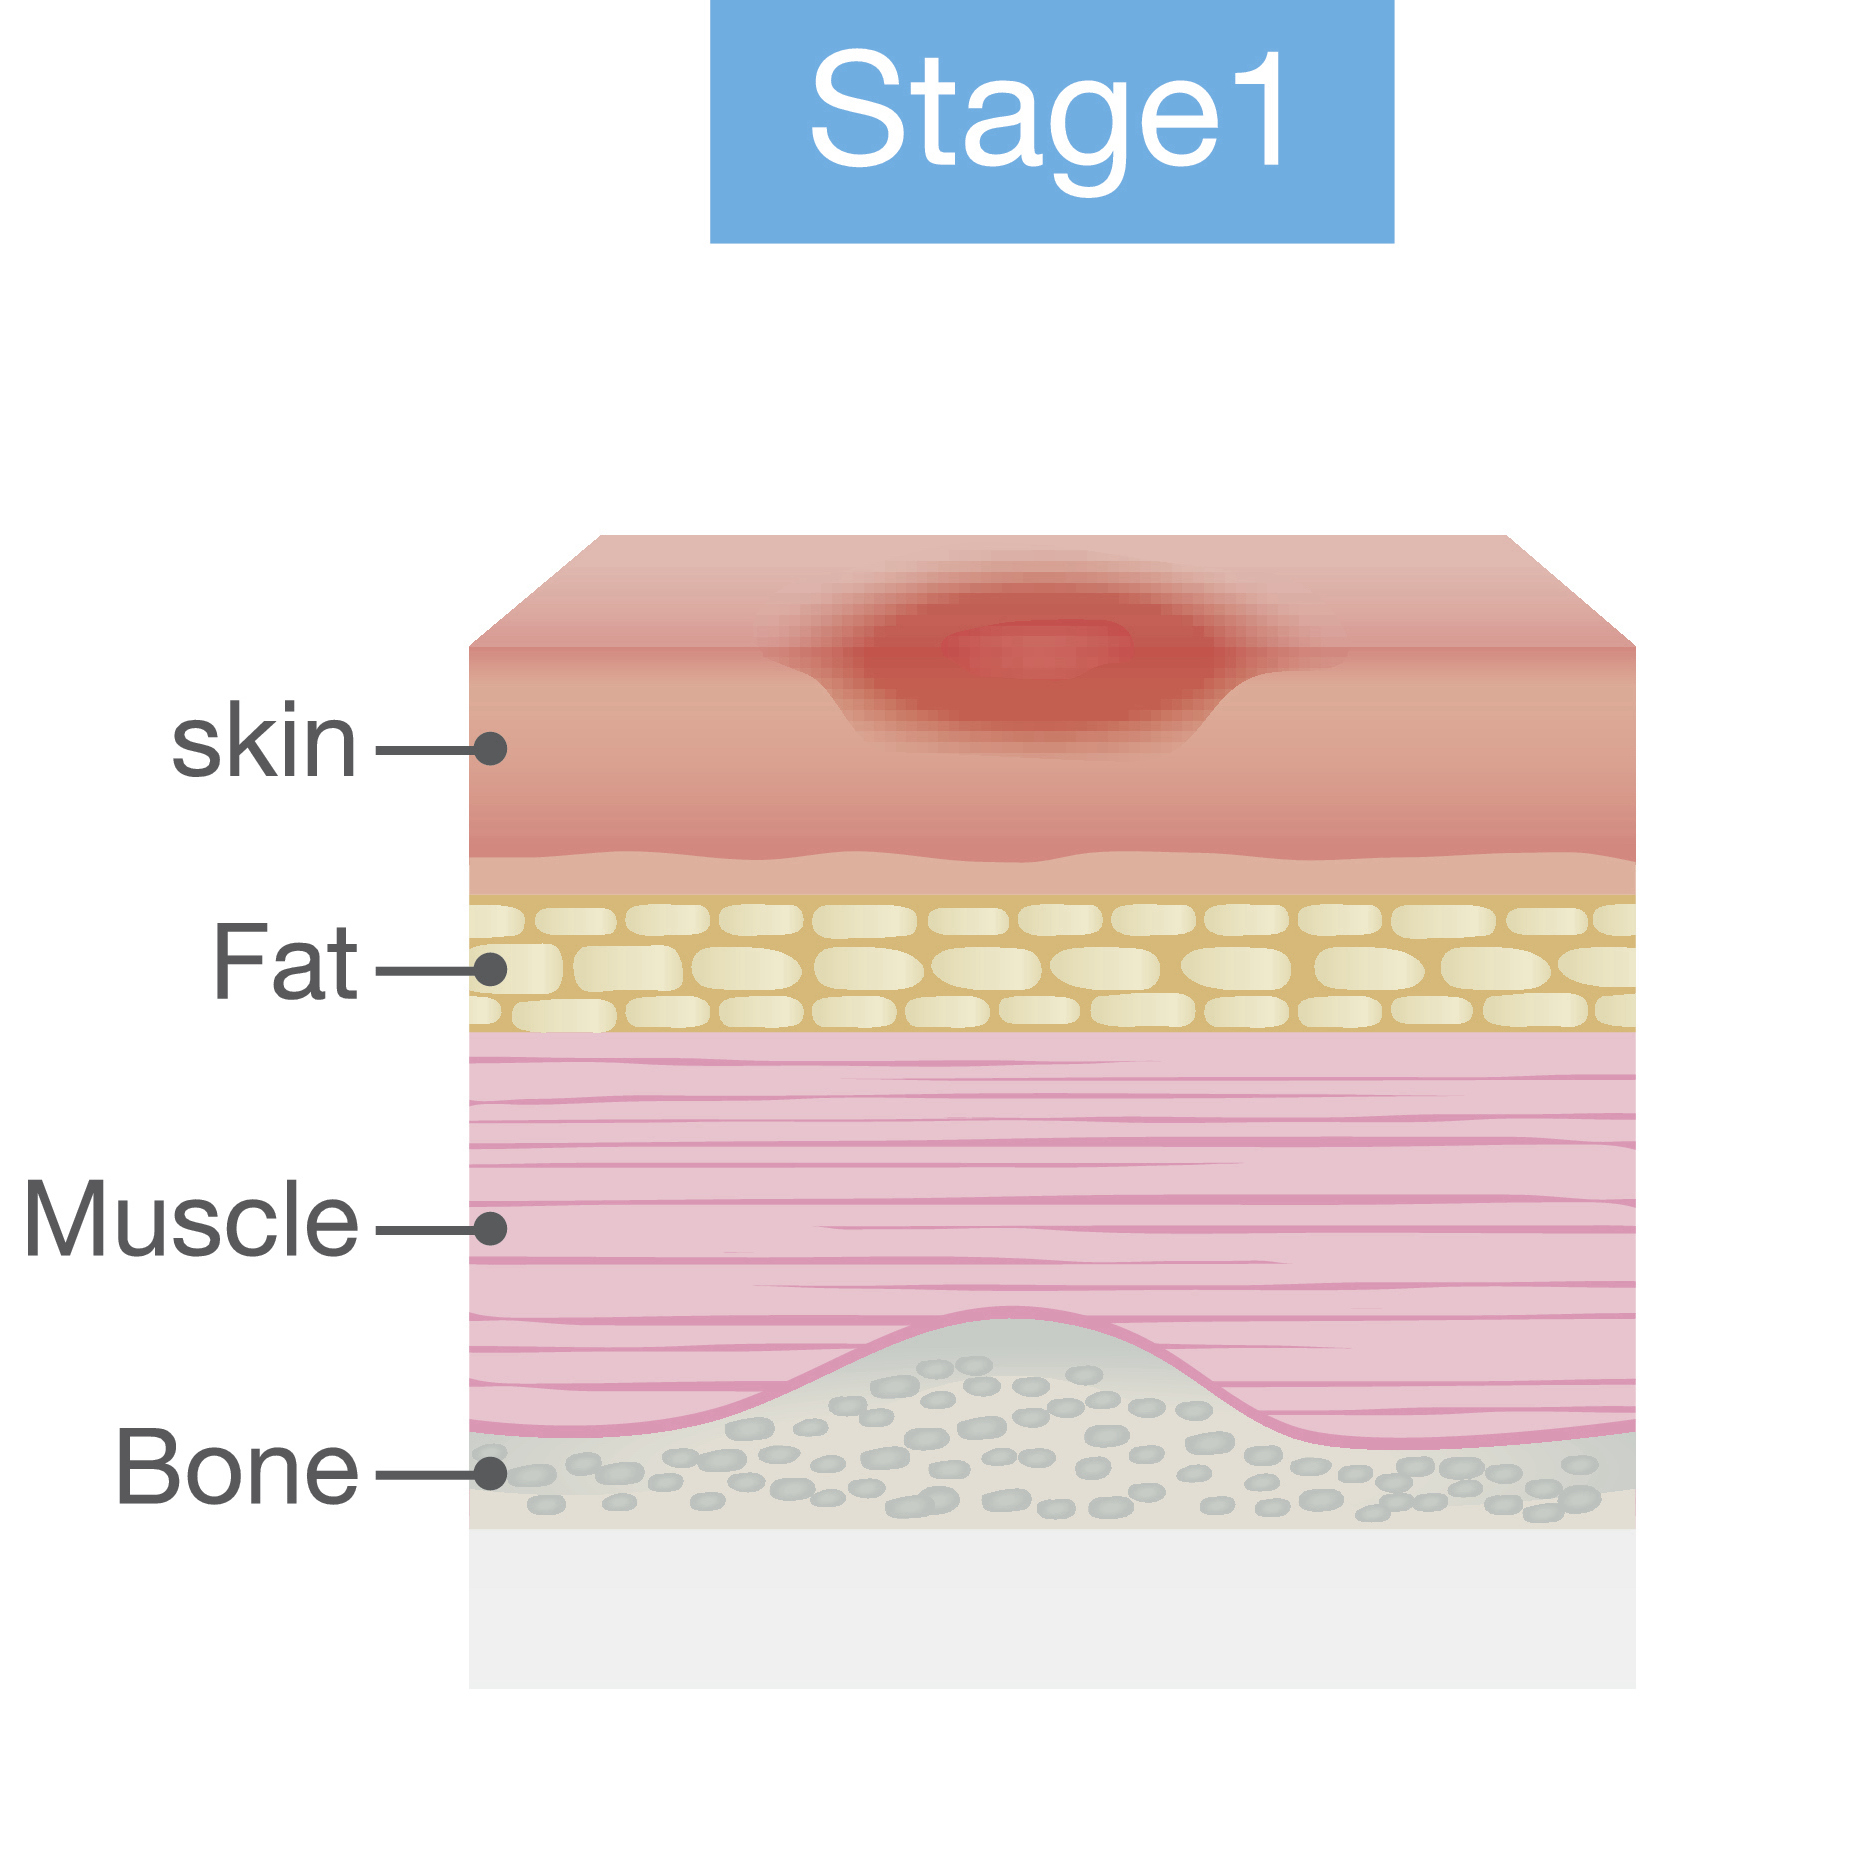
Figure 1. Stage 1 pressure injury.
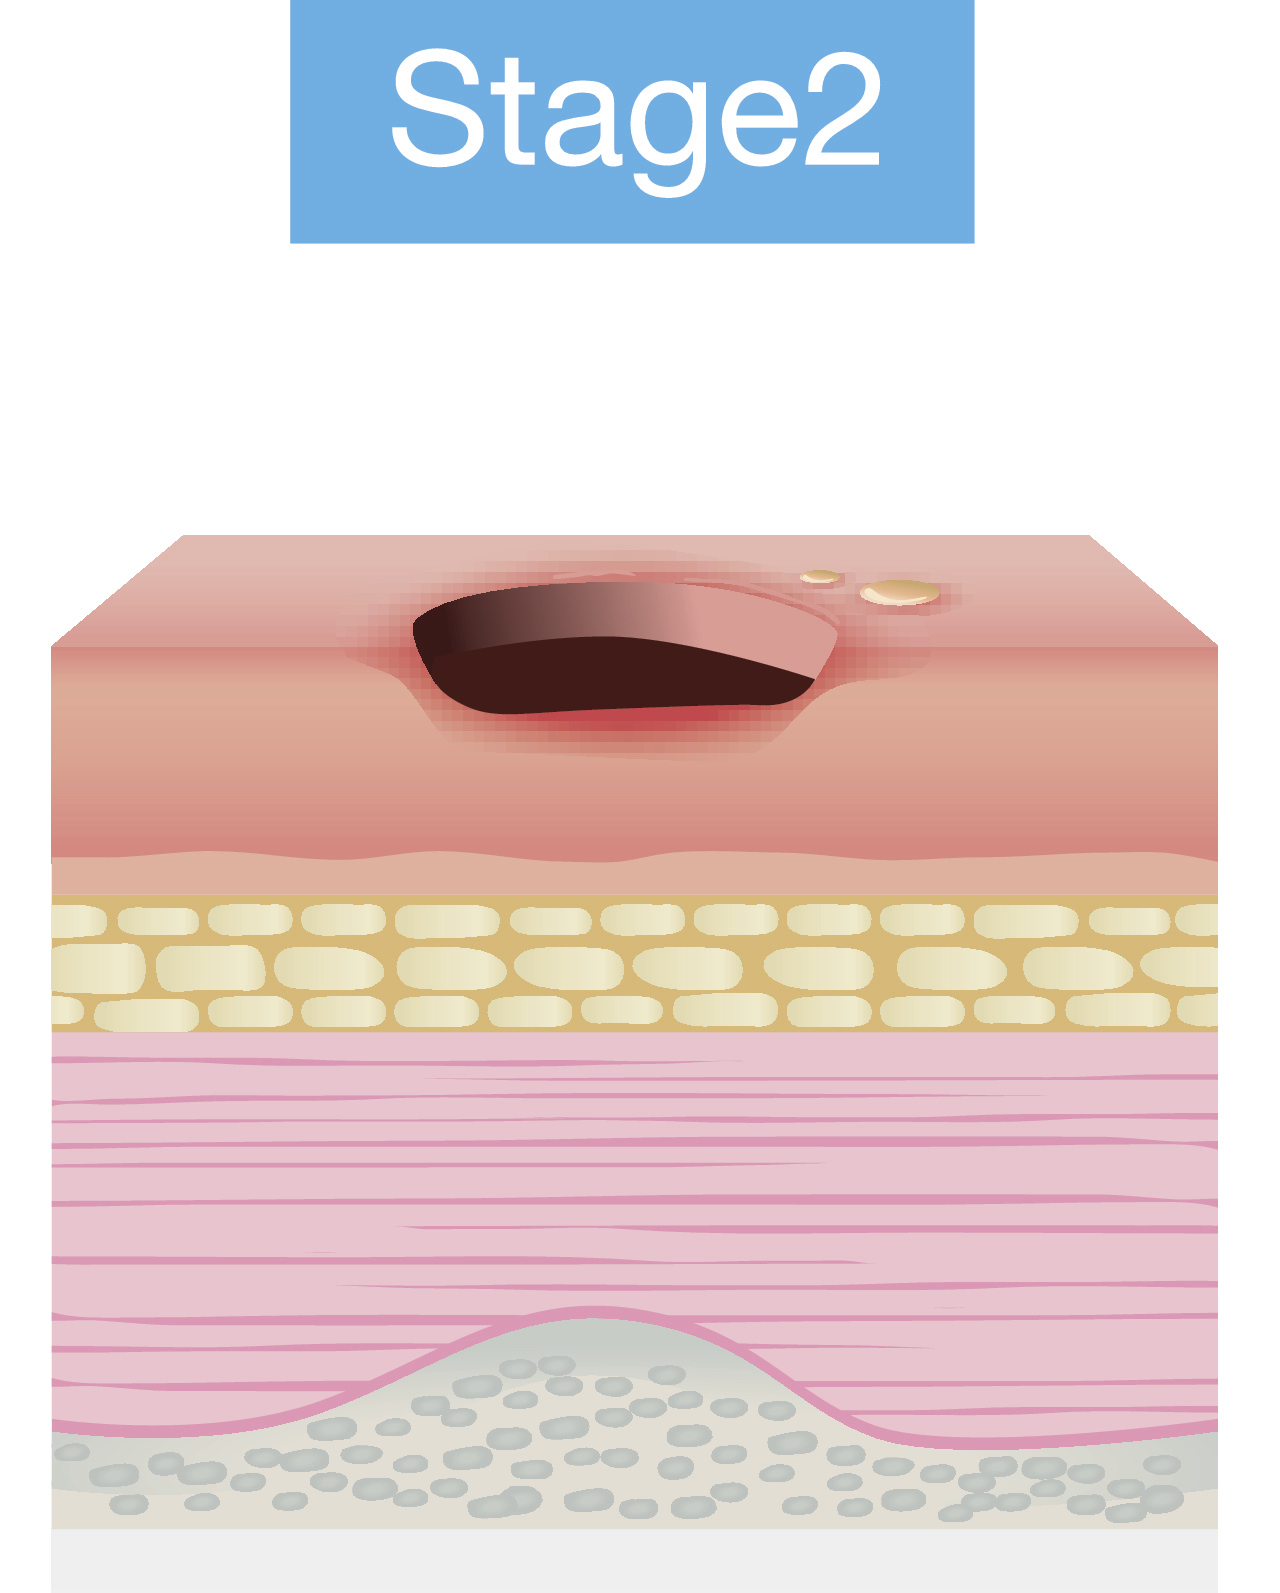
Figure 2. Stage 2 pressure injury.
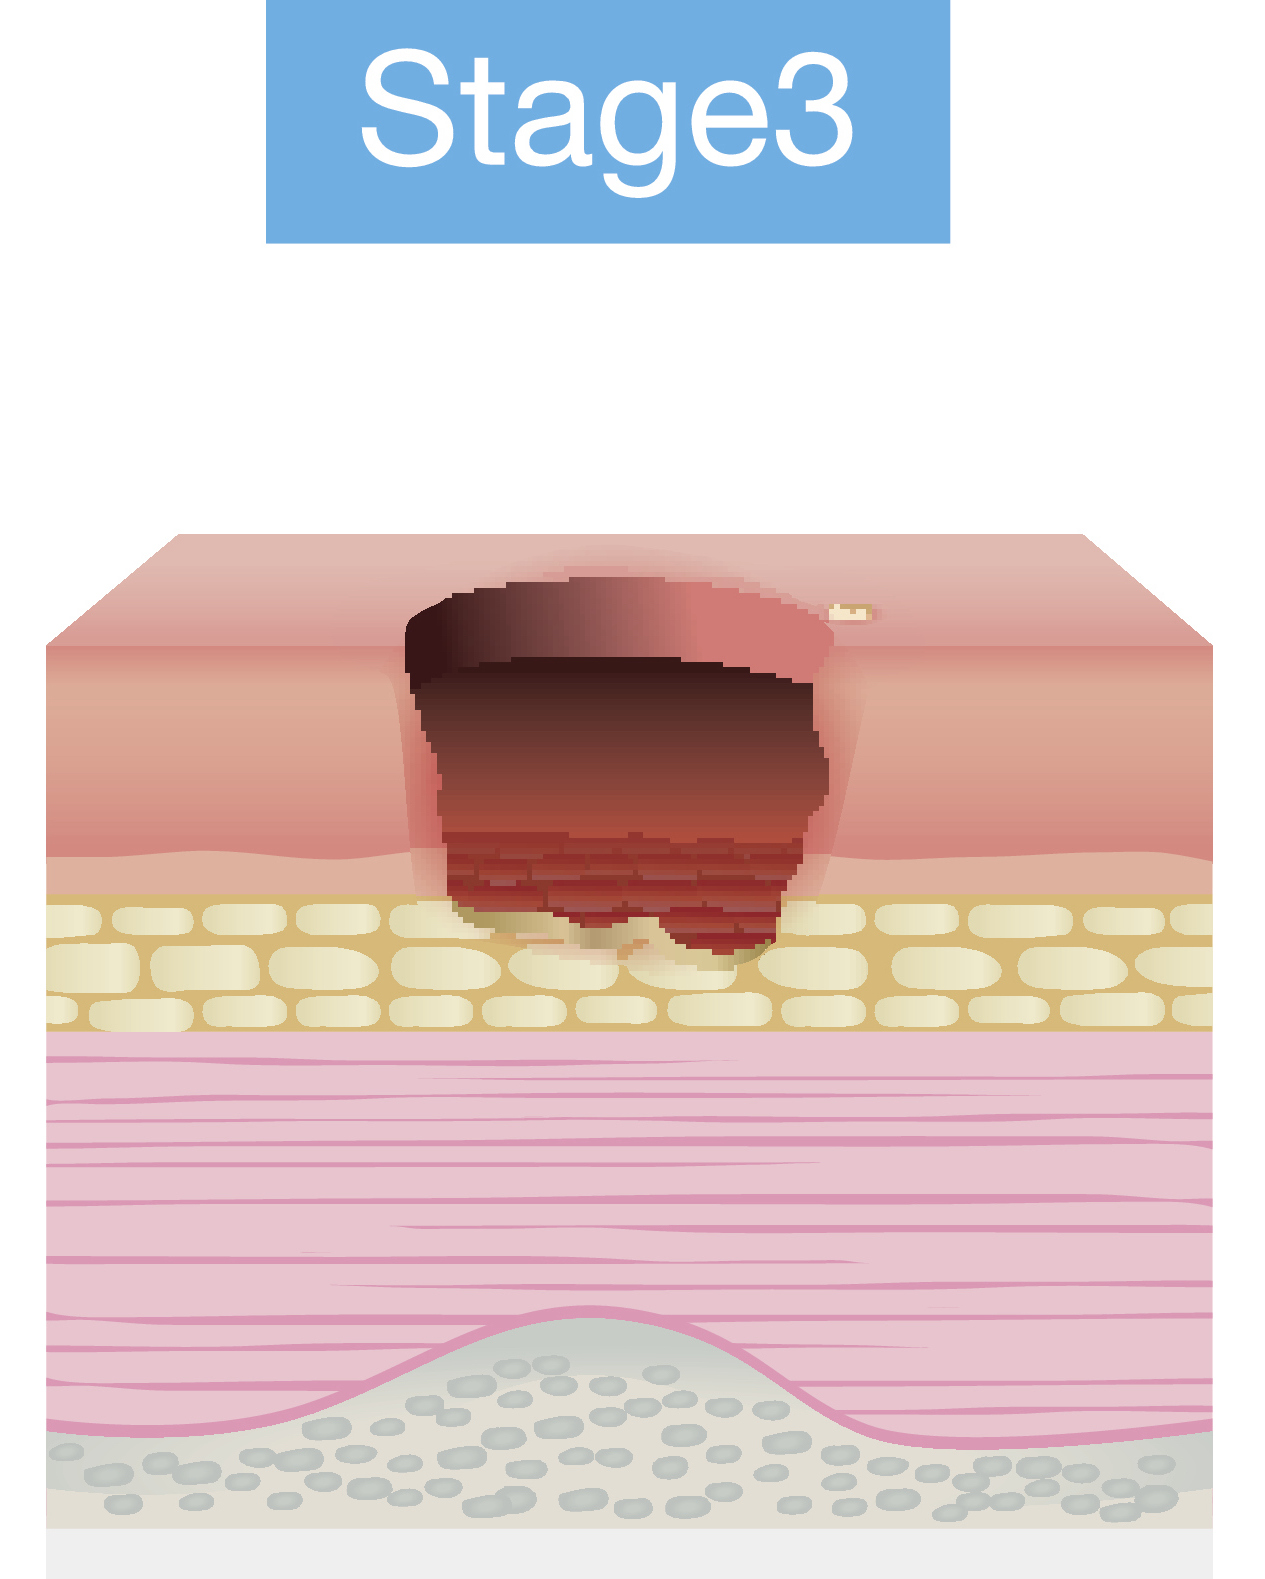
Figure 3. Stage 3 pressure injury.
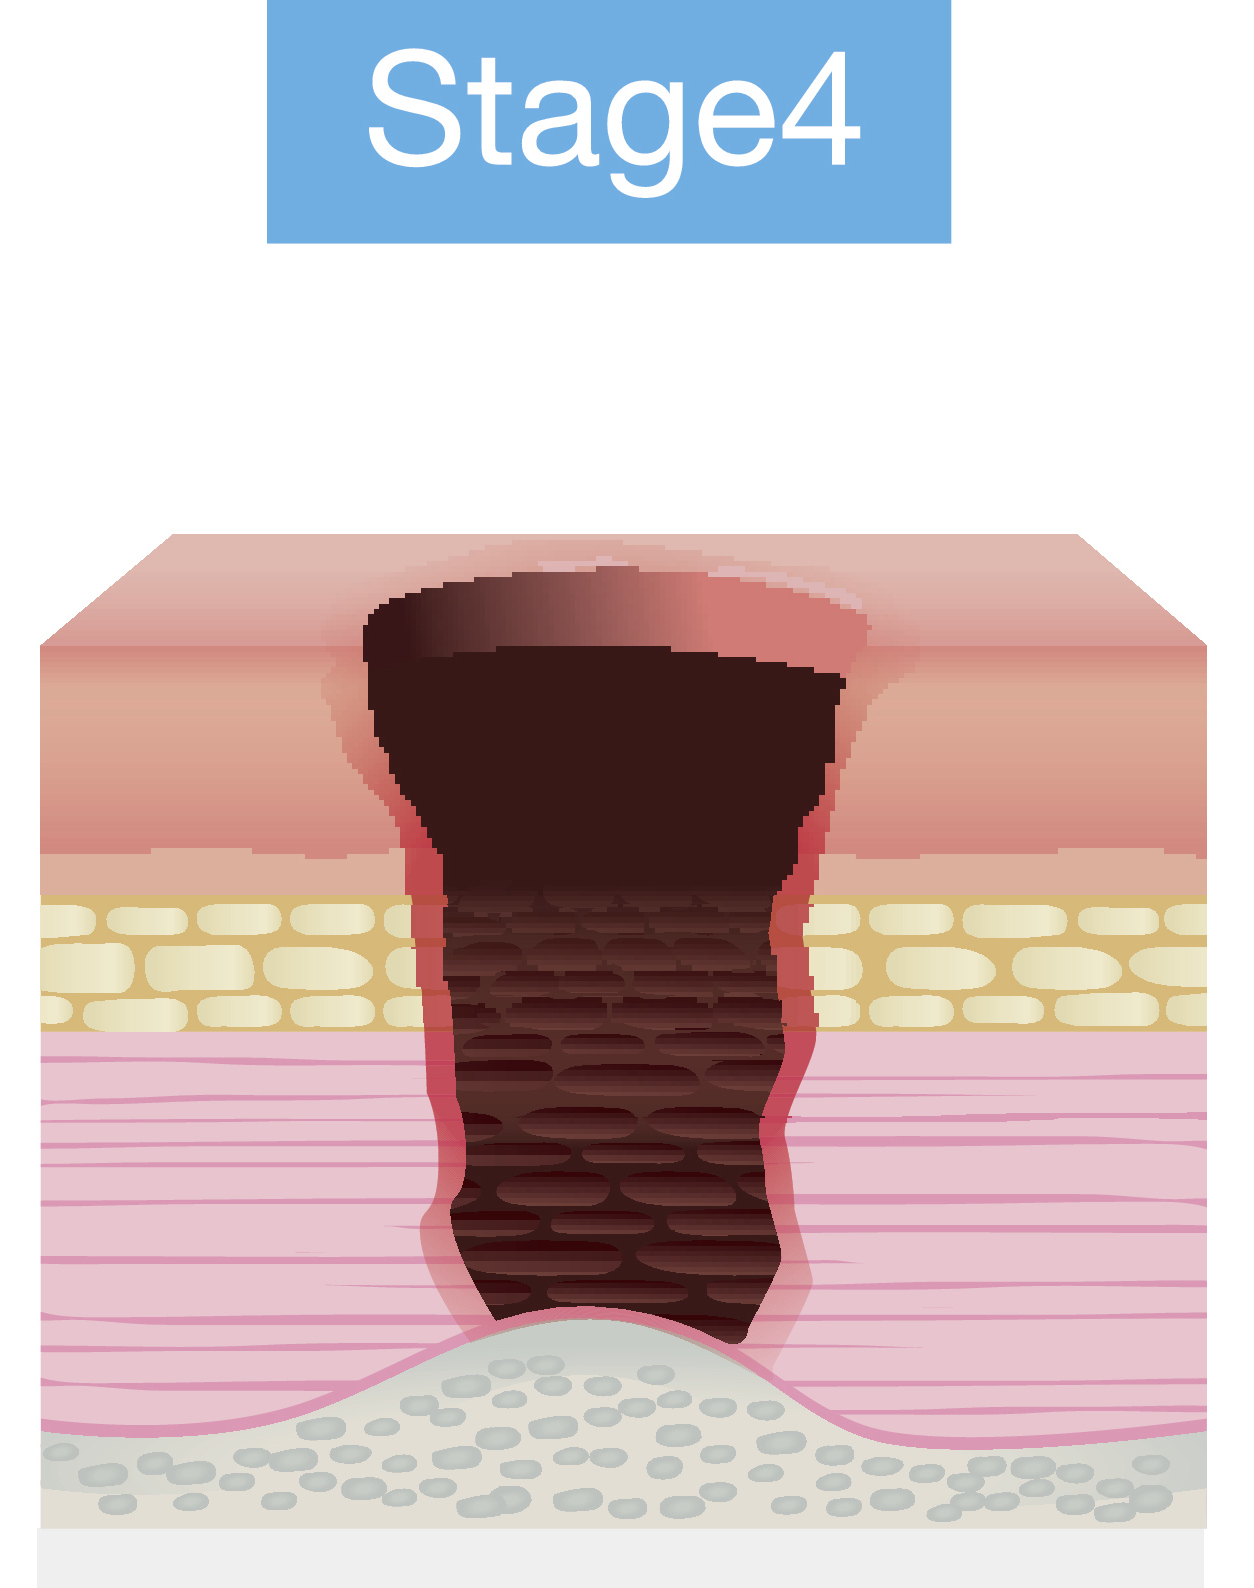
Figure 4. Stage 4 pressure injury.
Source: Continued (licensed from Getty Images)
General Strategies
- Avoid prolonged tissue loading
- Low and even pressure distributions
- Weight shifts
- Newer guidelines
- Avoid high loading even for shorter periods of time.
There are some general strategies that we need to keep in mind. We want to avoid prolonged tissue loading by not allowing someone to stay in one position for an extended time. That is not good for us as those tissues will be compressed and can lead to a lack of adequate blood flow. We need to even out pressure distribution and ensure the pressure is not high over certain areas like bony prominences. We also have to provide a means for this person to do weight shifts to unweight certain areas of the body for a while.
There are some newer guidelines based on current research. Much of this has to do with the interaction of shear and compression of the tissues. Per these more recent guidelines, avoiding high loading in body areas is crucial, even for short periods. Our previous research seemed to indicate that it was okay if someone was not maintaining that position for too long a time. But we now know that high loads and high shear situations can cause damage even over short periods.
Seating Implications
- Pressure distribution
- Pressure relief
- Reducing other causative factors
- Heat
- Moisture
What are the seating implications we are recommending a wheelchair seating system for a client? We need to distribute pressure. Instead of sitting on a hard flat metal bench, I need something that is contoured. I also need to provide pressure relief primarily through weight shifts, tilt, or recline. It is also important to reduce other causative factors. Remember, there was quite a long list of contributing factors for pressure injuries. Two of those are heat and moisture. With heat and moisture, it is vital to use materials in the seating system to reduce those particular issues.
Seating Implications: Pressure Distribution
- Distribute pressure over as large an area as possible
- Peak pressures at or below 80 mm Hg
- Materials that provide immersion
- Contoured
- Molded
- Increased immersion may interfere with transfers
- Some of these materials are less stable and so do not provide as much postural control.
Let's talk more about pressure distribution. We want to distribute pressure over as large an area as possible. You can see that this particular cushion from Ride Designs (Figure 5) is very contoured to match a client's contours.
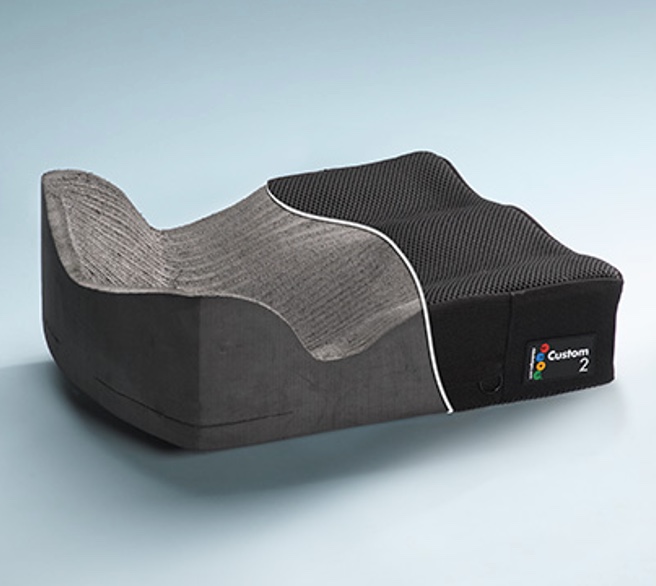
Figure 5. Contoured cushion by Ride Designs.
We are aiming for a peak pressure at or below 80 mm if you use something like a pressure mapping system. And we want to use materials that provide immersion within the cushion itself. There are a lot of different materials available. The more the client immerses into that material, the more the pressure is distributed as there is more contact with that entire seated area.
We can use more contoured cushions and even some that are molded to the client's specific shape. The flip side of immersion is that it can interfere with transfers. Now, the client has to climb out of their seating system.
Some materials used to increase pressure distribution are also less stable, like an air cushion. It also may result in less postural control or stability.
Seating Implications: Pressure Relief
- Provide complete relief to specific areas for specific lengths of time
- Tilt and/or recline
- Alternating air cushions
- Cushions that unweight key areas
- Weight shifts
- Forward lean
- Push-ups
- Lateral lean
- Wheelie
Depending on the client's risk factors for developing a pressure injury, we need some type of weight shift. There are many ways that clients can shift their weight, depending on their physical abilities. They may be able to lean forward, putting the weight on the distal thighs and off the buttock area for a while. The client may be able to push up off of their armrest, but it may be hard to sustain that for a reasonable amount of time. The client can lean to one side, so they have more weight temporarily on one IT and less on the other. The client may even be able to pop a wheelie to tilt themselves in space.
If the client cannot adequately complete a weight shift, we also have other options within the wheelchair frame. Tilt and recline systems can help redistribute pressure for the client off of the seated area and onto another site, like the back. Some alternating air cushions are also available that will completely unweight some areas of the seating surface and place that weight on another area. Some cushions unweight critical areas, which are sometimes called offloading cushions. For example, they may completely offload the ischial tuberosities.
- Tilt Guidelines
- Consortium of Spinal Cord Medicine – PVA
- Tilt every 15-30 minutes
- Remain tilted at least 1 minute
- Tilt more than 30 degrees to provide pressure relief
- Optimal pressure relief:
- 25-35 degrees tilt in combination with 120 degrees recline
A big question people ask is how long do I tilt and how often? Above are some tilt guidelines provided by the Consortium of Spinal Cord Medicine by Paralyzed Veterans of America. These are designed specifically for someone with a spinal cord injury and not necessarily clients with other diagnoses. They recommend that the client tilt between every 15 and 30 minutes and remain tilted for at least one full minute. Individuals do not have to hang out there for a couple of hours but only for a minute to let those tissues reperfuse. However, they recommend tilting more than 30 degrees to provide adequate pressure relief so that the pressure is placed on the posterior trunk rather than the seated surface.
A combination of tilt with recline provides optimal pressure relief and is more commonly seen in a power wheelchair where we combine 25 to 35 degrees of tilt with about 120 degrees of recline.
Seating Implications: Heat and Moisture
- Consider seating and upholstery materials that reduce both heat and moisture.
There are seating materials and upholstery materials that reduce both heat and moisture. They can also increase the airflow within the cushion to cool the body and minimize moisture. These materials can be a crucial part of our strategy.
Seating Biomechanics: Angles of Support
We will move on now to the seated angles for the client. We will also talk further about tilt and recline in this section.
Biomechanics
- Seating systems are more than support surfaces and strapping.
- Angles are essential to optimize biomechanics and subsequent function.
- Stability allows for dissociation and control of movement.
Seating systems are more than just the support surfaces the client sits on, the seat in the back, and various strapping such as pelvic belts or anterior trunk supports. Angles are essential to optimize function and biomechanics. Stability is also huge in wheelchair seating because it allows a person to stabilize their core and disassociate their head, arm, or leg for more controlled movement.
You and I usually do this automatically. If I need to do a more difficult motor task, I stabilize my core, allowing me to reach out and do something more precise with a hand, for example. Many of our clients cannot stabilize their core, so they rely on the seating system to do so. You and I change our seated angles depending on the task at hand. Our clients have one primary seating system.
Angles
- Pelvis: seat to back
- Knee: seat to calfrest
- Ankle: calfrest to footrest
- Position in space
- tilt
- recline
Angles are essential for us to consider. We are going to talk about the angles at the seat to back, pelvis, the seat to calfrest or knee, the calfrest to footrest or ankle, and then overall position in space where we will go into a little more detail about tilt and recline.
Pelvis: Seat to Back Angle
- Terminology matters!
- Refers to wheelchair
- Back canes to seat rail angle
- Refers to seating system
- Back to seat
- Refers to client
- Trunk to upper leg
Terminology is a big deal in the area of wheelchair seating and mobility. We often hear the term seat to back angle, referring to three different measurements. If we are referring to the wheelchair, this is the angle between the back canes and the seat rail, and we may measure it with a goniometer. If we measure back canes to the seat rail, this young man is about at a 100-degree seat-to-back angle (Figure 6).
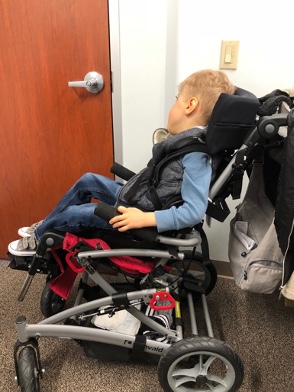
Figure 6. Child in a wheelchair at about a 100-degree seat-to-back angle.
We can also measure the back of the seating system to the seating surface of the seating system. That is often a smaller measurement. We can also measure this angle on the client, trunk to the upper leg. It is essential to specify which seat to back angle.
- Closed
- usually, 90 degrees or less
- can inhibit extensor tone
- can be combined with tilt to prevent falling forward
- can be combined with anterior tilt of thighs
- can be a "task performance" position
The seat-to-back angle is "closed," usually 90 degrees or less. Sitting up tall is about 90 degrees and can sometimes be used to inhibit extensor tone. We fold them up in our arms to keep a client from extending. We can close the angle with seating and combine it with a tilt to keep the client from falling forward.
You can also combine a closed hip angle with more of an anterior tilt of the thighs. This position is referred to as a task performance setup, but it is not something we want to use for an extended period as it is too difficult to maintain.
Figure 7 shows a young man with a seat-to-back angle that is a little too closed.

Figure 7. A child with a closed hip angle.
He needed some adjustments, mainly because his hip had some range limitations.
- Open
- usually, 90 degrees or more
- can increase extensor tone
- can improve head and trunk control
- provides a resting position
We can see him post adjustments in Figure 8.
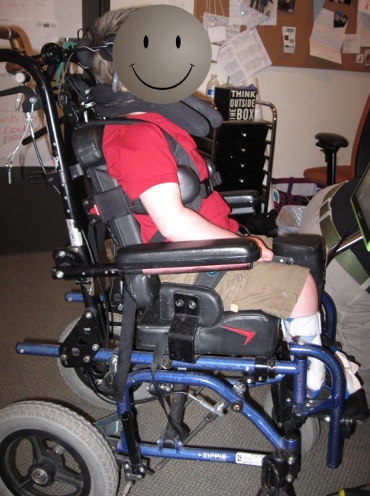
Figure 8. The same child with now an open closed angle.
A more open seat to back angle is usually 90 degrees or more, but it can sometimes increase extensor tone. An open back angle can improve head and trunk control because now gravity is assisting, and they are in more of a resting position. The more open the seat to the back angle is, the more the client can find a place of rest. And the more closed the angle is, the more difficult it is to stay upright even though it can be more functional.
We used to position everyone at 90-90-90, at the hips, knees, and ankles. This position is not very common anymore. Now you can see this young man in Figure 8 is positioned at about 100 degrees, allowing him to keep his head more upright and balanced.
Knee: Seat to Calfrest Angle
- Terminology matters!
- Refers to wheelchair
- Seat rail to footrest hanger angle
- Refers to seating system
- Seat to footrest hanger angle
- Refers to client
- Upper leg to lower leg angle
We then have a seat to calfrest angle, as shown in Figure 9.
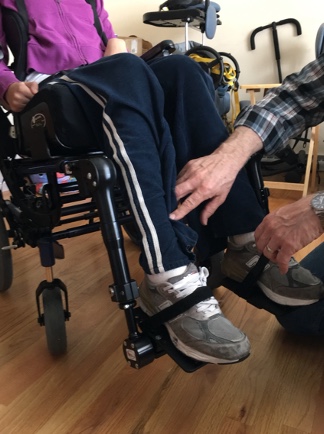
Figure 9. Seat to calfrest angle.
Again, the terminology is essential here. If we are talking about the wheelchair, the measurement would be from the seat rail to the footrest hanger angle. The seating system would be the seating surface or cushion to the footrest hanger angle or the client's upper leg to lower leg angle.
- Closed
- relieves pull on hamstrings
- can lead to loss of range
- may not clear front castors
The seat to calfrest angle tends to be a more closed angle, which works well for someone with very tight hamstrings. The client will slide into a posterior pelvic tilt if we pull on the hamstrings. But, if we keep someone at a very flexed angle at the knees, they will continue to lose range of motion and may have castor interference. Pictured in Figure 10 are some very specialized contracture footrests designed for someone with minimal knee extension.

Figure 10. Specialized contracture footrests.
- Open
- clears front castors
- passive stretch on hamstrings
A more open seat calfrest angle clears the front castors and can provide a passive stretch on the hamstrings, but that is not our goal here. It is to accommodate what someone's available range is. This young man has 90-degree footrest hangers, but you can see where his feet tend to hang out in front of that.
Figure 11. Ninety-degree footrest hangers.
He is more comfortable in this position, and it respects his range, so we changed him to a more open angle here.
Ankle: Calfrest to Footrest
- Terminology matters!
- Refers to wheelchair
- footrest hanger to footplate angle
- Refers to seating system
- calf strap or pad to footplate angle
- Refers to client
- lower leg to foot angle
Next, we have calfrest to the footrest angle, which could refer to the wheelchair footrest hanger to footplate angle, to the seating system, a calf strap or pad to footplate angle, or to the client's lower leg to foot angle.
- Closed
- dorsiflexion
- range may not be available
- can be used to "break up" extensor tone
- angle adjustable footplates
Many of our clients simply do not have the range of motion to be placed in this position. However, this position can break up extensor tone in some clients. Adjustable footplates also allow us to change these angles. Figure 12 shows a footplate adjustment for dorsiflexion.
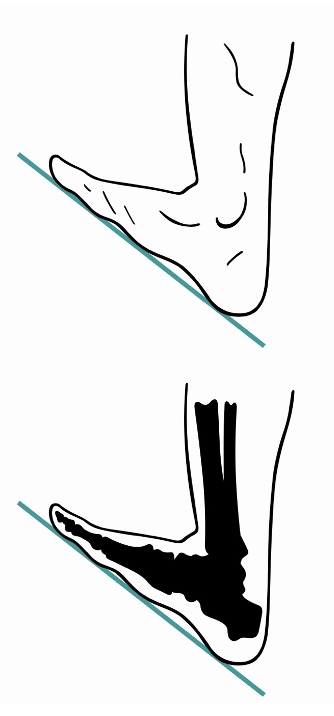
Figure 12. Adjustable footplate for dorsiflexion.
- Open
- plantarflexion
- may affect ground and castor clearance
If this is more open, we are placing the client in plantarflexion (Figure 13).
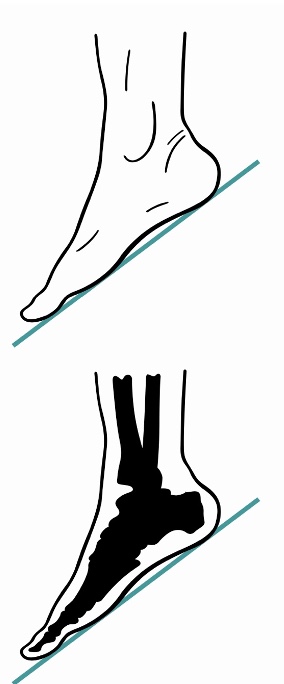
Figure 13. Adjustable footplate for plantar flexion.
A footplate in plantarflexion can affect ground and castor clearance, so it is crucial to keep that in mind as we are looking at specifics for this chair. Ideally, we want the ankle in a neutral position if the client can tolerate that.
Position in Space: Recline
- Open seat to back angle
We then have several options for the client's position in space, including recline and tilt. It is easy to get these two terms mixed up, but recline is where we are opening the seat to back angle, and this is often used in combination with elevating leg rest, as you see in Figure 14.
Figure 14. Quantum Rehab Q6 Edge reclined with elevating legrests.
- Pros
- easier catheterization
- pressure redistribution
- can do weight shifts at a work surface
- tray remains parallel to the floor
- may relieve orthostatic hypotension
- passive range of motion at hips and knees
- transfer may be easier
- postural management
- fatigue management
- medical management
There are advantages to reclining. This option is used mainly by people who have spinal cord injuries. This position can ease catheterization because we are opening that area up. It distributes or redistributes pressure off the seating surfaces to the posterior trunk. You can also do weight shifts at a work surface. For example, if this wheelchair is tucked under a desk, the person can lean back.
In contrast, their knees will hit the bottom of that work surface if they are in a tilt system. A tray will remain parallel to the floor when an individual reclines. People can use this change of position to help with orthostatic hypotension when they need to lay back quickly. Recline also provides some passive range of motion at the hips and knees, mainly if used with elevating leg rests. Transfers may be easier with this feature, particularly to and from the bed. Lastly, the management of posture, fatigue, and medical issues, like bladder management, may be advantages of a reclining system. Gravity assists with trunk and head control. A client can also recline for a position of rest.
- Cons
- shear forces can disrupt alignment
- reclining increases pressure over sacral area
- opening seat to back angle can set off spasms
- cannot be used with contoured positioning system
- cannot be used by positioning systems with fixed seat to back angle
- clients with limited ROM at the hips or knees may be pulled out of position
- reclining may affect the client's ability to access other assistive technology devices
There are also drawbacks as well. There are shear forces when we recline which is movement between the pelvis and the back of the seating system. This movement causes some drag on those soft tissues, particularly in a manual chair. Reclining always increases pressure over the sacral area, a typical place where pressure develops. Opening the seat to back angle can set off spasming for some clients. And you cannot use a recline with a contoured or molded seating system as the client will move out of the contoured support surfaces. We cannot use recline with systems with a fixed seat-to-back angle, or a one-piece system, because it has to move at that angle. And, if clients have limited range at the hips or knees and start reclining, it will pull them out of position because there is simply not enough range of motion to execute that movement. Finally, reclining may affect a client's ability to use assistive technology or communication devices.
Position in Space: Tilt
- All angles stay the same: pelvis, knees, ankles
- Posterior
- Anterior
- Lateral
With tilt, all the angles stay the same at the pelvis, the knees, and the ankles. A posterior is most common, but there are also anterior and lateral tilts available.
- Posterior tilt
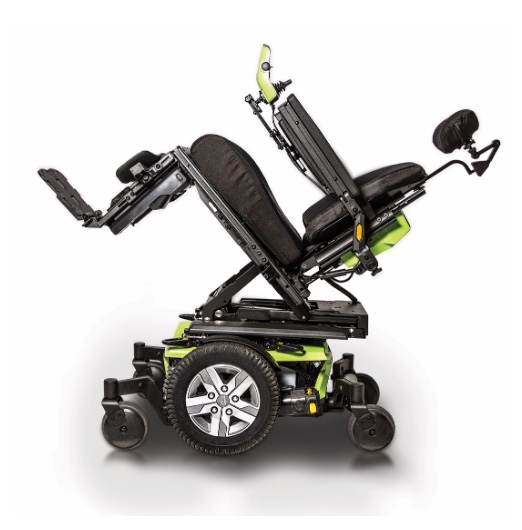
Figure 15. Posterior tilt on a Quantum Rehab Q6 Edge.
This image is an example of a posterior tilt on a power chair. You can see that the seated angles of the client do not change. They simply move within space, and this feature is often called a tilt-in-space.
- Anterior tilt
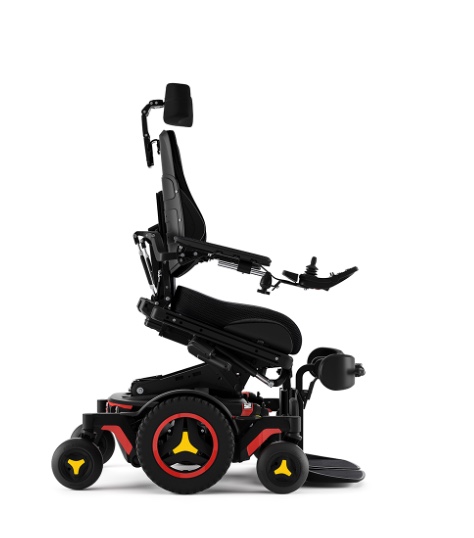
Figure 16. An anterior tilt on a Permobil M3.
There are anterior tilts that are sometimes used to help someone get to a standing position or assume more of a task performance position.
- Lateral tilt
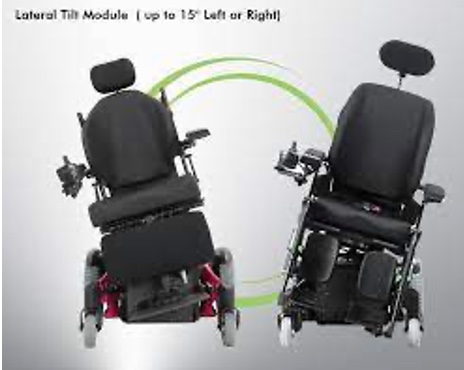
Figure 17. A lateral tilt on a Motion Concepts wheelchair.
A lateral tilt can be used for someone who cannot tolerate a posterior tilt. These are not as common as a posterior tilt.
- Pros
- redistributes pressure
- postural management
- fatigue management
- maintaining angles may inhibit muscle tone and maintains posture
- no shear forces
- other assistive technology devices remain in position relative to the client
- tilt systems accommodate contoured positioning systems and positioning systems with fixed seat-to-back angle
- range of motion limitations are accommodated
There are many advantages of tilting, similar to the benefits of reclining. We are redistributing pressure and managing posture and fatigue. But we are also maintaining the seated angles, which can inhibit muscle tone and maintain someone's posture. We are eliminating shear because we are not opening the seat-to-back angle. If an individual uses other assistive technology devices, they will remain relative to the client rather than the client moving away from them as they would using a recline. Tilt systems can accommodate contoured or even one-piece seating systems because we do not change the seated angles. And range of motion limitations are accommodated as well.
- Cons
- pressure relief not as great as with recline systems
- must move away from a work surface to tilt
- items left on tray will slide and fall
- maintaining the hips in flexed position can constrict the bladder
- a leg bag can leak during a tilt
- lack of movement at hips and knees can lead to range of motion losses
- some tilt systems have a higher seat-to-floor height than recline systems which can affect transfers and clearance under tables
One drawback is that pressure relief is less significant with tilt than with recline. Now, these functions are combined sometimes to maximize this. If someone is seated at a desk, they need to move away before tilt, or their knees will run into that work surface. And items left on the tray may slide into their lap. Maintaining the hips in that flex position all the time can sometimes lead to problems with contractures and even bowel and bladder issues. A catheter leg bag may leak if the wheelchair is tilted significantly. It is always important to look at alternative positioning outside the wheelchair to provide movement at the hips and knees. Finally, some tilt systems have a higher seat to floor height than recline, which can affect clearance under tables and transfers.
Strategies to Address Common Positioning Challenges
Let's now talk about some of the common positioning challenges we see. One of your handouts is a chart for your reference because wheelchair positioning can be complex. We also have other courses that dig deeper into each of these areas of positioning if those are of further interest to you.
Positioning Challenges and Strategies
- Pelvis
- Trunk
- Lower Extremities
- Upper Extremities
- Head
Let's talk about common challenges with our clients in these areas. Again, this is an overview with more in-depth information on these areas.
Positioning Challenges: Pelvis
- Tilt: posterior, anterior
- Rotation
- Obliquity
We always start with the pelvis, the cornerstone of positioning (Figure 18).
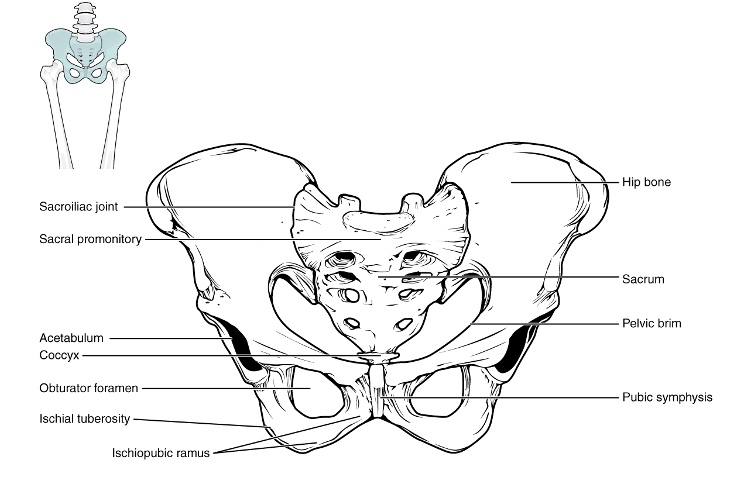
Figure 18. Overview of the pelvis. Click here to enlarge the image.
Nothing else will work if the pelvis is not in as neutral of a position as possible. So we have to start there.
The pelvis might end up in a posterior or anterior tilt, rotation, or obliquity. There are tendencies towards asymmetry in the pelvis that are reducible, sometimes called flexible, meaning we can correct it. Pelvic issues can also be non-reducible or fixed, which we have to accommodate.
Positioning Challenges: Posterior Pelvic Tilt
A posterior pelvic tilt is the bane of all seating clinicians (Figure 19).
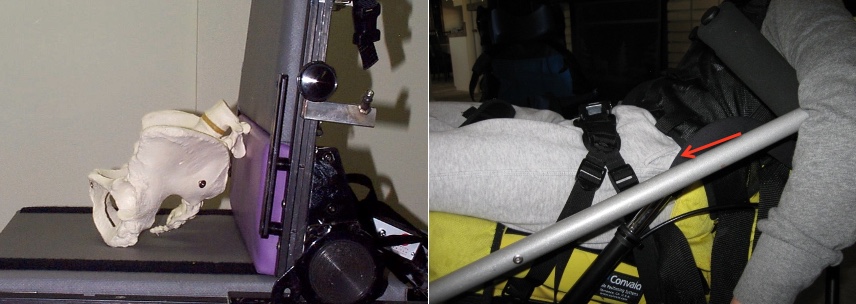
Figure 19. Examples of posterior tilt.
Posterior tilt is a tricky one. Most clients have a posterior pelvic tilt where the pelvis has slid forward. Sometimes, this is called sacral sitting because the client is weight-bearing on the sacral area.
We can now do a hands-on activity. Sit up nice and tall and find your ischial tuberosities (ITs).
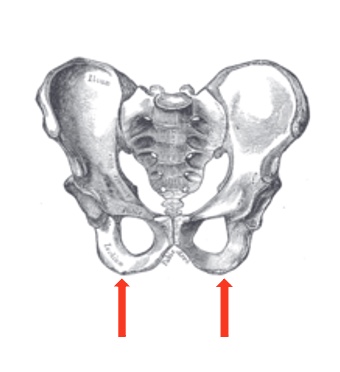
Figure 20. Location of the ischial tuberosities.
Hopefully, you can find those two bony prominences. Go ahead and slide forward into that posterior pelvic tilt. Where did those ITs go? Our clients have the ability, all of us do, to move into a significant posterior pelvic tilt. You have probably all seen those clients sliding out of their wheelchair seating system. Once in that posterior pelvic tilt, think about how your spine is flexed and kyphotic and how that can cause different factors. A crucial part of our wheelchair assessment is to determine what is causing a posterior pelvic tilt. Depending on the cause, our solutions might be different.
- Possible Causes:
- low abdominal/trunk tone
- tight hamstrings
- seat depth too long
- limited range of motion, particularly limited hip flexion
- sliding forward on seat
- extensor thrust
- sling seat and back
Here are some of our common causes.
- Cause:
- Low abdominal/trunk tone
- Interventions:
- provide support to posterior superior surface of pelvis to block backward movement
- biangular back
Some of our clients have low tone or weakness in their trunks, and everything just tends to collapse. We can support the superior posterior surface of the pelvis to block this rearward movement. In a posterior pelvic tilt, the pelvis does not simply move forward but also rotates. The back of the pelvis rotates in a backward direction, and we need to block that.
Some commercial backs have a buildup behind the pelvis to prevent this rotation in a posterior direction. Other backs, with a biangular hinge, are used with linear seating systems (Figure 21).
Figure 21. An example of a biangular hinged back.
The lower portion is often placed at about 90 or 95 degrees to support the posterior pelvis, and the upper portion extends beyond that to encourage more trunk extension. Figure 21 is a commercially available, off-the-shelf back called the Tarta, distributed by Stealth Products.
Figure 22. A Tarta back by Stealth.
It has a customizable shape to a degree, supports the posterior pelvis, and allows trunk extension above that.
- Cause:
- Tight hamstrings
- Interventions:
- open seat to back angle
- decrease thigh to calf angle
A common cause of a posterior pelvic tilt is tight hamstrings. We have a slew of issues within a seating system with tight hamstrings. Hamstrings cross the pelvis and the knee, so if I pull on a person's foot, I pull this person into a posterior pelvic tilt. I can relieve the pull on the hamstrings by decreasing the thigh to calf angle or by opening the seat to back angle, as seen in Figure 23.
Figure 23. Seat angle adjustments for tight hamstrings.
Either of these angle adjustments and often in combination can help to put that hamstring in a more relaxed position.
- Cause:
- Seat depth is too long.
- Intervention:
- provide appropriate seat depth for hip and knee flexion
Sometimes the seat depth is too long (Figure 24).
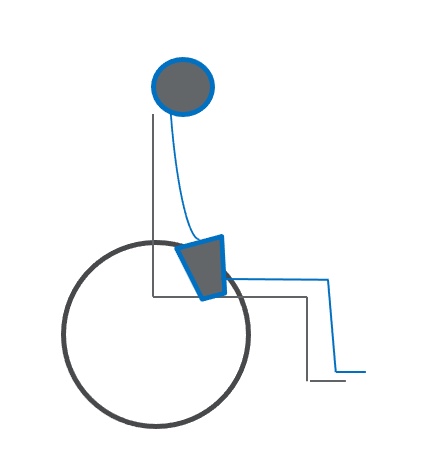
Figure 24. Posterior tilt due to long seat depth.
We can pull this client up all we want underneath their armpits, but it will not work. We need to provide the appropriate seat depth for what is available for their hip and knee flexion. I often lean a client forward within their seating system to see if I can see daylight between the back of their pelvis and their seating system. If they are pulled back as far as they can go, the seat depth is too long.
- Cause:
- Limited Range of Motion, particularly limited hip flexion.
- Interventions:
- Accommodate fixed limitation in hip flexion by opening seat to back angle
- Accommodate asymmetries with contoured or molded positioning system
We might see limitations and range of motion at the hips that can also push the pelvis into a posterior pelvic tilt. If someone has a limitation in hip flexion, you can see what might occur, as seen in my graphic in Figure 25.

Figure 25. Posterior pelvic tilt due to hip tightness.
As we bring that hip into more flexion, we will rock the pelvis back into a posterior pelvic tilt because we have exceeded their available range. If this limitation is fixed or non-reducible, we need to open the seat to back angle to accommodate the limitation and range. If there are some significant asymmetries in the hip range, we may also need to consider contoured or molded seating to help accommodate this.
- Cause:
- Sliding forward on seat.
- Interventions:
- Provide anti-thrust or aggressively contoured seat
- Stabilize pelvis using appropriately angled pelvic belt or anterior pelvic stabilizer
- Change upholstery type
Some of our clients slide forward in their seats, as seen in Figure 26.
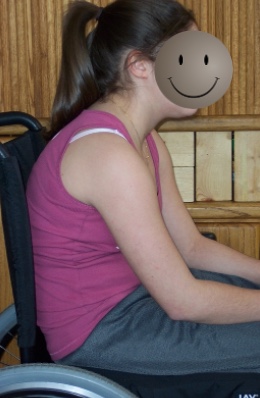
Figure 26. Client sliding forward in the seat.
These clients are fine one minute and look like this the next.
- Anti-thrust Cushion
- Curb doesn't need to be high
- Too high can unweight ITs and close seat to back angle
We may want to provide either an anti-thrust or aggressively contoured seat to keep the pelvis in a better position to minimize the chances of sliding forward.
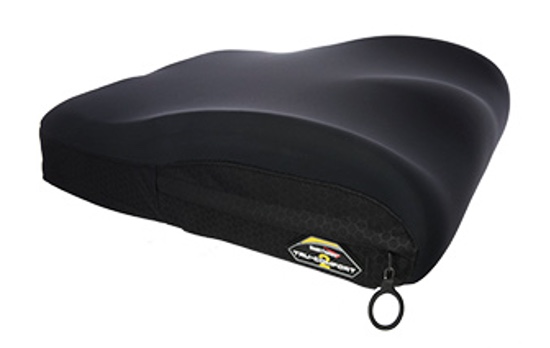
Figure 27. Contoured cushion to prevent forward sliding (Stealth Products TRU-Comfort 2 SPP cushion).
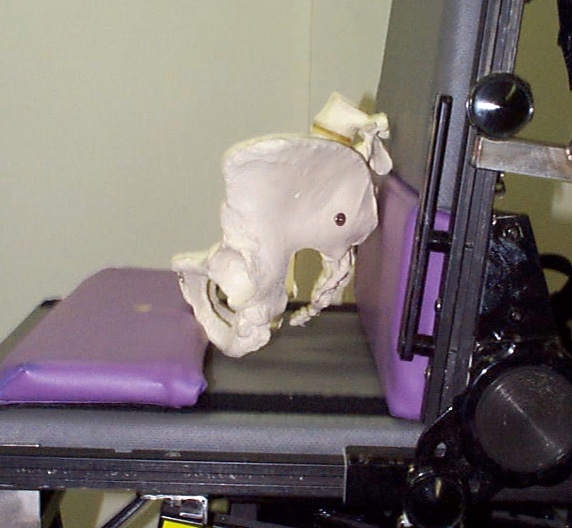
Figure 28. Planar seating with an anti-thrust shelf.
- Posterior pelvic tilt hip belt position
- 60-degree angle maintains a neutral pelvic tilt
In combination with that shape, we can stabilize the pelvis using an appropriately angled pelvic belt. Figures 29 and 30 show a belt on the wheelchair and a close-up of one.
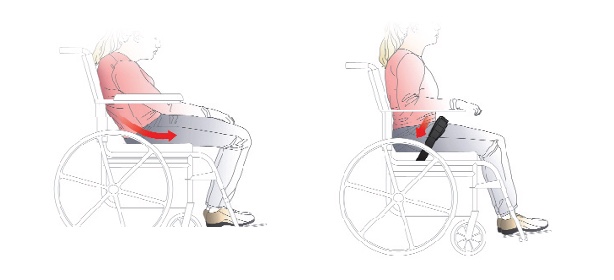
Figure 29. A pelvic belt pulls the individual back into a neutral position (Bodypoint).
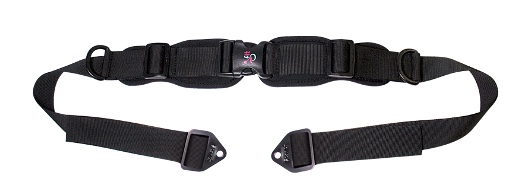
Figure 30. Example of a Stealth positioning padded dual pull pelvic belt.
We must get the angle right to help prevent a posterior pelvic tilt.
The final thing we can do is sometimes change the upholstery type. The person may be on a very slick surface, and we may need to add more resistance. If in combination, we can use an anti-thrust cushion with a pad in front of the ischial tuberosities. Many of our off-the-shelf cushions have a similar shape and goal. We do not want that curve to be high as it can cause other issues.
What about the angle of that belt? Many belts tend to be placed at about a 45-degree angle because it is easy to put the belt where the back post and the seat rails meet. If we place that hip belt instead at a 60-degree angle, it will maintain a neutral pelvis for someone who has a tendency towards a posterior pelvic tilt.
Positioning Challenges: Anterior Pelvic Tilt
- Let's try it!
- Sit up straight
- Sit on your hands, find those ITs
- Assume an anterior tilt
- Where did those ITs go?
- What is your spine doing?
Next, we have anterior tilt, which is not as common. Some clients tend to have an anterior tilt where the pelvis is tipped forward.
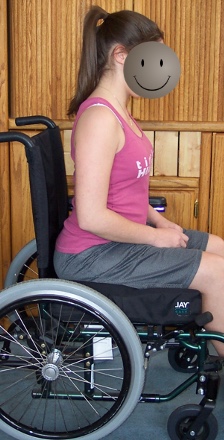
Figure 31. An individual with an anterior pelvic tilt.
Let's go ahead and try it again if you are willing. Go ahead and sit on your hands and find your ITs again. Assume an anterior tilt and lean forward. Where do those ITs go? We do not have nearly as much travel available anatomically as with a posterior pelvic tilt. Think about what your spine is doing. The lower spine is hyper-extended or lordotic, so we often see anterior pelvic tilt and lordosis together.
- Possible causes:
- low trunk tone
- muscle weakness
- lordosis
An anterior pelvic tilt can be caused by low tone in the trunk, muscle weakness, or it might be that lordosis has already occurred and pulling the pelvis into this anterior pelvic tilt.
- Interventions:
- place pelvic positioning belt across ASIS
- anterior superior illiac spine
- belly binder or corset
- see interventions for lordosis
- place pelvic positioning belt across ASIS
We want to place that pelvic belt across the ASIS, in the front of the pelvis. When we tighten the belt, if the pelvis is reducible, we can move it back into a more neutral tilt. We need to be careful because sometimes that belt will want to slip off the top of the pelvis onto soft tissue. We can use a belly binder or other strategies that we use for lordosis, and we will talk about those here in a little bit. Figure 32 is an example of a belt's position when dealing with an anterior tilt.
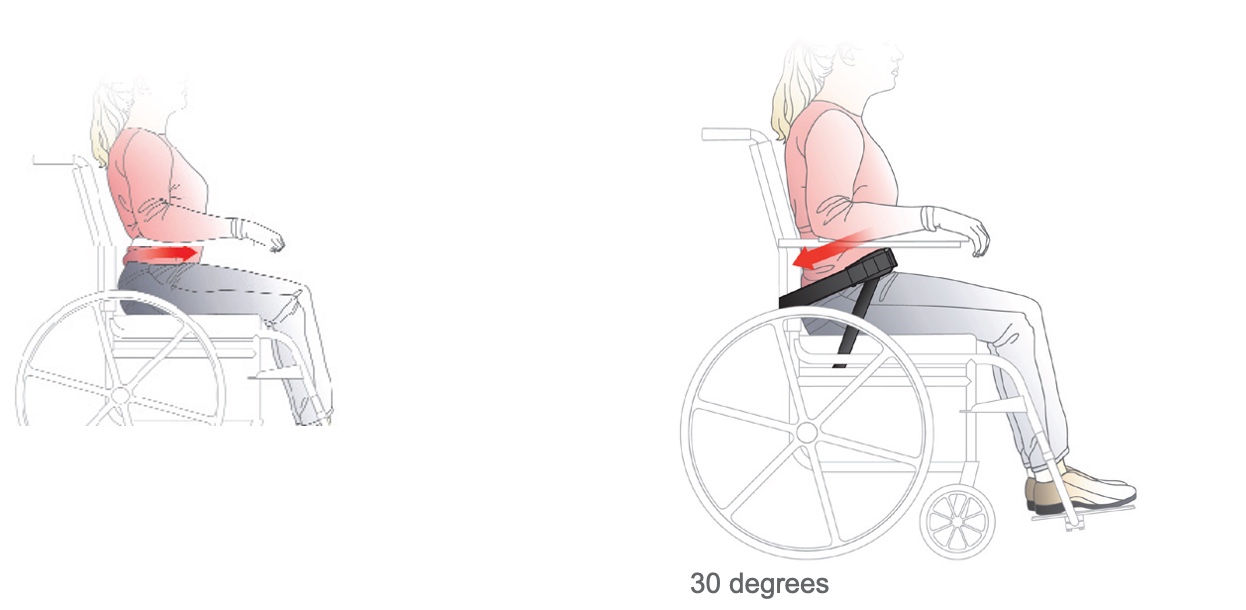
Figure 32. Examples of positioning belt for an anterior pelvic tilt.
The belt is much higher up on the client in front of those bony areas and on the top of the pelvis. And there is a second belt that is attached to the seat rail. A four-point belt, at a 30-degree angle, can keep the primary angle from slipping up and over the top of the pelvis onto the abdominal area.
- Belly binder
- Also called abdominal panel or corset
- Spans the lower rib cage and upper pelvis
- Must fit closely to lateral trunk
- Custom made
Other options for an anterior tilt include a belly binder, as seen in Figure 33.
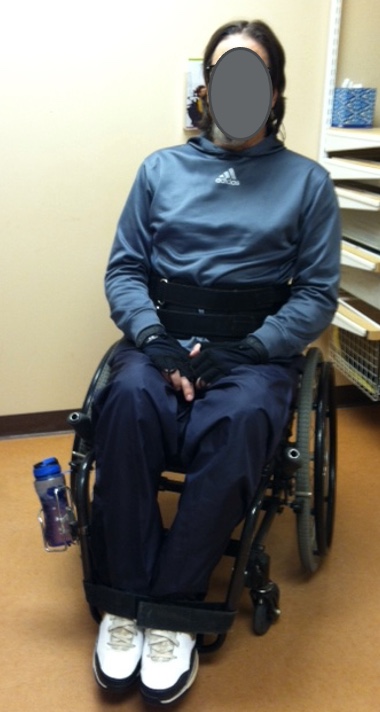
Figure 33. Client with an abdominal binder.
Sometimes this is called an abdominal panel or corset. It is designed to span the lower ribcage and the upper pelvis. We do not want this to hang onto soft tissue, but it has to be snug on the lateral trunk to work well. Generally, these are custom-made, and the example in Figure 34 is made by Aspen Seating, who happens to be in my neck of the woods.
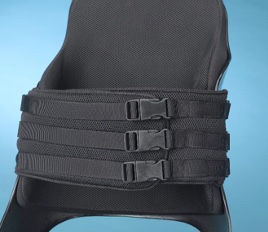
Figure 34. Abdominal binder by Aspen seating.
Positioning Challenges: Pelvic Rotation
- Let's try it!
- Sit up straight
- Sit on your hands, find those ITs
- Put one knee forward of the other
- Where did those ITs go?
- What is your spine doing?
Next, we have a pelvic rotation where one side of the pelvis is more forward than the other (Figure 35).
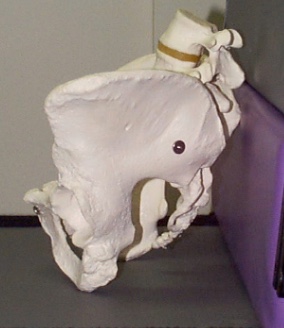
Figure 35. Pelvic rotation to the right.
If you are willing again, sit up nice and tall. Sit on your hands, and find your ischial tuberosities. Put one knee in front of the other by a couple of inches. One of your ITs should still be firmly in hand, but the other has moved forward with the pelvis now rotated.
What is your spine doing? The spine is rotated as well. Most clients will not tolerate not facing forward and will attempt to face forward again. This is where we may see a double spine rotation develop.
- Cause:
- Range of motion limitations in hip:
- Abduction
- Adduction
- Hip flexion
- Windswept posture
- Intervention:
- Align pelvis in neutral and accommodate any residual asymmetrical lower extremity posture
- Range of motion limitations in hip:
Several things can cause pelvic rotation, a range limitation at the hip in abduction, adduction, flexion, or a windswept posture. The young lady in Figure 36 shows this posture.
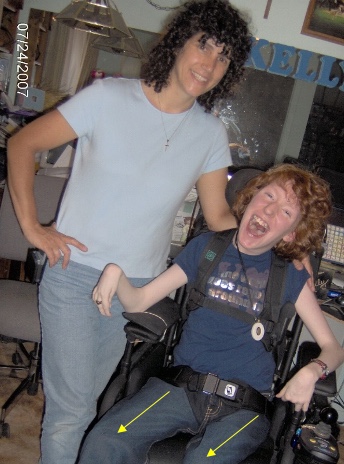
Figure 36. Client demonstrating windswept posture to the right side.
Her right leg is more abducted and externally rotated, and her left is more adducted and internally rotated. I can swing her legs around in front of her and straighten those out, but when I do so, she ends up in pelvic rotation. So, I allow her legs to go to the side so that we can maintain her pelvis in a neutral rotation. In this situation, we want to align the pelvis in neutral and accommodate any residual asymmetrical lower extremity posture. In this case, the pelvis wins.
- Cause:
- Fixed limitations in spine, pelvis and/or femoral mobility (i.e., rotational scoliosis)
- Intervention:
- Pelvis may need to assume asymmetrical posture in order to keep head and shoulders in neutral position
- (facing forward)
Sometimes we have a client with fixed or non-reducible limitations in the spine, pelvis, or hips.
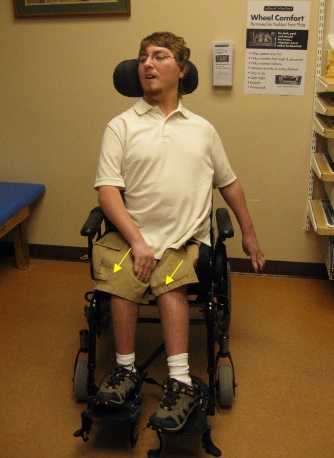
Figure 37. Client with fixed deformities of the hips and spine.
For fixed deformities, we may need the pelvis to be asymmetrical for this person to face forward. Due to increased spinal rotation, instead of the pelvis winning, facing forward wins in this case. Our first goal is to put the pelvis in neutral rotation even if the legs may be windswept to the side a little bit. But if placing the pelvis in neutral rotation causes the person to look at the side, we want to allow this person to be forward-facing.
- Causes:
- Unequal thigh length
- Hip dislocation
- Interventions:
- Check measurement to confirm leg length discrepancy vs. pelvic rotation
- Asymmetrical seat depth, if fixed
Some of our clients have an unequal thigh lengths. This discrepancy may be from hip surgeries like osteotomies or a dislocated or subluxed hip. It is essential to check whether a person has a leg length discrepancy or a true rotated pelvis. If this is something we cannot correct, the client may need a unique seating surface with an asymmetrical seat depth so that the longer and shorter legs are well supported—a specialized cushion in Figure 38.
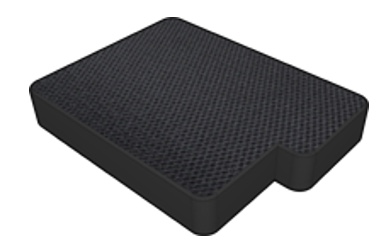
Figure 38. Asymmetrical seat cushion by Stealth products for leg length discrepancies.
This specialized cushion may be required to prevent the pelvis from being pulled into a rotated position if we only have a single length to a cushion, and the shorter leg pulls that side of the pelvis forward.
- Cause:
- Discomfort
- Intervention:
- Identify the source and remediate, or refer to physician
Some of our clients sit with a rotated pelvis because they are uncomfortable. Usually, the discomfort is at the hip. It is crucial to figure out what is going on and bring in the rest of the medical team because the wheelchair seating system cannot correct medical issues.
- Causes:
- Tone and/or reflex activity
- ATNR
- Interventions:
- Lower extremity abduction, hip and knee flexion, ankle dorsiflexion
- To "break up" tone
- Pull pelvic belt back on forward side of pelvis
- Lower extremity abduction, hip and knee flexion, ankle dorsiflexion
Pelvic rotation can also be caused by tone or reflex activity like an ATNR. So this young woman is showing off her ATNR (Figure 39).
Figure 39. Client with increased tone and ATNR in her power wheelchair.
Due to this abnormal reflex pattern, she has more flexion on the left side and more extension on the right causing a significant amount of pelvic rotation. We can break up the tone when we position someone in more abduction, hip and knee flexion, and ankle dorsiflexion. Another easy solution, if this position is flexible or reducible, is to cinch down a pelvic belt (Figure 40) on the forward side.

Figure 40. Positioning belt.
In the above image, the young lady is rotating forward on the right side. We may be able to use a pelvic belt and tighten it to derotate her pelvis. That can be a simple and effective trick for our clients.
Positioning Challenges: Pelvic Obliquity
- Let's try it!
- Sit up straight
- Sit on your hands, find those ITs
- Cross one leg over the other
- Where did those ITs go?
- What is your spine doing?
Our last pelvic concern is pelvic obliquity. With pelvic obliquity, one side of the pelvis is higher than the other, as seen in 41.
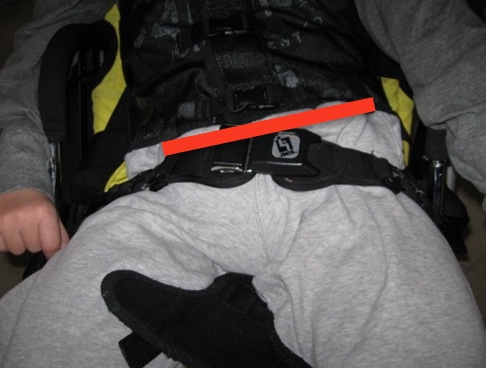
Figure 41. An example of pelvic obliquity.
Pelvic obliquity is a notoriously difficult situation in seating. Go ahead and sit on your hands again to find those ITs. Cross one leg over the other. Where did your ITs go? You should still have one on each hand, but because you have crossed one leg over the other, you now have more pressure on one IT in one hand and less pressure on the other.
Pelvic obliquity is a common issue of pressure. Many people have a pressure injury under one IT due to pelvic obliquity. Think about what your spine is doing. You may have to exaggerate this position a little more through the pelvis. Still, if one side of the pelvis is considerably higher than the other, you will notice that there is now a lateral flexion curvature in the spine.
- One side of the pelvis is higher
- Causes:
- Scoliosis
- ATNR
- Surgeries
- Discomfort
- Cushion tipped on sling seat
One side of the pelvis is higher (Figure 42), which can be caused by different things.
Figure 42. Example of pelvic obliquity.
Causes may be from scoliosis already present, a component of an ATNR, asymmetrical tonic neck reflex, or the result of hip surgery. Post-surgery, one side of the pelvis may be higher than the other. Often, this is due to discomfort and trying to unweight it. You may bring in the team. And my least favorite cause is if someone is using a sling seat. What we are going to do about this is going to vary tremendously.
- Interventions:
- Reducible / Flexible
- Change angle of pull of pelvic belt
- Wedge under low side
- Reducible / Flexible
If the pelvic obliquity is reducible or flexible, I may be able to get it back to neutral by changing the angle of pull of the pelvic belt or adding a wedge under the low side to even out the pelvis.
- Best pelvic positioning placement is over the lap, just in front of the ASIS, to pull the leg down on the high side, pulling the pelvis down.
- Contra-indicated for dislocated hip
- If rotation or posterior tilt are also present, a 4-point belt may be indicated.
In Figure 43, the angle of the pelvic positioning belt is over the lap at about 90 degrees.
Figure 43. Therafin pelvic positioning belt over the lap at 90 degrees.
By pulling down on the thighs, we are pulling down on the hips. This setup is contraindicated for a dislocated hip because I am relying on the integrity of the hip to pull down the pelvis and correct a flexible obliquity. A four-point belt might be indicated if this person also has pelvic rotation or posterior tilt, which is very common when we see a pelvic obliquity (Figure 44).
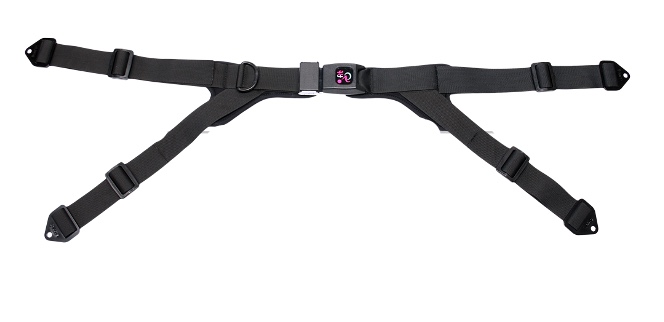
Figure 44. Stealth four-point positioning belt
We can decide which angle is most critical to preserve. Let's say a posterior pelvic tilt is a more considerable concern. The primary angle might be 60 degrees for a posterior pelvic tilt. The secondary angle might be 90 to help counter that obliquity. This is a very common presentation.
- Interventions:
- Reducible / Flexible
- Wedge
- Under low side to accommodate
- Wedge
- Reducible / Flexible
Again, if this is reducible, sometimes we can place a wedge under the low side to even out the pelvis. This wedge does not go right under the IT as it can lead to pressure. Instead, they go under the cushion itself. Some cushions accept wedges, and some do not. Figure 45 shows Spex seating with this option.
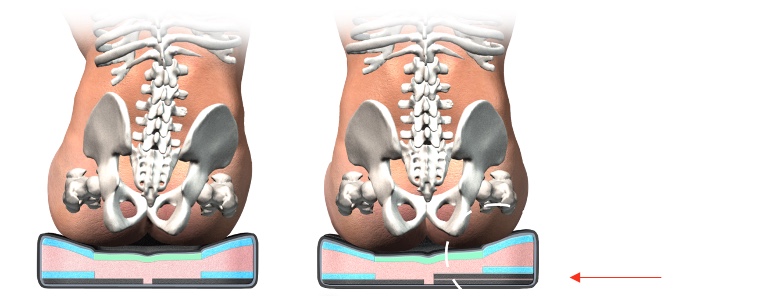
Figure 45. Spex seating to fix a pelvic obliquity.
- Interventions:
- Wedging a non-reducible pelvic obliquity
- Wedge under high side to accommodate
- Goal: to fill in space and distribute pressure
Sometimes, people have a non-reducible obliquity, which can be very significant. We may have to look at a custom-molded seating system because we have a lot of pressure to distribute. However, we can also look at wedging. Instead of wedging under the low side to even things out, we are filling in space on the high side. So, we can see these pictures from Invacare (Figure 46) showing this option.
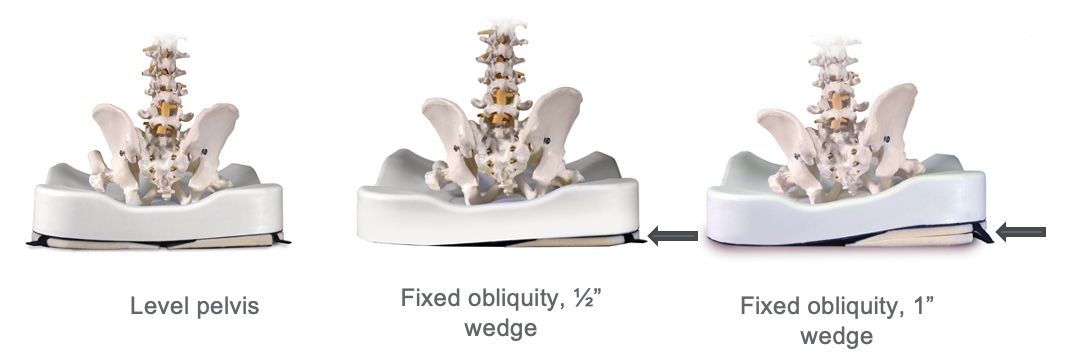
Figure 46. Positioning seating option for a pelvic obliquity by Invacare Matrx InTouch.
Again, we are adding a wedge to fill the space because the deformity is non-reducible. We are trying to distribute pressure as well as we can to reduce pressure risk.
Positioning Challenges: Trunk
- Trunk:
- Kyphosis
- Lordosis
- Rotation
- Scoliosis / Lateral Trunk Flexion
Let's move on to positioning challenges at the trunk. Again, we can dive deeper into other courses if any of these areas tickle your fancy. With the trunk, we might see kyphosis, lordosis, rotation, or scoliosis.
Positioning Challenges: Kyphosis/Forward Trunk Flexion
- Kyphosis can be at various levels of the spine.
- Kyphosis may be reducible or non-reducible.
- May be combined with neck hyperextension
Kyphosis can be at various levels of the spine. An example is seen in Figure 47.
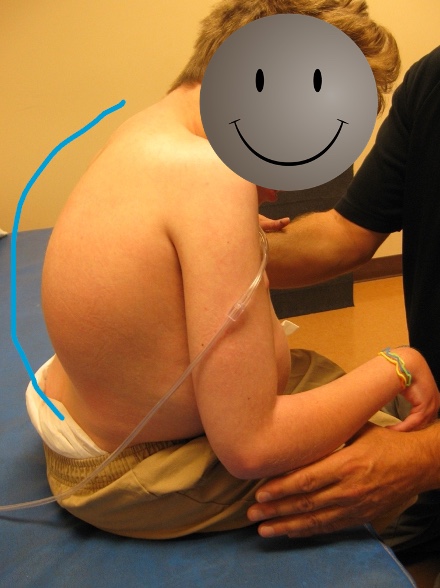
Figure 47. Client with severe kyphosis.
It is usually in the upper thoracic area, but it does not have to be. It can be reducible, meaning I can correct this person to a neutral spinal alignment or non-reducible where we have to accommodate it. It may also be combined with neck hyperextension because as the trunk is so flexed forward, the only way the person can see is by hyperextending the neck. All of these various spinal issues that we will look at can be seen in combination with each other.
- Kyphosis and Forward Trunk Flexion Possible Causes:
- Flexion at hips
- Flexion at thoracic area
- Flexion at shoulder girdle with gravitational pull downward
- May occur from increased or low tone, abdominal weakness, poor trunk control, weak back extensors
- Increased tone (i.e., hamstrings) pulling pelvis back into posterior tilt
- Posterior pelvic tilt
- Habitual seating in an attempt to increase stability
- Non-reducible kyphosis
- Sling back
There are many possible causes for what we see here with a forward trunk flexion. The person may have flexion at the hips, thoracic area, and shoulder girdle due to gravity. It may occur from either increased or low tone, particularly in the trunk. Many clients with high tone in the extremities can have low tone trunks. It could also be an abdominal weakness, poor trunk control, and weak back extensors. Increased tone in the hamstrings can pull the pelvis into a posterior tilt because posterior tilt and kyphosis go together. The person may have assumed this posture to be more stable, or it might be that a non-reducible orthopedic change has already happened. It could even be this person is sitting in slingback upholstery.
- Interventions:
- If reducible:
- Anterior trunk support
- Posterior trunk support
- Force and Counterforce
- If reducible:
What do we do if this is reducible and flexible? We can use shoulder straps, vests, et cetera, and posterior trunk supports. Wheelchair positioning is force and counterforce. If we push on one side of the trunk, we need to apply counterforce to the other side, or we will not succeed.
- Anterior Trunk Supports
- Chest strap
- Shoulder straps
- Shoulder retractors
- Vests
- Abdominal supports
- TLSO
Figure 48 shows some options for a client.
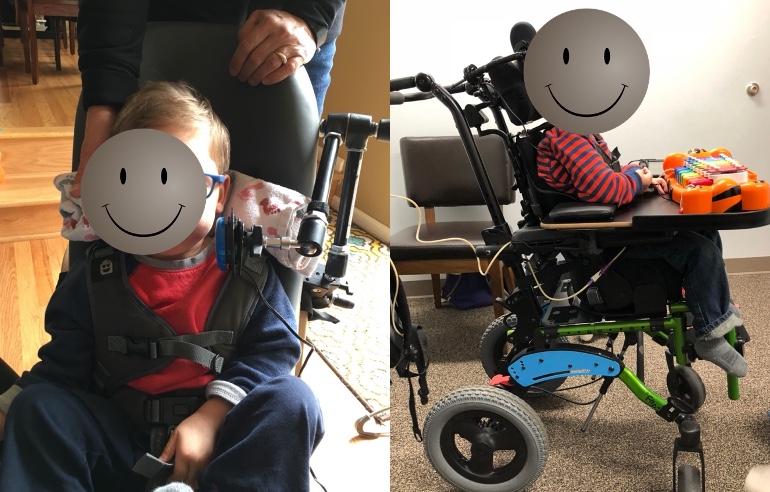
Figure 48. A child positioned in a wheelchair with more increased posture.
Colton has good support for the posterior and anterior trunk. This combination allows us to keep his trunk upright and his head balanced. We can start with anterior trunk supports (Figure 49).
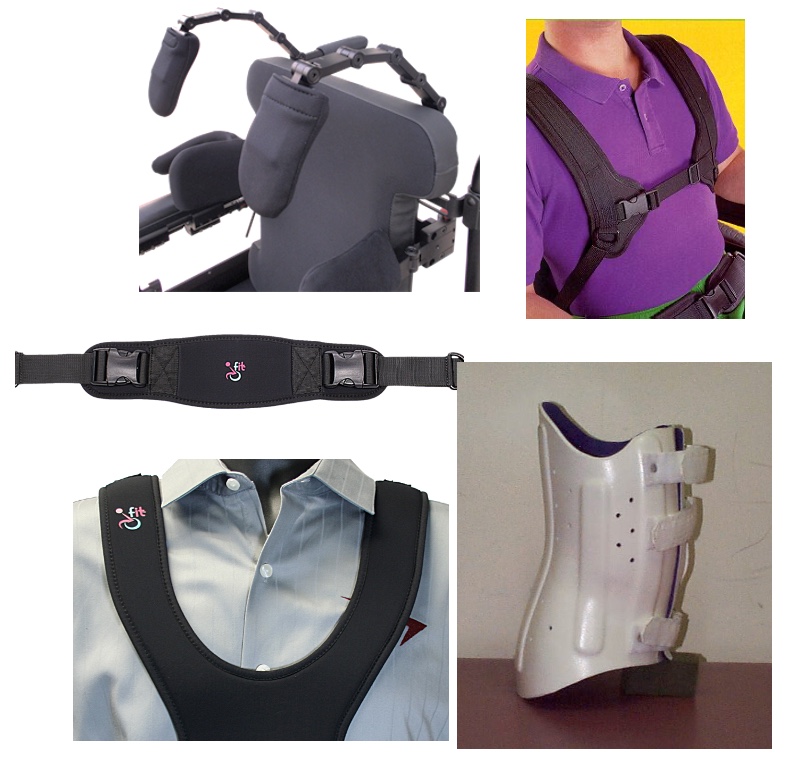
Figure 49. Examples of anterior trunk supports.
Various anterior trunk supports are available, and each has various clinical indicators depending on the individual. There are simple chest straps and multiple styles of shoulder straps. There are even rigid shoulder retractors. Lastly, vests, abdominal supports, belly binders, and even orthotics, like a TLSO, are available. There are various clinical indicators for each of these. Sometimes we have to try more than one with a client to see what will best meet their individual needs.
- Goals of anterior trunk supports
- Facilitate an upright trunk
- Provide stability
- Maintain client contact with the back
The goal of these anterior trunk supports is to facilitate an upright trunk to counter that tendency toward trunk flexion to provide stability and maintain client contact with the back. Sometimes these are seen as restraints, but these can be used even in restraint-free environments. I would refer you to some of the reference materials. Figure 50 shows anterior trunk support helping this client maintain an upright posture.
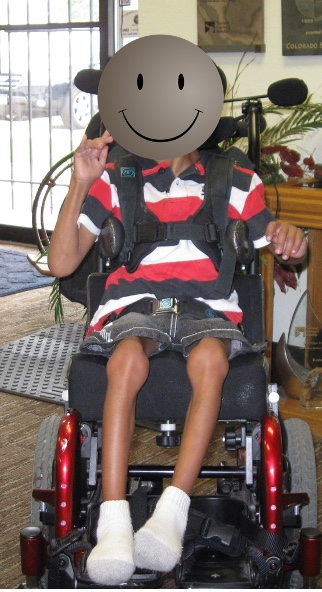
Figure 50. Anterior trunk supports help the client maintain an upright posture.
- Interventions:
- If non-reducible:
- *Open seat to back angle to match pelvis angle
- Contoured back to accommodate trunk
- Tilt seating system to allow the upright head
- If non-reducible:
If the trunk flexion and kyphosis are non-reducible, we may need to open the seat to back angle. Remember the angles we talked about and how to match those to the angles of the pelvis. Let's look at the images in Figure 51.
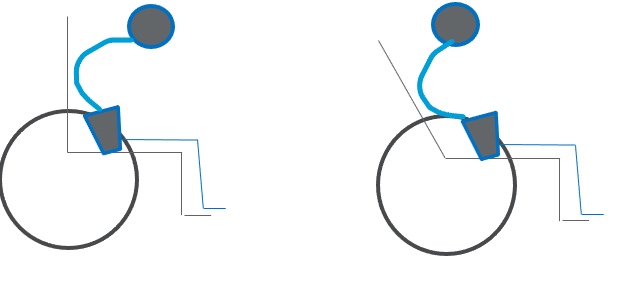
Figure 51. Graphic showing how to accommodate a kyphotic posture with an opened back angle.
When someone has a fixed kyphosis, their head is now over mid-thigh instead of balanced over the pelvis. Look at the picture to the right. We have opened the seat to the back angle until the head is balanced over the pelvis or just behind the pelvis. This change allows someone to stay upright and look straight ahead without neck hyperextension. Sometimes a contoured back is also required because you can see that only a tiny portion of the posterior trunk is in contact with the back of the seating system.
- Non-reducible Kyphosis
- Tilt to balance head over pelvis
- Head behind pelvis to reach point of head balance
Here is an example in Figure 52.
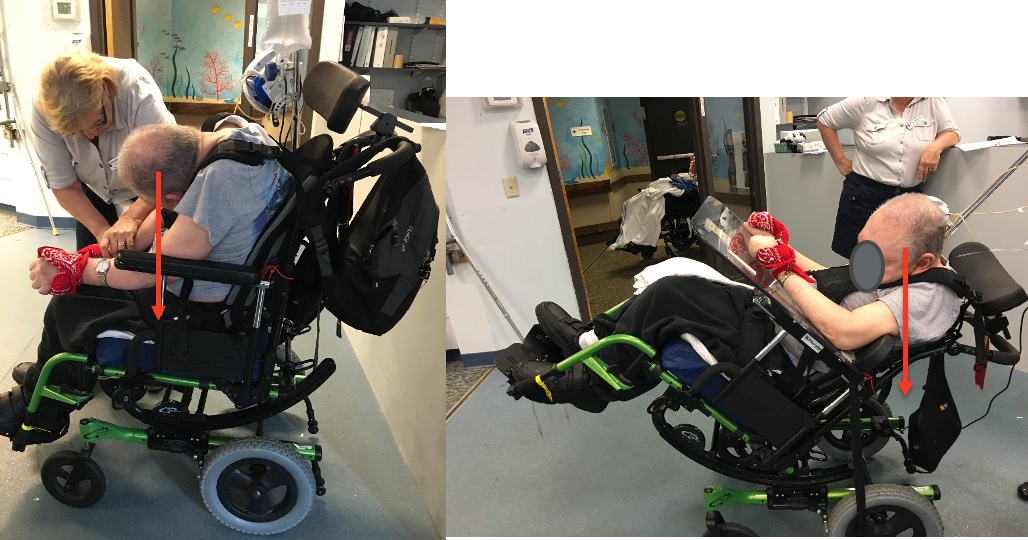
Figure 52. Tilting a client with custom seating allows for a better head position for this client.
For those of you working in skilled nursing, you know how this looks. This gentleman is in a tilt-in-space chair, but his head looks straight down and well forward of the pelvis. By taking advantage of his tilt system, we have tilted him until his head is behind his pelvis so he can look ahead without being in hyperextension. He is in quite a bit of tilt here. Sometimes, we can combine opening a seat to back angle and tilt to accommodate for non-reducible kyphosis.
Positioning Challenges: Lordosis
- Hyperextension of the lumbar area
- Often combined with anterior pelvic tilt
Lordosis is a hyperextension of the lumbar area, often combined with anterior pelvic tilt, as we discussed before. An example of this can be seen in Figure 53.
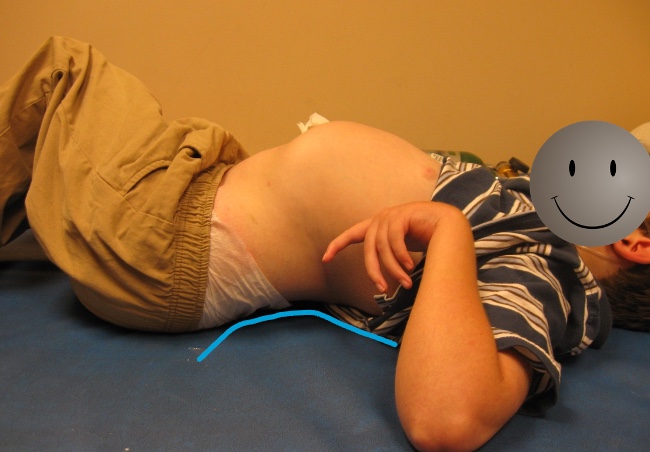
Figure 53. An example of lordosis.
- Possible Causes:
- Tight hip flexors or over correction of tight hip flexors
- Increased tone pulling pelvis forward into an anterior tilt
- Habitual posturing in an attempt to lean forward for functional activities
- "Fixing" pattern to extend trunk against gravity (i.e., in conjunction with shoulder retraction)
A lordotic posture can be caused by several factors, including tight hip flexors. As you push down the thighs, it pulls the pelvis forward into an anterior tilt and the spine into a lordotic position. Increased tone can also pull the pelvis forward. Or the person may be in the habit of using this posture to lean forward for function. Additionally, some clients fix in this position as they need more support.
- Interventions
- If reducible:
- Provide lower back support as needed
- Biangular back
- May need to change seat to back angle
- Do not overcorrect limited hip flexion
- Pulls the pelvis into anterior tilt
- May require anterior trunk support
- If reducible:
So what do we do? If this is reducible, it is crucial to provide adequate lower back support. Sometimes a biangular back can be helpful to fill in some of the space. We might need to play around with the seat to back angle a little in our assessment until we find a position that minimizes this reducible lordotic tendency. It is important not to over-correct limited hip flexion if that is an issue because that will pull the pelvis into an anterior tilt. We might need some anterior trunk support.
In this case, my favorite anterior trunk support is a belly binder in Figure 54.
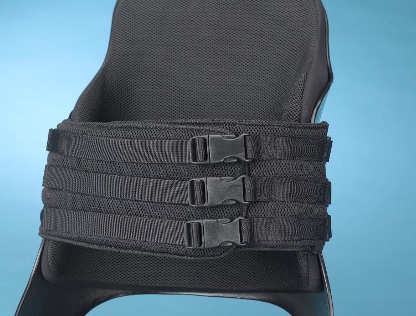
Figure 54. Belly binder by Aspen seating.
We are capturing the lower ribcage and the upper pelvis and reducing reducible, flexible lordosis. If it is non-reducible, then usually, we will need molded seating, either the entire seating system or at least the back, to accommodate this asymmetry and distribute pressure. Otherwise, there will not be very much of this client's back touching the back of the seating system. We can use a bi-angular back, as seen in Figure 55.
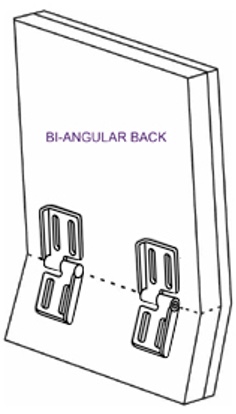
Figure 55. Bi-angular back by Therafin.
What about trunk rotation? The client we saw earlier with the significant ATNR has quite a bit of rotation in her trunk. Rotation is often seen in combination with lateral flexion and pelvic rotation and is caused by the same issues we will get to momentarily. We can try to correct the pelvis. If the pelvis is reducible, we want to correct rotation at the pelvis. Then, if we still are seeing rotation at the trunk and it is reducible, we can use some kind of anterior trunk support, which is usually enough to fix this.
If the entire trunk is rotated, you can use specialized anterior support called a Y-strap (Figure 56) as it derotates the whole trunk.
Figure 56. Y-strap positioning support by Stealth Products.
- Interventions
- If non-reducible:
- Molded seating system to accommodate asymmetry and distribute pressure
- If non-reducible:
Suppose this is not reducible and the spine is rotated. In that case, we need to ensure the client is facing forward and accommodate any residual asymmetries at the spine, the trunk, and the pelvis within the seating system. This might mean we need to place the asymmetrical pelvis in the seating system. For this configuration, a molded back is required to distribute pressure adequately.
Figure 57. Custom molded seating system.
Positioning Challenges: Trunk Rotation
- Often seen in combination with lateral flexion
- Often seen in combination with pelvic rotation
- Possible Causes:
- Pelvic rotation
- Lateral trunk flexion causes
Figure 58. Client with trunk rotation.
- Interventions:
- See pelvic rotation interventions
- If reducible:
- Use anterior supports on forward side, if rotation is primarily from upper trunk
- Y-strap, if entire trunk is involved
There can cause a C curve or an S curve if there is a rotational component. AC curve happens as one side of the spine collapses and quickly turns into an S curve as the client attempts to right their head.
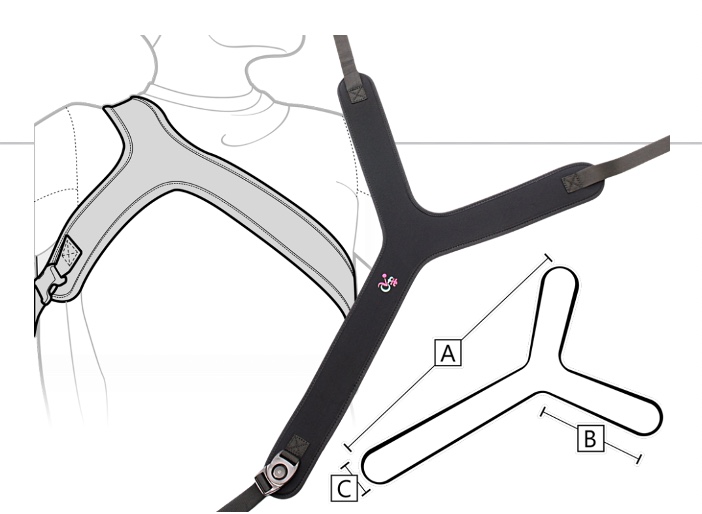
Figure 59. Anterior support options for trunk rotation.
- Interventions:
- If non-reducible:
- If the trunk is fixed in rotation, the primary goal is to allow the client to face forward.
- This may require placing the pelvis asymmetrically in the seating system.
- A molded back may be required to distribute pressure behind the pelvis and trunk.
- If non-reducible:
Figure 60. Client with a molded back to align him forward facing.
Positioning Challenges: Lateral Trunk Flexion
Scoliosis, this lateral flexion can be reducible or non-reducible.
- Scoliosis may be C curve, S curve, and/or rotational
- Scoliosis may be reducible or non-reducible
And we can see it with other spinal asymmetries.
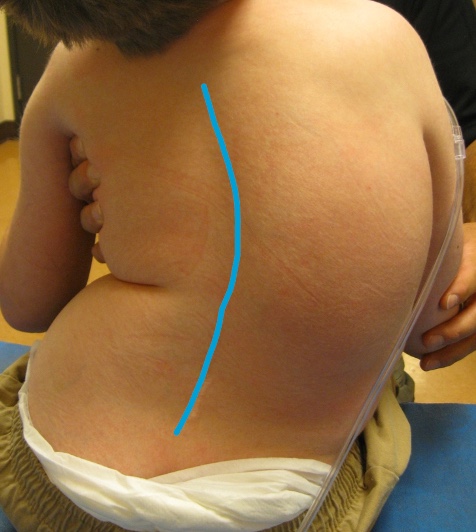
Figure 61. C curve due to lateral trunk flexion.
- Possible Causes:
- Increased tone on one side
- Musculature imbalance; may have pelvic involvement
- Decreased trunk strength or decreased tone, causing asymmetrical posture
- Habitual posturing for functional activity or stability
- Non-reducible scoliosis
One side of the spine is pulling more than the other, or there may be more tone. It might be a muscular imbalance with less strength on one side. Primitive reflexes may also play a role.
- Often worse with effort
The lateral trunk flexion may be worse with effort. My friend Taylor is already leaning to his left side, but when he gets excited, he actively pulls to that side (Figure 62).
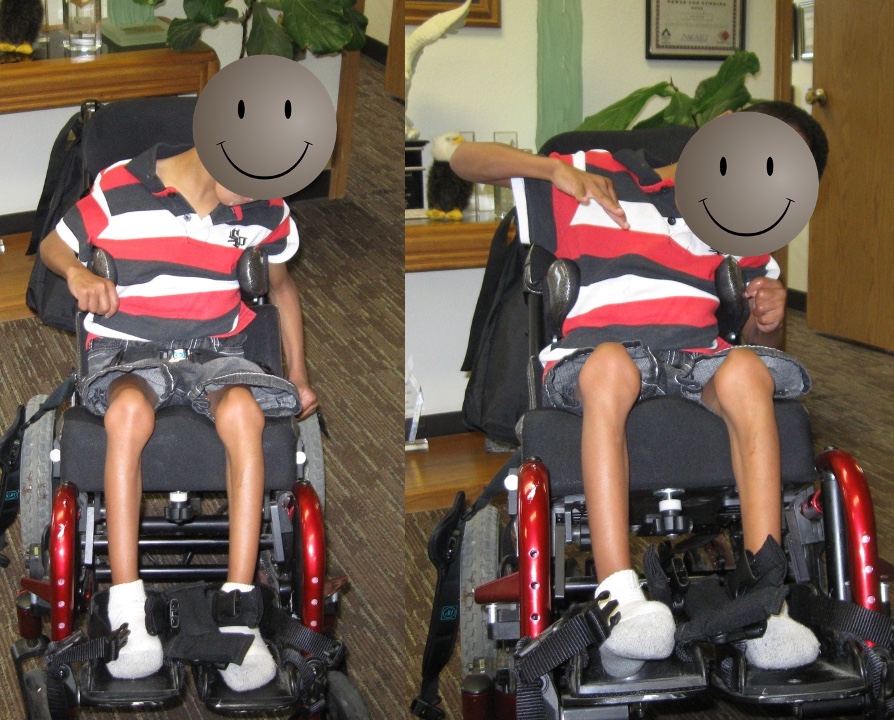
Figure 62. The client demonstrates increased leaning to the left side when excited.
We can see the postural collapse and active pulling in the right picture. His seating system was inadequate, and we needed to make some changes.
- Interventions:
- If reducible:
- Generic contoured back
- More targeted contoured backs often add more lateral support
- If reducible:
If lateral trunk flexion is reducible, we can look at general generic contoured backs, like the one pictured in Figure 63.

Figure 63. Generic contoured back.
The purpose of this generic contour is to encourage someone to stay in the middle of the back, but it does not provide much support. We can use more aggressive contours as needed.
- Interventions:
- If reducible:
- Lateral trunk supports (may need to be asymmetrically placed, one lower at the apex of lateral convexity for that force and counterforce)
- Anterior trunk supports to correct any rotation (see forward trunk flexion interventions)
- If reducible:
But if that is not enough, I usually have to add lateral trunk support for my clients. This can be added to a linear system, like the one pictured in Figure 64, or on a more off-the-shelf type back.
Figure 64. AEL linear system with lateral trunk supports.
We want to remember the principles of force and counterforce. Where I put my hands on the client's trunk to correct any lateral asymmetry is where these pads need to be. This might mean that one lateral is higher than the other. This is sometimes called three points of control or three-point contact.
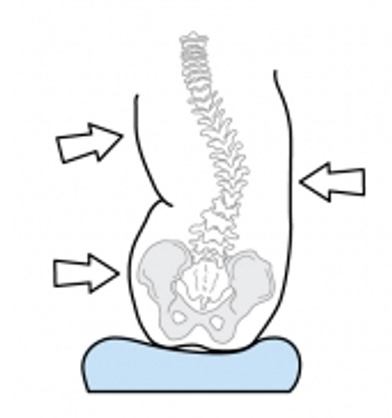
Figure 65. Example of force and counterforce, three points of control, or three-point contact.
Often, we have to provide a force on one side of the pelvis so that the client does not scooch over and reassume lateral scoliosis.
- Interventions
- If non-reducible:
- Refer to a physician to explore medical or surgical procedures, x-rays
- TLSO
- Aggressively contoured or molded back to allow for non-reducible curvature of the spine and/or rib cage
- Horizontal tilt under the seat to right head, if pressure distribution is good
If this is non-reducible, then it is essential to talk to the medical team to discuss these asymmetries to see if there are any plans from a medical standpoint to address these. Indeed, if your client is getting a spinal fusion in a few weeks, you do not want to recommend a new seating system. Your client is wearing orthotics some of the time. It is crucial to know if they will be wearing an orthotic in the seating system, as it is challenging to create a seating system that can accommodate the client in and out of their orthotic.
Figure 66. Example of an orthotic.
We need to pick one or the other. We might need a more aggressively contoured or molded back to accommodate asymmetry in the spine and keep it from worsening or slowing that progression. If someone has a significant C curve and their head is to the side, occasionally, we might need to wedge under the seat or even use a horizontal tilt, pictured in Figure 67, so that the head is level.
Figure 67. Example of a horizontal tilt.
There are many things to keep in mind.
Positioning Challenges: Lower Extremities
- Lower Extremities:
- Hip Adduction
- Hip Abduction
- Hip or Knee Flexion
- Hip or Knee Extension
- Ankle and foot limitations
Next, we will talk about positioning challenges at the lower extremities where we could see hip adduction or abduction, hip or knee flexion limitations, extension limitations, and ankle and foot issues. This is why seating positioning evaluations take longer than 15 minutes.
- Lateral pelvic supports
- To keep the pelvis in the middle of seat
Lateral pelvic supports are designed to keep the pelvis in the middle of the seat and can be seen in Figure 68.
Figure 68. Lateral pelvic support.
Sometimes I will put these on a seating system to encourage caregivers to place the client in the middle of the seat to keep that pelvis in a more neutral position.
- Medial knee support
- To limit knee adduction
- Not to prevent posterior pelvic tilt
- The groin is not a weight-bearing surface!
Another option is medial knee support (Figure 69).
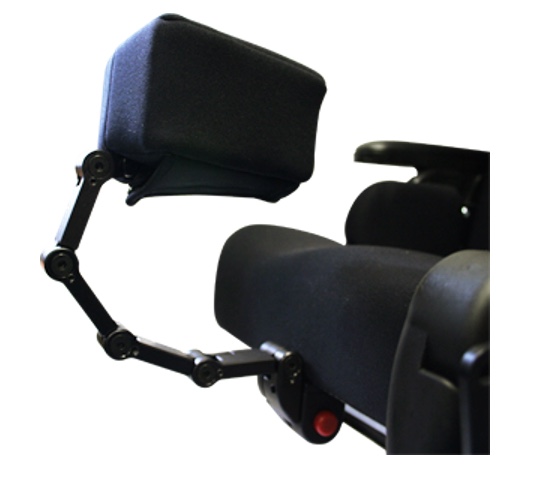
Figure 69. Flip-down medial knee support by Stealth Products.
Medial knee support is designed to limit knee adduction and not to prevent a posterior pelvic tilt. Many people place this way into the groin to help avoid a posterior pelvic tilt, but there are other strategies. Medial knee support should be between the knees and not the groin, as it is not a weight-bearing surface.
- Lateral knee support
- To limit excessive hip abduction
As shown in Figure 70, we might also put supports at the lateral knees to limit excessive hip abduction.
Figure 70. Lateral knee support by Stealth Products.
If somebody's leg tends to go to the side, we may need to allow that leg to abduct to maintain a neutral pelvis, but we may not want it to go past a certain amount. We can use lateral knee support to limit that movement in these cases. These sometimes swing out of the way for transfers, especially if someone transfers side to side.
- Foot supports
- To limit excessive knee extension
- To prevent injury
- To increase stability
Looking at the feet, we often will secure the client's feet to the footplate. Your facility may bring up restraint concerns], but again, I refer you to the RESNA Position Paper on restraints. This can be used for several reasons.
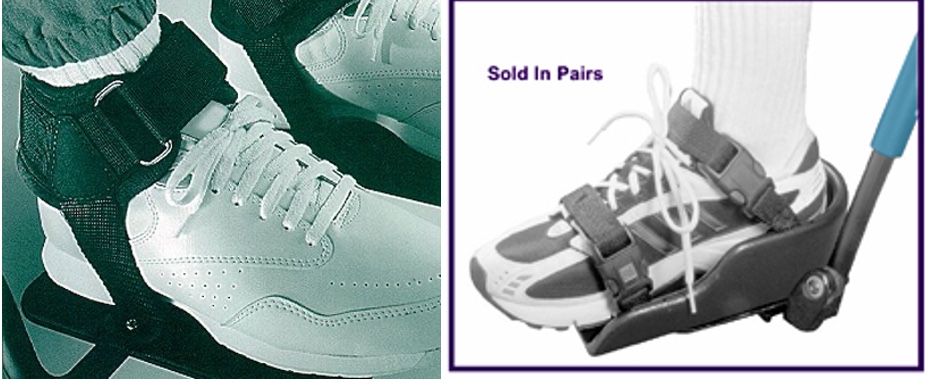
Figure 71. Bodypoint Ankle Huggers and Therafin shoe holder with straps.
By strapping someone's feet, we can limit knee extension and keep the foot in contact with the footplate. It can help prevent injury as well. If the feet are constantly forward to the footplates, that is a hazard. We also can provide increased stability and weight-bearing. When using our body for a functional task, we plant our feet on the ground, as it gives us a lot of stability. If our client's feet are not on the footplates, they lack that stability and subsequent function.
- Foot support
- If the foot shape is altered, different support may be required
Additional support may be necessary if someone's foot shape is significantly altered. First, we can change the angle of the footplates to accommodate plantarflexion, dorsiflexion, inversion, and eversion of the ankle. Figure 72 shows some adjustments.
Figure 72. Footplate adjustments for foot limitations.
The goal is to distribute pressure as much as possible along the foot. Once we are sitting, we have pressure along the buttocks, posterior thighs, and foot soles. When these body areas do not make contact, there is more pressure on other sites. Even with changing the angles of his footplate, you can see this gentleman only had a tiny section of his foot in contact with this hard surface. He could not wear typical shoes, so his mom found some nice thick slippers that helped better protect his feet. Figure 73 shows another client of mine. Due to his ankles and feet changes, he had to use a single-foot box.
Figure 73. Aspen Seating single-foot box
They also have separate foot boxes to swing out of the way for transfers if needed. The foot box provides protection and some weight-bearing and is well padded. The towel there is not part of the padding.
Positioning Challenges: Upper Extremities
- Upper Extremities:
- The need for more support
- Shoulder retraction
- Elbow extension
- Uncontrolled movements
People may require upper extremity support in addition to the armrest. The client may have a large amount of scapular retraction, elbow extension, or uncontrolled movements. There are several different options available to address these. For example, an arm trough is in Figure 74.
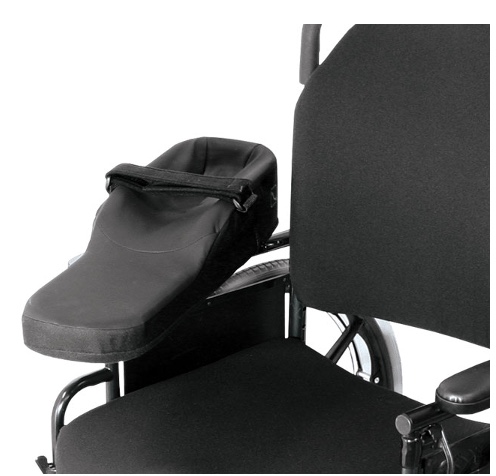
Figure 74. Arm trough.
An arm trough can support the upper extremity more than we would otherwise have. Typical arm pads are thin and only support a small part of the elbow. An arm trough provides more support and less traction on the shoulder girdle. This particular one has a strap as needed to keep the arm from falling off. It also pivots to meet individual needs. Figure 75 shows a posterior elbow support.
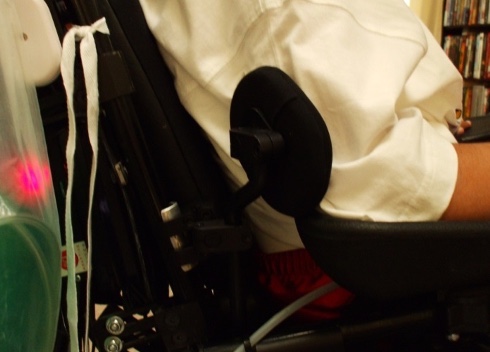
Figure 75. Posterior elbow support.
Even with arm troughs, we may need additional posterior support. For example, their arms might fall off the arm trough during tilting, and this device keeps the arm within the arm trough and well supported.
Many different options are out there for people who have uncontrolled movements. It gets tricky as we start getting into strapping and restraint concerns. However, some clients benefit from options that give them stability and security in the arms. I worked with a teenage girl who stuck her arms out whenever she drove towards a doorway. We did not want to strap her arms down, but it was a safety concern. Her dad came up with the brilliant idea of taking a simple towel bar and drilling it into the front of her tray. When she came towards the doorway, she would bring her arms in, grab onto the towel bar, and drive through. Sometimes we need to be creative about addressing some of these scenarios. Again, some other courses go into more detail about addressing some of these unique issues with the upper extremities.
Positioning Challenges: Head
- Head:
- Decreased head control
- No head control
- Lateral flexion
One of my favorite areas of wheelchair positioning is the head. It depends on the position of the rest of the body, particularly the pelvis. There is another course that only addresses positioning the head on this site. We might see clients with decreased head control where their head tends to fall forward. Other clients may have little to no head control or lateral neck flexion. This young man in Figure 76 has specialized head support called the i2i Head and Neck Support System.
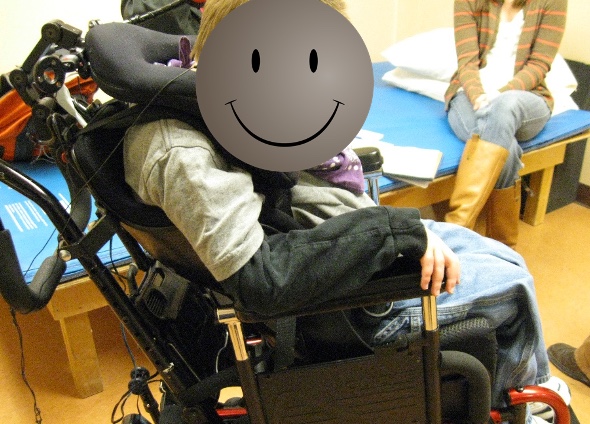
Figure 76. The i2i Head and Neck Support System
He is looking down at his lap, so we needed to figure out what to do to help with his head position. Figure 77 shows an example of a before and after intervention.
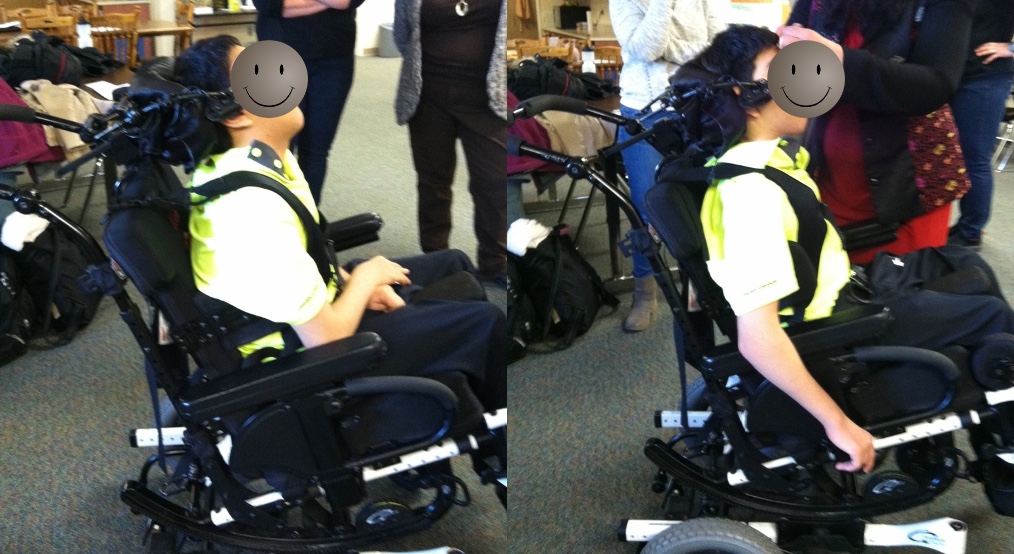
Figure 77. Example of a before and after intervention for head positioning.
This young man on the left is hyperextended at his neck. This positioning affects his line of sight, swallowing, and breathing. He is at a much higher risk for aspiration in this position because his neck is hyperextended. Looking closely at these two pictures, you can see that he is in a much better position on the right. His mom is brushing the hair out of his eyes, but she is not holding his head up. In the second picture, he is aligned in a safer position for swallowing and breathing. We made other adjustments to his seating system, including tightening his shoulder strap to provide a counter force in the front.
- Decreased or No Head Control
- Interventions:
- increase trunk extension and scapular retraction
- neck rest
- posterior head support
- change pull of gravity against head by reclining or tilting seating system
- anterior solutions
- refer to behavioral optometrist, if appropriate
There are some general interventions that we need to keep in mind. We need to do what we can to increase overall trunk extension and scapular retraction as this helps with the position of the head. From there, we can provide support at the neck, posterior to the head. We can also change the influence of gravity against the head by either opening the seat to back angle or adding some recline or tilt. And occasionally, we need to look at collars or forehead straps as a last resort. We want to look at everything else we can first. We can also work with behavioral optometrists as appropriate. These folks work on functional vision, and sometimes we have clients that experience a midline shift that can impact their head position.
- Posterior Head Supports
- Many posterior headrests or head supports are on the market.
- None will be effective if the client's head never touches it!
- Tilt can be used to enlist gravity in the battle.
- Ensure that pelvis and trunk are in an optimal position to facilitate head control.
There are a lot of posterior head supports on the market, but none of them will be effective if the client's head never touches it. I see a lot of clients who have tried 20 different head supports behind them, but they still look at their lap. We need to do more. Again, sometimes tilt can be helpful to reduce the impact of gravity, and we have to ensure the pelvis and trunk are in an optimal position.
- Occipital and Suboccipital
- Occipital support contacts the upper rear of the head.
- Suboccipital support can actually provide postural support as it "cups" the occipital shelf.
- This also can reduce neck hyperextension.
Occipital support is going to contact the upper rear of the head. Suboccipital support actually provides some partial support because it cups the occipital shelf. Cup the back of your head. That is precisely where occipital support goes to give some weight-bearing. If we have something simply behind the head, that is not always as helpful and does not prevent hyperextension. Figure 78 shows the areas of the skull and an X-ray of the cervical spine.
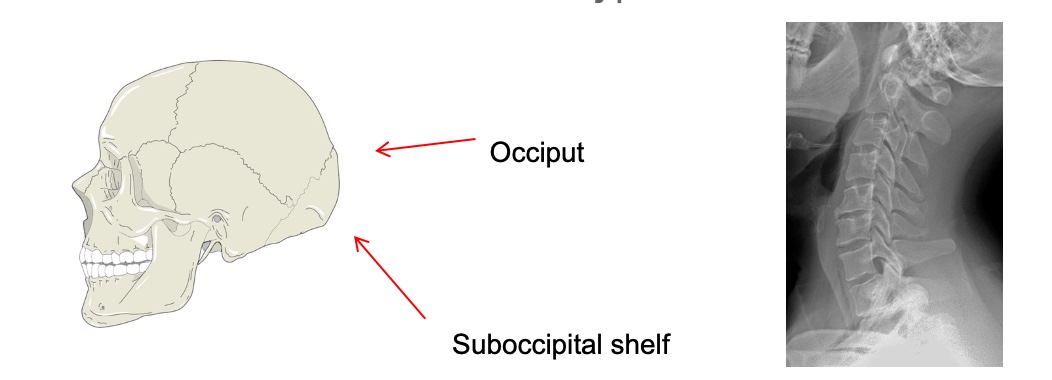
Figure 78. Areas of the skull and an X-ray of the cervical spine.
A suboccipital pad can often limit hyperextension for some of our clients.
- Posterior Head Supports
- Wide variety to meet a client's specific needs
Figure 79 shows some examples of posterior head supports.
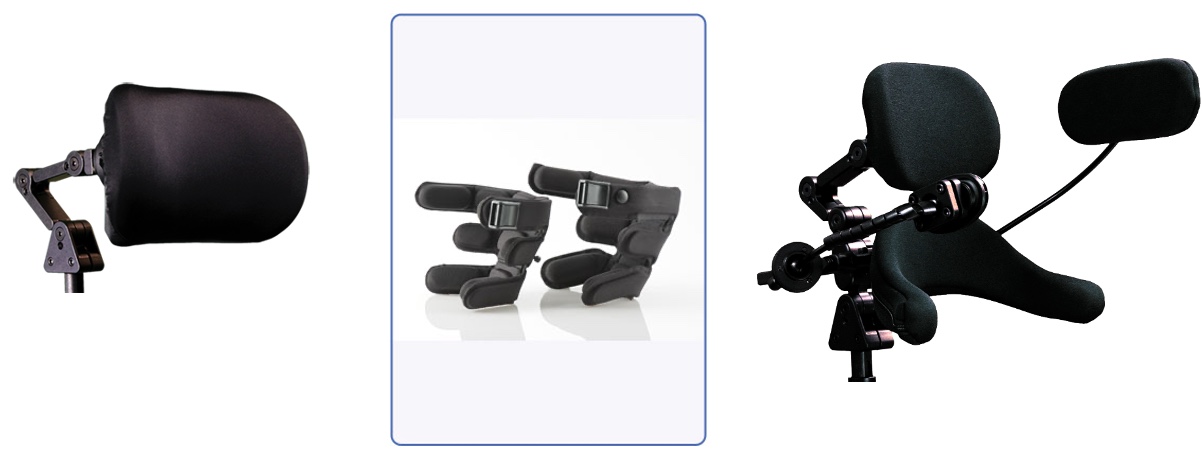
Figure 79. Stealth Products Comfort Plus, Symmetric Designs Savant, and Stealth Products Ultra posterior head supports.
The Comfort Plus is a basic head support with a generic curve to encourage someone to stay in the middle. The Symmetric Designs Savant is in the middle and can be bent to provide some occipital, suboccipital, and lateral support. There is also a buckle on there for a forehead strap if needed. People with ALS often use this. On the right is the Ultra from Stealth which includes an occipital pad, a suboccipital pad, and the lateral pads that can be added.
If, despite our best efforts, a client is still collapsing forward or to the side, we can look at anterior supports (Figure 80).
- Anterior Head Supports
- Forehead support
- Collars
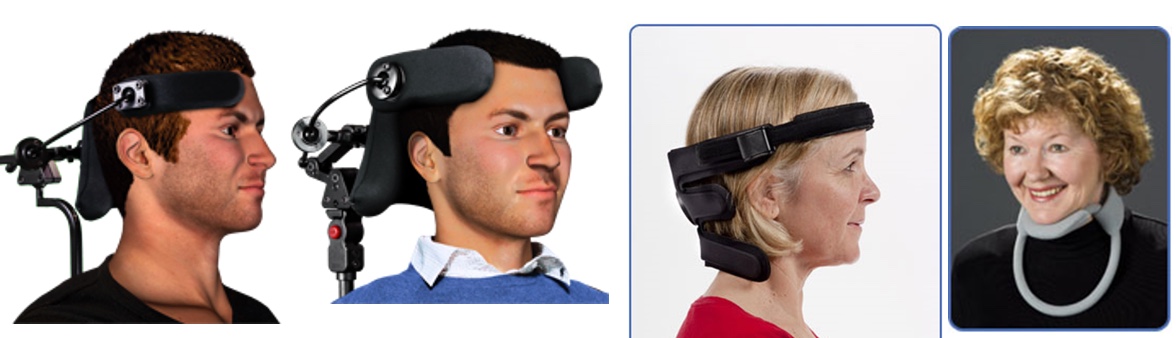
Figure 80. Anterior supports by Stealth Products Lateral Pads, Symmetric Designs Savant with forehead strap, Symmetric Designs Headmaster collar.
It is possible to take two lateral pads and make them a little snug. This adjustment may be enough to help someone's head stay upright. We can also use a long pad and bend it a little bit. Some people prefer this swing-away pad rather than a strap over their forehead. A forehead strap may also keep their head upright. One challenge with forehead straps is they may lose head control because they are not actively using their neck muscles anymore. Lastly, the Symmetric Designs Headmaster Collar is often used by people with ALS and spinal muscular atrophy.
Take Home Message
- Pressure is an issue for anyone using wheelchair seating and must be considered.
- The angle of support surfaces and components has a significant impact on positioning and function.
- Specific seating challenges must be identified.
- Intervention strategies can be applied to multiple seating system categories.
Pressure is an issue for anyone using wheelchair seating, and it has to be considered. Some of our clients are at much higher risk, but it is an issue for anyone using a seating system. We always have to address it. The angle of the primary support surfaces, the seat and back, and secondary support surfaces like lateral trunk pads, lateral knee pads, et cetera, significantly impact positioning and function.
We determine much of those angles during the MAT assessment. There is also a MAT assessment on OccupationalTherapy.com. We then need to identify specific seating challenges and the causes of each of those challenges. Depending on the cause, we will choose a different strategy to address it.
Intervention strategies can be used and applied to multiple seating system categories. Interventions include off-the-shelf seats and backs, linear seating systems, and custom molded seating.
Resources
- RESNA Wheelchair Service Provision Guide
- www.RESNA.org
- Positioning Chart
- www.atilange.com, under Resources
Here are some resources. RESNA is the Rehabilitation Engineering and Assistive Technology Society of North America. On their website, there is a Wheelchair Service Provision Guide that has some helpful information. You should use a positioning chart as a part of your handouts, or you can also find it on my website under resources.
Hands-on Activity
- Contact a Seating and Mobility Clinic in your area
- Arrange to observe a Seating Evaluation
- Bring chocolate!
I also have a suggested activity for you. I would find a seating and mobility clinic in your area and arrange to observe a seating evaluation. It can be quite educational and a lot of fun. Bring them some chocolate, and they will be your best friend.
Questions and Answers
What kind of cushion or wheelchair would you suggest for someone with a necrotic mass in the pelvis to promote comfort and prolonged tolerance?
It sounds like there is a current pressure injury. Depending on what stage of injury, they may have to stay out of a seated position for some time until they get to a certain level of healing. It is essential to determine the cause of that pressure injury and the best way to treat it.
Is there a gold standard wheelchair cushion for pressure injury prevention like gel, air, et cetera?
My favorite answer is that it depends. Each of our clients is so individual. Individual risk factors, presentation, and functional needs will determine what type of seating materials and upholstery. Many people at high risk for pressure benefit from a surface that is either gel or air. Even then, there are various options; some do a better job than others. Many clients do well with an offloading cushion as well. This is where that careful assessment is required.
Are there any wheelchair seating systems that provide tilt and recline options to accommodate fluctuating postural needs?
There are manual and power wheelchair seating systems that include tilt and recline, but power wheelchair systems are more common. Tilt is more common in our manual wheelchairs. Both together are designed to help with weight shifting, pressure redistribution, and managing fluctuating postural needs. If someone's postural needs fluctuate throughout the day, like dystonia, we need to find a seating system that will provide adequate support, despite those fluctuations in tone and movement.
Is it possible for a client to fluctuate between anterior and posterior pelvic tilt?
I have someone in mind who has been tricky to position securely. They present with low tone and poor body awareness. If somebody has low tone in the trunk, the pelvis can collapse into an anterior or pelvic tilt. You might see both. Ensuring the client has adequate proximal and core stability is vital. You want to lock in that pelvis and trunk to compensate for their intrinsic lack of stability so they can better disassociate the extremities and the head.
How can you tell the difference between reducible and non-reducible pelvic obliquity?
With any of these positioning challenges at the pelvis, reducible means I can get it back to a neutral position. For example, in an obliquity, I can return someone to a level pelvis. In non-reducible, I cannot, and I have to accommodate that instead.
How would you address balancing the need to stabilize the pelvis and trunk in neutral with increased risk for pressure injury, specifically from the pelvic belt exerting pressure to correct it?
The pelvic belt should not apply pressure to correct the position of the pelvis. It keeps the pelvis in the correct alignment with the support surfaces, and in that way, it helps with pressure injury mitigation. So I am not worried about pressure from the pelvic belt. What we need to do is stabilize the pelvis and trunk but also provide weight shifts and other strategies to reduce someone's risk of developing pressure,
I work in a skilled nursing facility setting. Sometimes these lap belts sound like they may be considered restraints.
This is a big issue legally, and per OBRA (Omnibus Budget Reconciliation Act), you can use a pelvic positioning belt in a restraint-free setting. Someone might tell you cannot, but it is allowed if it meets specific requirements. RESNA presented a position paper on providing appropriate seating strategies in a restraint-free environment. There is a link to that position paper at the end of the talk/
Would you recommend tilt and/or recline for anyone who cannot independently provide weight shifting?
The main drawback of tilt and recline is that it makes the chair very heavy and challenging to propel if someone can self-propel a manual chair. If they are not self-propelling, it is not as big a deal. If this person has another way of performing those weight shifts, that is great. If not, then yes, I would consider at least a tilt in a manual wheelchair or a tilt in a power wheelchair.
One of my past patients would only bring her head to neutral for brief periods when cued to do so. The patient otherwise laterally flexes their head and neck to the left. I do not recall their diagnosis. Would such a patient benefit from head support?
If this is someone who is in a wheelchair seating system, then absolutely. As with all these challenges we have been discussing, try to figure out the cause. Could it be vision or something else? It takes some digging to determine why the client is obligated to move in that direction. Head support with lateral supports may provide force and counterforce to correct that person's head position. I hope that helps.
I want to make a real quick comment here. When I was doing seating positioning, especially in a skilled nursing facility, there were no consistent caregivers. Usually, the headrest would be set, and then they would either have a posterior pelvic tilt or staff would put someone else in the wheelchair. Do you have any suggestions for how, besides training caregivers as much as possible, to make people aware of the proper settings?
Educating everyone who might be transferring someone in and out of their system is challenging. We can do as much education as possible, such as through videos. I also encourage clients to inform their caregivers if they are not in the correct position.
I also work with a lot of nonverbal clients who use speech-generating devices. We can add phrases on their communication device like, "I need you to correct my position in my wheelchair," or "I need you to pull me back."
Is there an easy modification to the posterior pelvic tilt hip belt position? You mentioned a 60-degree angle maintains neutral pelvic tilt, but most are commonly placed at 45. Is there something I can change?
Absolutely. Once upon a time, we were limited to placing strapping only where there was a hole in the frame. Now, all sorts of hardware are available to attach these straps anywhere we want on the frame. There is also hardware that goes around the frame tubing itself, so you do not even have to have a hole.
What are your thoughts on self-propulsion?
I work with a lot of power mobility. I think that we can get focused on whether we want either a manual or a power chair. The goals are mobility, function, and safety. If this person has a significant kyphosis, posterior pelvic tilt, and is stuck in cervical hyperextension, it will be hard for them to self-propel from a biomechanical standpoint. It might make more sense for that person to get into the best position to accommodate those limitations and look at power mobility.
Do you have a good resource site for sleep posture support systems?
Tamara Kittelson has a fantastic website. Some specific products are available out there.
Summary
Each client is an individual, and this is why we have to vary our recommendations. We need to look at their age, diagnoses, whether things are reducible, their settings, and their mobility base. There are a lot of factors. I may need to see a client repeatedly to tease all this out, or it might take one appointment to identify problems and goals. You can also ask, "What's worked for you before?, or "What do you like?" Being truly client-centered means spending lots of time listening to clients and their caregivers. We then have to investigate the issues and how they interrelate. What solutions are going to match this person's needs? All that has to happen long before we walk to a closet and start pulling things out. We have so many products available to us now.
References
Hodges, G. J., Mallette, M. M., Rigby, A., Klentrou, P., Cheung, S. S., & Falk, B. (2019). Comparison of different wheelchair seating on thermoregulation and perceptual responses in thermoneutral and hot conditions in children. Journal of tissue viability, 28(3), 144–151. https://doi.org/10.1016/j.jtv.2019.04.003
Nace, S., Tiernan, J., & Ní Annaidh, A. (2019). Manufacturing custom-contoured wheelchair seating: A state-of-the-art review. Prosthetics and orthotics international, 43(4), 382–395. https://doi.org/10.1177/0309364619836028
Citation:
Lange, M. (2021). Wheelchair seating interventions. OccupationalTherapy.com, Article 5533. Available at www.OccupationalTherapy.com