Editor's note: This text-based course is a transcript of the webinar, Seating Assessment For Mobility Bases: An Introduction, presented by Michelle Lange, OTR, ABDA, ATP/SMS.
Learning Outcomes
- After this course, participants will be able to:
- Recognize a client's posture in their wheelchair seating system.
- List 3 components of a mat exam.
- List the appropriate steps in assessing available hip and knee flexion for a seated posture.
Welcome, everyone, to this course today. I do hope that it is helpful to you and to the clients that you are serving.
What We Are Covering
- The Evaluation Team
- Seating Assessment Process
- Referral
This course is part of a series of classes. There are further courses in the library for more in-depth information on any of the areas. We will discuss the evaluation team, the seating assessment process, and when referrals are appropriate for mobility bases.
The Evaluation Team
Team Members
- Client
- Caregivers
- Clinician(s)
- Occupational Therapist
- Physical Therapist
- Supplier
- Manufacturer's representative
- Others
We must be client-centered and keep the client's goals in mind, as the client will be using the recommended equipment for many years. Clinicians are often involved, which could be private therapists or those from a school system. A complex rehab supplier and a manufacturer's representative may also be involved. Figure 1 shows an example of a team working together.

Figure 1. The author is working on a team for wheelchair seating.
Scope of Service
- All clinicians must understand the importance of appropriate positioning.
- All clinicians must recognize when a seating system is not meeting a client's needs.
- Assessment for wheelchair seating requires additional training.
We also need to remember our scope of service. All clinicians must understand the importance and implications of appropriate positioning. If someone is not positioned well, medical consequences like pressure, loss of range, and orthopedic changes can affect someone's function. Therapists must also recognize when a seating system is no longer meeting someone's needs.
Specialized Training
- Clinicians who perform seating assessments for complex rehab equipment typically have additional training and experience in this practice area.
- Clinicians may be certified by RESNA, though this is not required.
- Assistive Technology Professional - ATP
- Seating and Mobility Specialist - SMS
Appropriate wheelchair seating requires additional training. There are many practice areas where I am not your go-to person. I used to make a good splint, but that was long ago. Now, splinting is outside of my scope of service. Thus, I need to recognize when somebody needs a splint and refer that to someone with more training.
I hope these courses can help you build skills so you can be a part of a seating team. At a minimum, one should be able to recognize when there is a need for referral. In most cases, clinicians who perform wheelchair seating assessments for complex rehab equipment have additional training and experience.
Some clinicians are also certified by RESNA, the Rehabilitation Engineering and Assistive Technology Society North America, which offers two different certifications, Assistive Technology Professional (ATP) and Seating and Mobility Specialist (SMS). The Continued platform has a preparatory series for both the ATP and the SMS certifications if those are of interest to you.
The equipment supplier working with this complex rehab equipment should also have specialized training and experience and be certified. A Medicare supplier and other funding sources have specific requirements, like an ATP certification.
- The equipment supplier working with complex rehab equipment should also have specialized training, experience, and certification.
- NRRTS: National Registry of Rehabilitation Suppliers
- Registered Rehabilitation Technology Supplier® – RRTS
- Certified Complex Rehabilitation Technology Supplier® - CRTS
- RESNA
- Assistive Technology Professional - ATP
NRRTS, the National Registry of Rehabilitation Suppliers, has two certificates, the Registered Rehabilitation Technology Supplier (RRTS) and Certified Complex Rehab Technology Supplier (CRTS). To qualify for either of these, the supplier has to have their ATP. Many suppliers will pursue these additional levels of certification to demonstrate that they are qualified to work with these clients. Feel free to ask the suppliers you are working with what credentials they have.
Clinician Goals
- Correct what is reducible (flexible)
- Accommodate what is non-reducible (fixed)
- Provide orthopedic alignment/symmetry
- Address abnormal muscle tone
- Inhibit abnormal or primitive reflexes
- Improve postural control and stability
- Optimize function
- Address pressure risk
- Mitigate pain
As the clinical portion of the team, we must know our goals. We also have to clarify the client and caregiver goals, as they are the most crucial part of the team. Clinicians must determine what deformities are reducible or flexible, what a client will tolerate, and what does not negatively impact function.
First, we need to accommodate what is non-reducible or fixed. This young man in Figure 2 is not symmetrical.
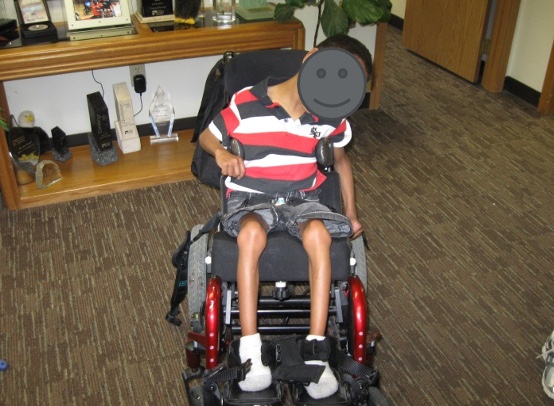
Figure 2. The pediatric client is not sitting symmetrically.
He is leaning to his left side. In his case, this position is flexible, and I can move him back to a neutral spine. However, if it is not reducible, I need to accommodate that within the seating system. We want to achieve orthopedic alignment and symmetry to the best degree possible so that it does not negatively impact function.
Abnormal muscle tone, high, low, or a combination, must also be addressed. The client has some abnormal or primitive reflexes, and we know that certain positions can sometimes inhibit those to an extent. We want to provide improved postural control and stability for this client. We have a great deal of inherent stability to reach out and use our bodies for functional tasks. Clients using wheelchair seating rely on the seating system to provide that stability.
We always want to optimize function, address any client's pressure risk, and mitigate pain. These areas are difficult to assess in clients who are nonverbal. We must look at their communication methods to see if there are other ways they can let us know they are uncomfortable and ensure we are also addressing that.
Seating Assessment Process
Let's look at the seating assessment process itself. The process may look different between settings, but generally, it will include the following.
- Intake
- Assessment of current posture/equipment
- Mat Exam
- Simulation
- Equipment Trials
- Fabrication/Fitting
- Follow-up
We have some form of intake where we get information about the client. This can be done before the evaluation, during, or a combination of both. We need to assess the client's current posture and equipment.
The mat examination is a critical part of the seating assessment, and we will discuss that in depth. During the mat evaluation, we simulate what we hope will meet the client's needs regarding a seating system. We may also trial what we recommend to ensure it works.
Once the equipment is recommended, we write a letter of medical necessity, the supplier fills out paperwork, and we hopefully get funding.
We must be present at the fitting and delivery of this equipment. Some of the equipment may be fabricated, but the delivery process is a continuation of the evaluation. We want to ensure that what we have recommended meets the client's needs. There might be some fine-tuning and some finessing required at this point.
Finally, there is a follow-up. I do not know about you, but it is off my radar if my dentist does not call me or send a postcard. Similarly, we need to have a process to follow up with our client's changing needs.
1. Intake
- Intake is more than just gathering information and demographics.
- Intake provides critical information to develop client parameters that will then be matched to appropriate equipment.
- Intake provides context and direction.
Figure 3 shows an example.
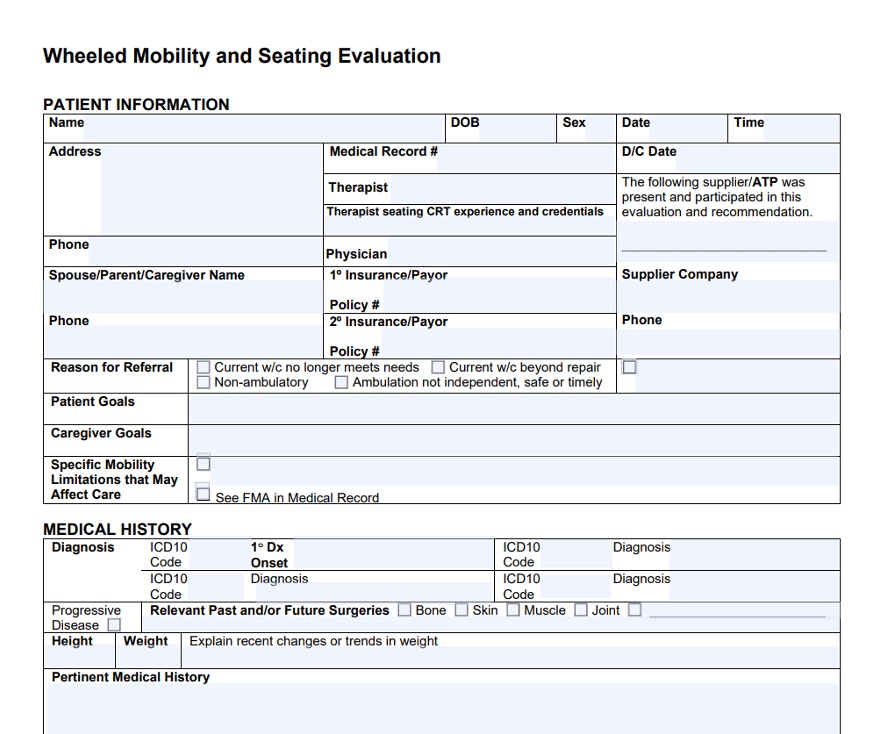
Figure 3. Example of an intake form. Click here to enlarge the image.
Intake is more than getting some info and demographics. It also provides critical information to help us develop parameters for a client so we can start matching their needs with product solutions.
Until I know what this unique client requires, I cannot start thinking about needed product features. The intake provides context like the setting, where they use the equipment, and how long they use it during the day. The intake provides context and direction for our evaluation.
- Intake: Goals
- Client
- Caregiver(s)
- Short and long term
- For different environments
- For different tasks
- Building consensus
We need to know the client's and caregiver's goals. I work primarily in pediatrics, so family goals are fundamental. These goals represent short-term and long-term goals like what they want immediately from the seating system and years later. We also need to know what a seating system needs to do in different environments for different tasks.
Can we get everyone on the same page? We have several players involved in a team, and there is often a lack of consensus. A big part of our job is to build that consensus so everyone is on board and we can devise a viable solution.
- Intake: Home Accessibility
- Type of residence
- Own or rent
- Lives alone or with others
- Hours without caregiver
- Entrance accessibility
- Number of floors
- Bedroom accessibility
- Bathroom accessibility
A key part of the intake process is to ask about home accessibility because this seating system is not just hovering in space. It is attached to a mobility base like an adaptive stroller, a manual chair, or a power wheelchair. Thus, we need to know about the client's residence and if they own or rent. If it is a rental, modifications may not be possible. Does a client live by themselves or with others? We also need to document how many hours a person spends with a paid or non-paid caregiver, as a funding source often requires this. Is the entrance accessible? How many floors are there? Are the bedroom and bathroom accessible? Do they use any other equipment? Figure 4 shows an adapted bath seat.
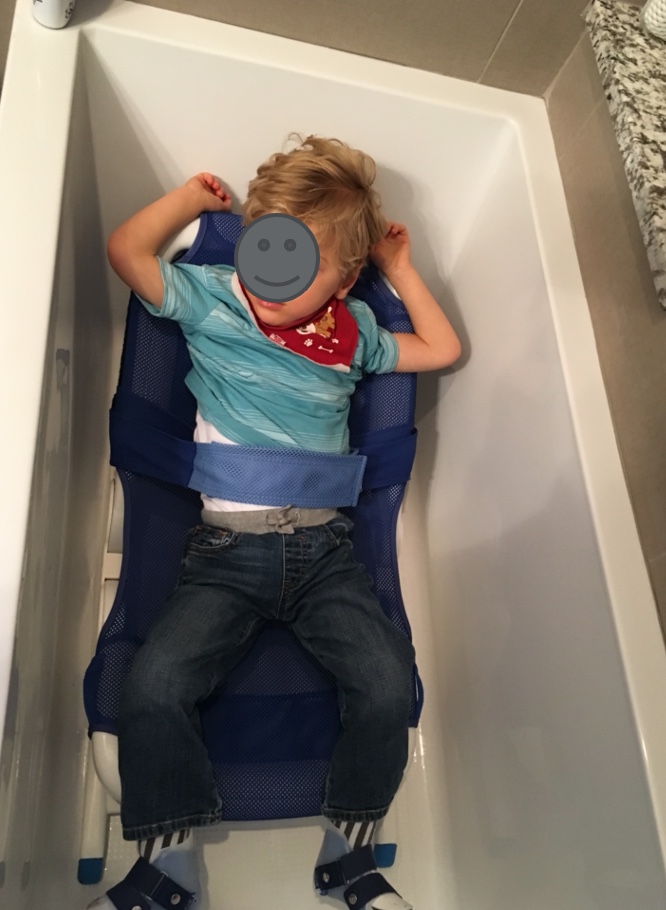
Figure 4. Adapted bath seat.
This does not mean we have to go to their home, depending on your setting. The supplier sometimes is required to do that, but it is something we want to include in our intake.
- Intake: Vehicle Accessibility
- Vehicle type
- School bus
- Public transport
- Vehicle adaptations
- Tie downs
- Does client ride in the wheelchair or transfer?
- Does client drive?
- Vehicle type
Vehicle accessibility is critical to know as well. Does this person ride on a school bus on their mobility base, or will they in the future? Do they ride public transport or have a private vehicle? Are there any adaptations, or do they have tie-downs to secure the mobility base? Is the client riding in the mobility base, or are they transferring to a car seat? Do they have an adaptive car seat or use a standard passenger seat? This is all crucial information to capture. Figure 5 shows an adapted car seat.
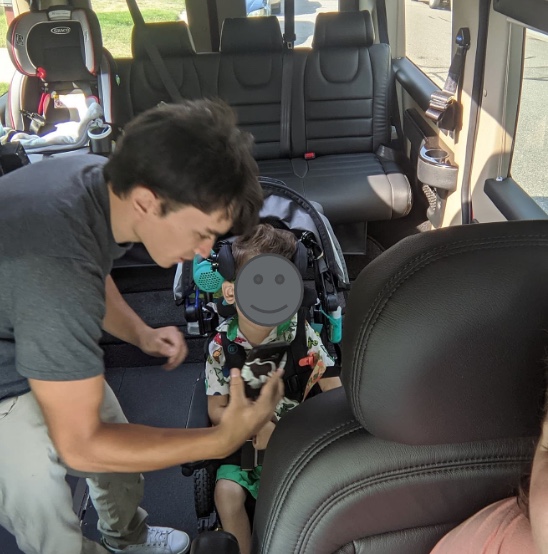
Figure 5. Adapted car seat.
- Intake: Other Medical
- Vision
- Hearing
- Communication
- Sensation
- Skin status
Medical information to gather on intake includes the client's vision, hearing, and communication. This young man here uses a communication device (Figure 6).
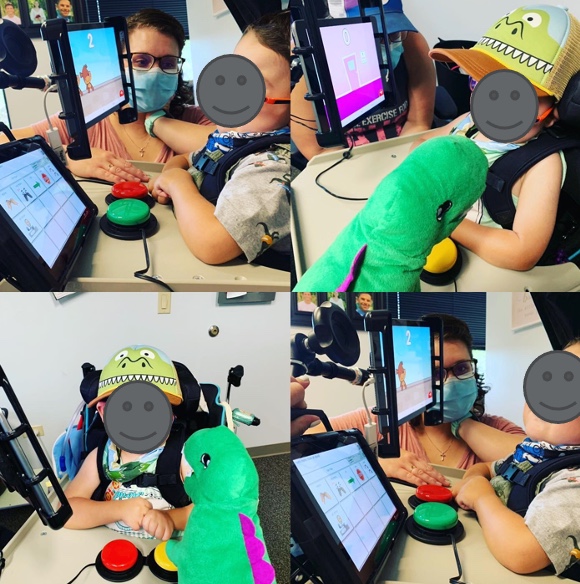
Figure 6. Child using a communication device.
We also need to know their sensation and skin status and whether it is impaired or nonexistent, with a risk of skin breakdown. I ask clients if they have numbness in their butt when they sit for some time. They may be having some changes in sensation.
- Intake: ADLs
- Dressing
- Eating
- Bathing
- Toileting
- Continence
- Meal Prep
It is also essential to ask about ADLs: dressing, eating, bathing, toileting, meal prep, et cetera. Most of my clients are dependent for all of their ADLs, so the seating system's goal is not for them to fix dinner for the family. We still need to document the level of assistance required for these tasks. Many of my clients also do not eat by mouth or just small amounts for taste, which is also essential to document. Figure 7 shows an adapted highchair.
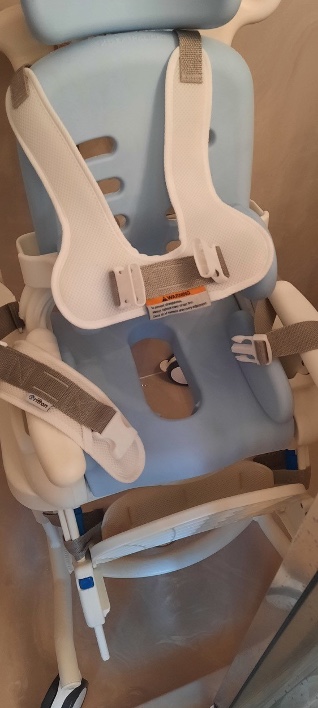
Figure 7. Adapted highchair.
- Intake: Current Equipment
- Seating
- Include all components
- Describe current posture
- Mobility Base
- ADL equipment
- Other AT
- Seating
We need to document current equipment and all the components of that seating system, including the mobility base. What is the client's posture within the seating system itself? Figure 8 shows a client with custom seating.
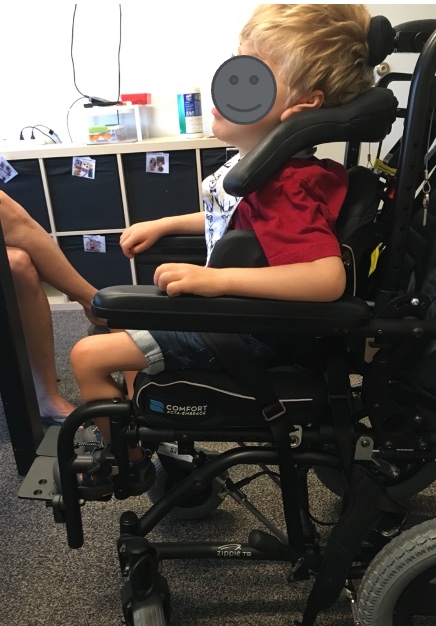
Figure 8. Client with custom seating.
Mobility Evaluation Video
I may recommend the first mobility base for very young children. This video shows me working with a child on a mobility evaluation.

- Intake: Wheelchair Skills
- Transfers
- Balance
- Sitting, standing
- Mobility
- Ambulation
- Dependent, independent in mobility base
- Mobility Base
We also want to document wheelchair skills. If this client is already using a mobility base, can they transfer in and out of it? If not, how much help is required?
What is their balance in sitting and standing? I work with very complex clients that usually have no sitting or standing balance, but it still needs to be documented. We can save time during the evaluation by gathering as much of this information ahead of time as possible.
For mobility, can this person ambulate or with assistance? Are they dependent in a manual wheelchair, or can they self-propel? Are they able to drive a power wheelchair? If they already have one, what mobility base are they using? All this information is essential to collect.
2. Assessment of Current Posture
- What is the client's posture in the current equipment?
- Describe position of the pelvis
- Describe position of the trunk
- Describe position of the neck
- Describe position of the extremities
Besides the intake during our seating assessment process, it is also vital that we assess the client's current posture.
Sometimes a client comes in, and they are a hot mess in their seating system because maybe they have had a long ride over to our clinic and have moved out of position. If I see that caregivers are correcting that position, I say, "Let's not do it yet." I want to see how they settle into or slide out of position before we move forward. I take many pictures of my clients with permission and let them know I may use them for educational purposes or in my documentation. I will take a picture of their current posture, and then once we have corrected things, made recommendations, or simulated things, I will take another picture.
I include these before and after pictures in my documentation because a picture truly is worth a thousand words. In addition to my narration, I can explain why this client needs intervention. I describe the position of the pelvis, trunk, neck, and extremities within the current seating system. Figure 9 shows a young woman whose pelvis is rotated forward and higher on the right side. Her right lower extremity is internally rotated to the point that her foot is outside the base of the chair, putting her at risk. She also has rotation and curvature occurring in the trunk as well.
Figure 9. Client with asymmetrical posture.
For example, those would be things we would include.
- Assessment of Current Equipment
- Describe current equipment
- Seating system
- Mobility base
- Age of equipment
- Condition of equipment
- The Intake lists current equipment
- Describe current equipment
Again, it is crucial to describe the current equipment, including the mobility base, specific seating system, components, and the age of everything. The seating system may not be the same age as the mobility base. Usually, the seating system needs to be replaced sooner than the base because of growth or wear and tear, and it is not designed to last as long. We also want to note the condition of the equipment. Are there tears in the upholstery or something hanging off the side of the chair? This can also be listed on the intake.
3. Mat Exam
- The purpose of the mat exam is:
- To determine available range for a seated posture
- To determine where support surfaces are required
- To determine seated angles
- What we can support with our hands, the seating system can also support.
The mat exam is easy to skip when we are short on time. It is important to remember that the evaluation is not necessarily completed on one visit but might take place over several visits. The initial visit may include reviewing the intake, asking more questions, and doing the mat exam. On the second appointment, we may go into a deeper evaluation.
The mat examination is designed to determine the available range of motion that someone has for a seated posture. Figure 10 is an example of a mat table.
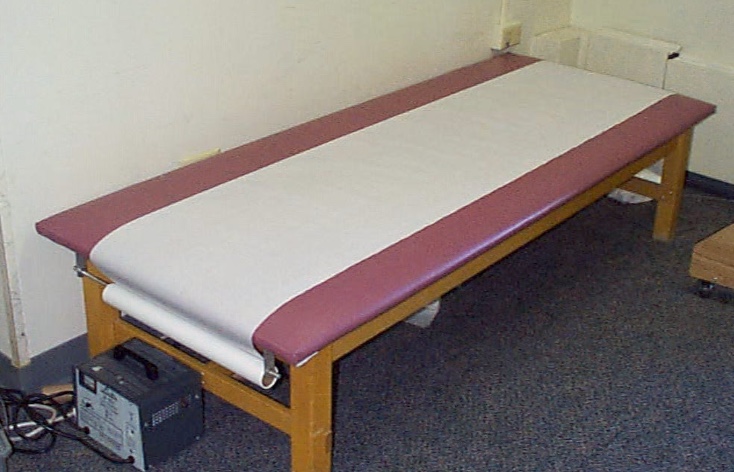
Figure 10. Example of a mat table.
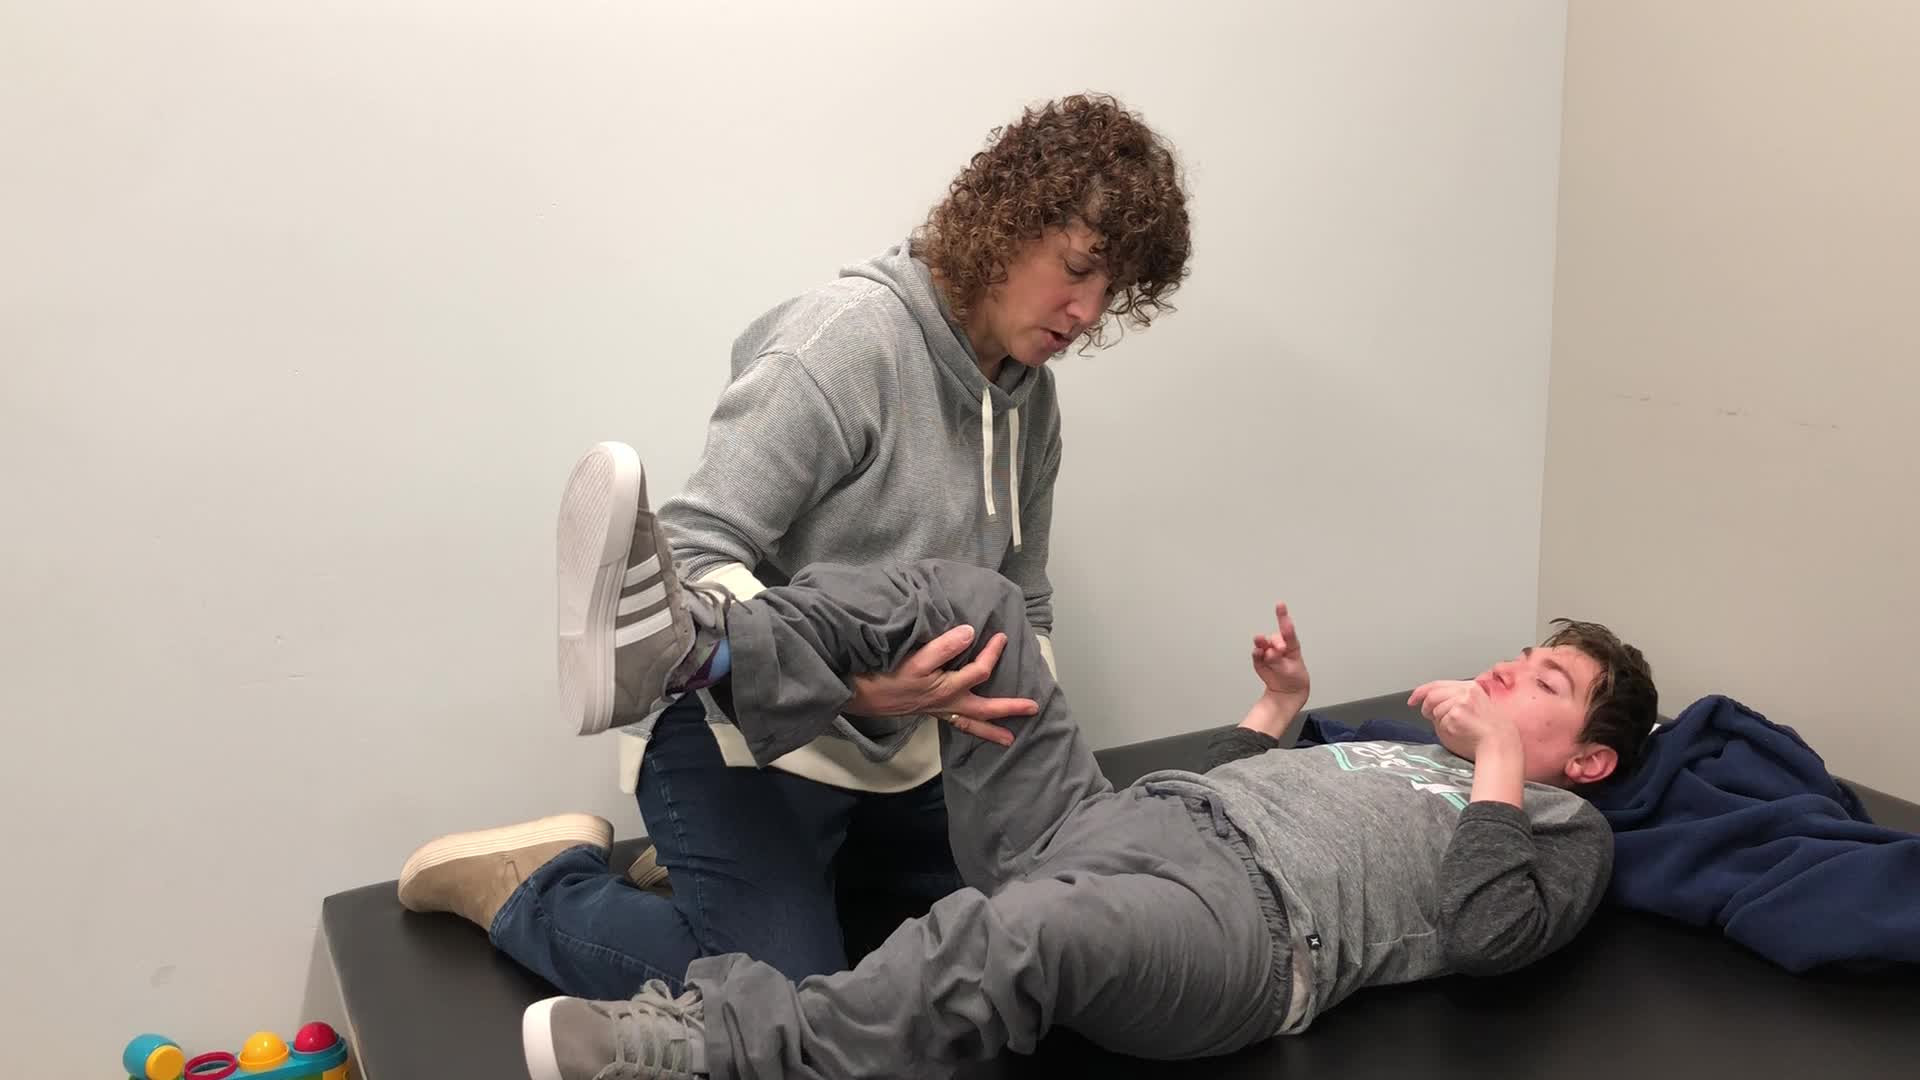
You do not have to measure the range of every joint of someone's body. The main areas to assess are an adequate range at the hips for a seated posture and determining what the angles of the seating system will be. I also want to determine where this person needs support. In Figure 11, you can see in the picture on the right that I have added my hands in to simulate a seating system.
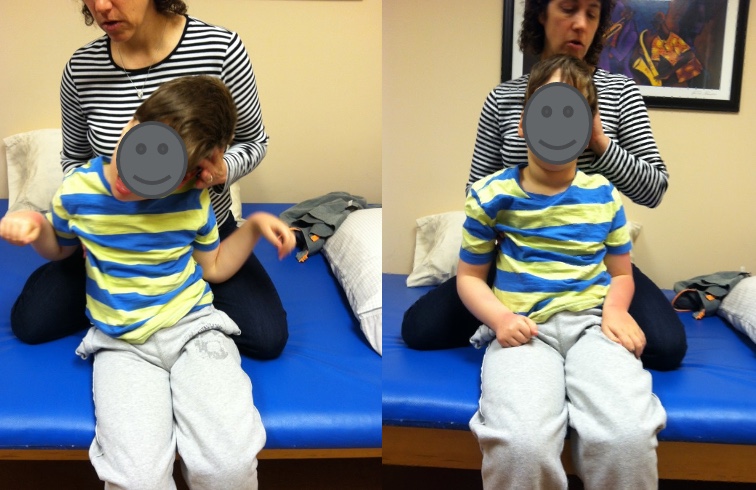
Figure 11. Presenter supporting a client on the edge of a mat table.
Supporting the client tells me how much force is required, what area I need to cover, where support is required, and at what angles. If I can support a client with my hands, the seating system should also be able to do so.
If it is taking every bit of strength I have to maintain a position for a client, most likely, I am using too much force, and the client will not be able to tolerate it. There could be discomfort or skin breakdown. If I am using a great deal of force but feel like the client can tolerate it, this information tells me more about the type of seating system I need. If I think this client will need a lot of force and contact, I need to distribute that force over a larger area of their trunk. For example, I may need a molded seating system versus a small little lateral pad on the side of their trunk.
- Describe reflexes and influence on body movements and posture
- Describe muscle tone and influence on body movements and posture
- Note any range of motion limitations
- Look for causes, not just symptoms
During the mat exam, I am also looking for any reflexive activity and patterns of movement because what I see on that mat exam, I will most likely see within the seating system. I will describe muscle tone and its influence on body movements and postures and note any range limitations. It is very critical to look for causes, not just symptoms. For instance, if I notice someone is chronically flexing the left side of their trunk, I want to get a sense with my hands and eyes of why that is occurring or being set off. Then, I have a better idea of how to address it.
During the mat exam, we examine the client in two positions: sitting on the edge of the mat table and supine. In supine, we get rid of gravity, so it frees us up to look more closely at their tone and range of motion while moving the client around. Figure 12 shows a client supine during a mat exam.
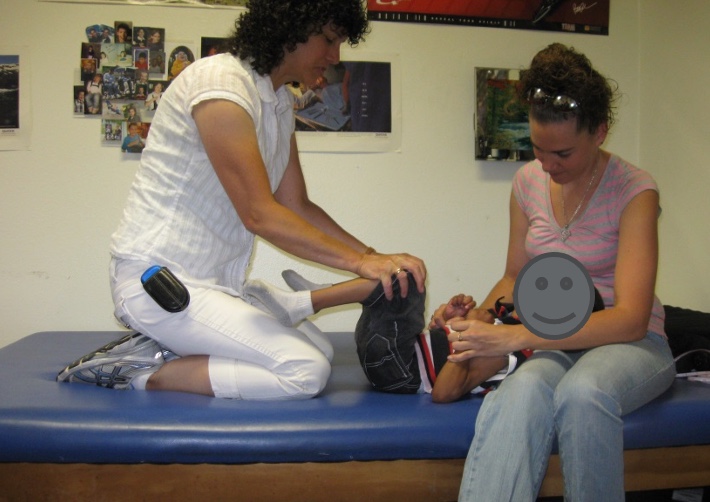
Figure 12. A client is being evaluated in supine.
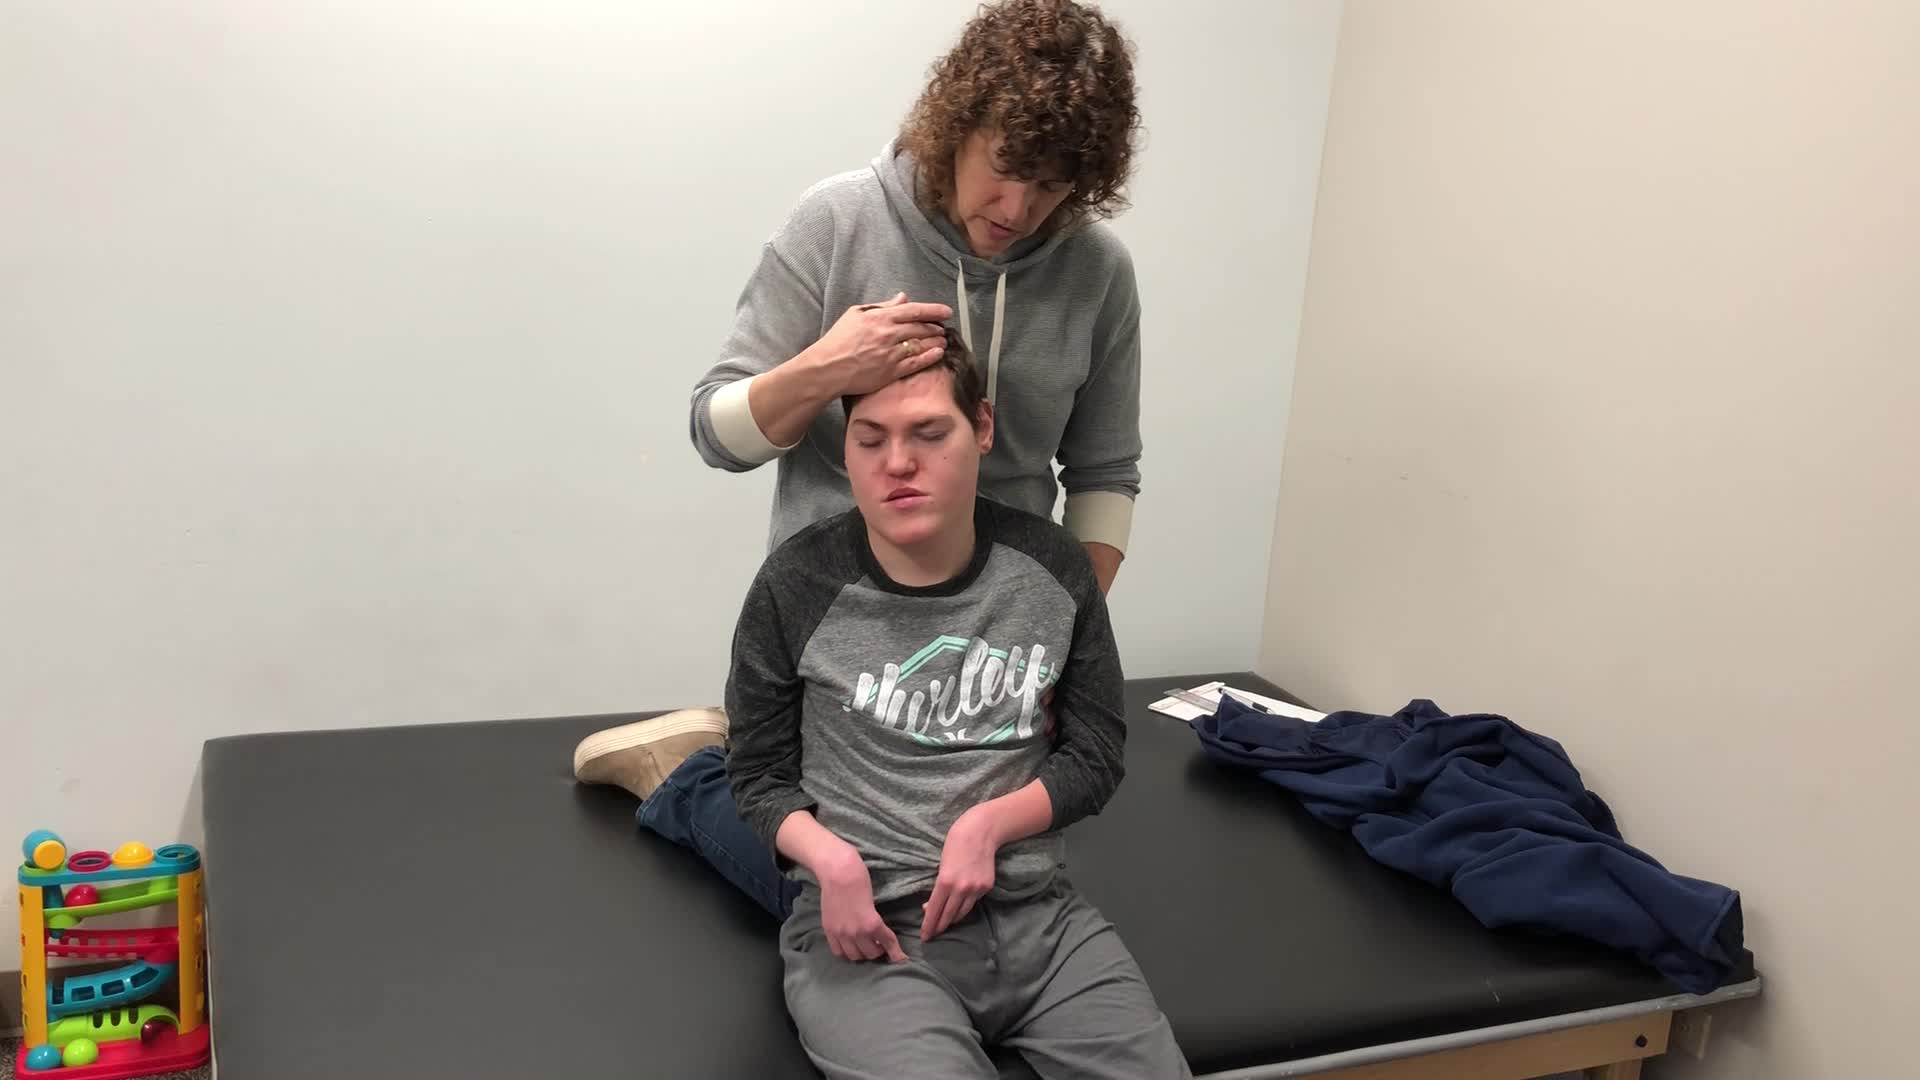
- In sitting on edge of mat table, note:
- Position of head
- Neck control
- Influence of tone/reflexes
- Support required
By sitting the client on the edge of the mat table, we can now see how gravity impacts them in their wheelchair seating system. In this position, I will note the position of their head, neck control, the influence of tone, and reflexes, and note what support is required. I gave this young lady in Figure 13 minimal support to keep her from falling off the mat table, as she has quite a bit of forward flexion in her neck.
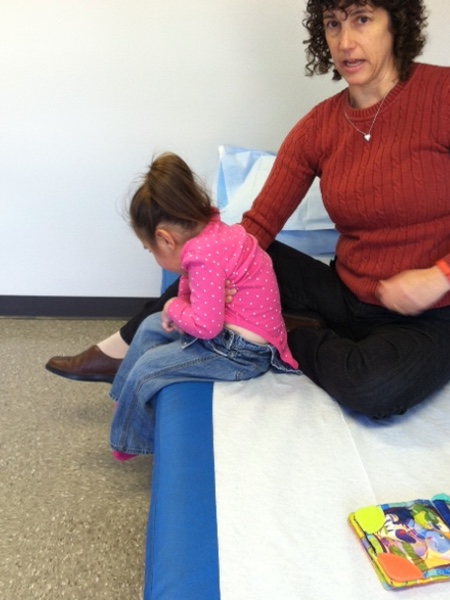
Figure 13. The presenter supports a client at the edge of the mat.
- In sitting on edge of mat table, note:
- Position of shoulders/upper extremities
- Functional control
- Range of motion
- Influence of tone/reflexes
- Condition of shoulder girdle
- Fisting
- Support required
I want to also look at the client's shoulders and upper extremities, the functional control of those extremities, range of motion, and the influence of reflexes. Are there any integrity issues at the shoulder? Does the client fist quite a bit or have a lot of tone? Figure 14 shows another example of an evaluation in sitting.

Figure 14. Another example of a seating evaluation on a mat.
How much support is required? I will look at their trunk position for anterior and posterior, left and right, rotation, and any asymmetries. Are these fixed or flexible? I want to see what level of functional trunk control they have and if they can support themselves. Can they support themselves if they have a hand or two on the mat table? Do they require all of my support to remain upright?
- In sitting on edge of mat table, note:
- Position of trunk
- Anterior/posterior
- Left/Right
- Rotation
- Fixed or flexible
- Functional trunk control
- Support required
- Position of trunk
The young lady from before takes quite a bit of support anteriorly and posteriorly to correct her chronic trunk flexion (Figure 15).
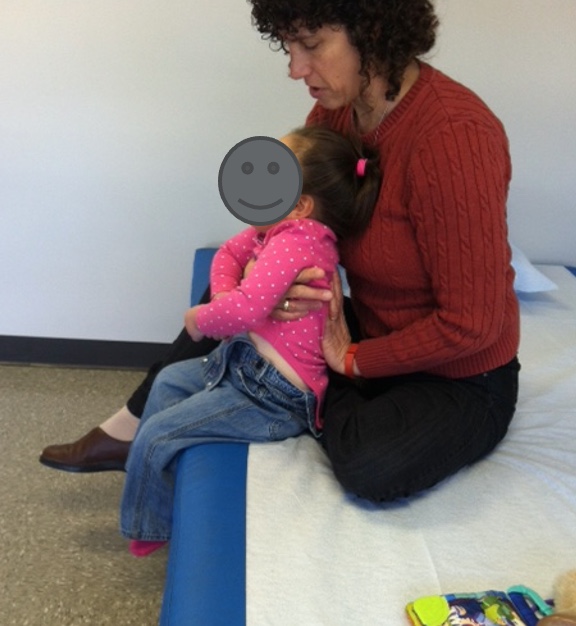
Figure 15. The presenter supports a child at the edge of the mat.
Once I have addressed the position of her pelvis with my leg and used my hands and arms to hold her trunk in place, her head can come upright. I also support her posterior head to keep it from falling in that direction.
- In sitting on edge of mat table, note:
- Position of pelvis
- Anterior/posterior
- Obliquity
- Rotation
- Fixed or flexible
- Functional pelvic control
- Support required
- Position of pelvis
I need to look at the position of the pelvis, whether it is anterior, posterior, oblique, or rotated) and whether this is fixed or flexible. I want to see how much the client can control the position of their pelvis. The amount of support required with my hands will help dictate what is needed with a seating system.
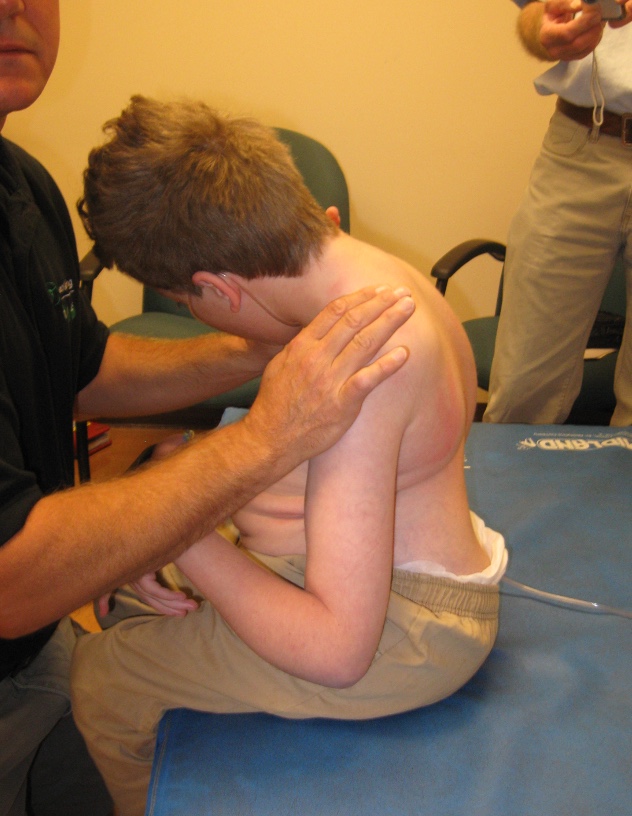
Figure 16. Client with an anterior pelvic tilt.
- In sitting on edge of mat table, note:
- Position of hips
- Neutral
- Abducted
- Adducted
- Windswept
- Range of motion
- Support required
- Position of hips
I also want to see if their hips are neutral and if the lower extremities are aligned. Are their legs abducted, adducted, or in a windswept posture? Are there limitations in their range of motion? Lower extremities are a common area where we see range limitations impacting the seated posture and how much support is required. Figure 17 shows the earlier child at the edge of the mat. I am assessing his pelvis and lower extremity position.

Figure 17. The child's pelvis and lower extremity positioning are being evaluated.
- In sitting on edge of mat table, note:
- Position of knees and ankles
- Within functional limits
- Limitations
- Range of Motion
- Support required
- Atypical footrest placement
- Atypical footplate placement
- Position of knees and ankles
I also need to look at their knees and ankles' position and see if their range is within functional limits. Figure 18 shows another client at the edge of the mat table.
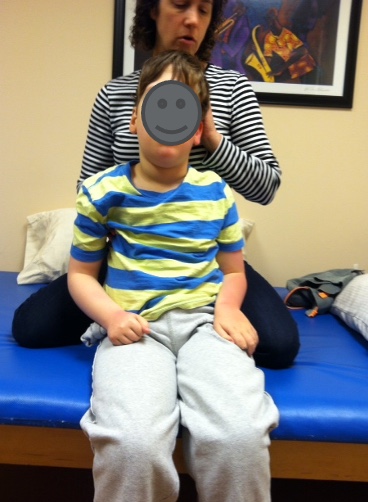
Figure 18. Client's seated position at the edge of a mat table.
I am not too worried if they have full range but are within functional limits. We then decide what support may be required, particularly if the footrest may have to be placed in a less than typical position to accommodate the position of a foot and whether the footplate itself might have to be at a different angle.
Mat Exam Sitting Video
We will watch a video that will give you an idea of what we look at when we examine someone sitting on the edge of the mat table.
Hopefully, this video gives you an idea of how each client is unique in their presentation and what you will look at during an assessment.
- In Supine, note:
- ROM
- Tone
- Flexibility
- Alignment
We then move to supine to eliminate gravity and look at their range of motion, tone, flexibility, and overall alignment. This young lady we saw before is showing us her ATNR, with quite a bit of lateral trunk flexion and shortening on her right side (Figure 19).
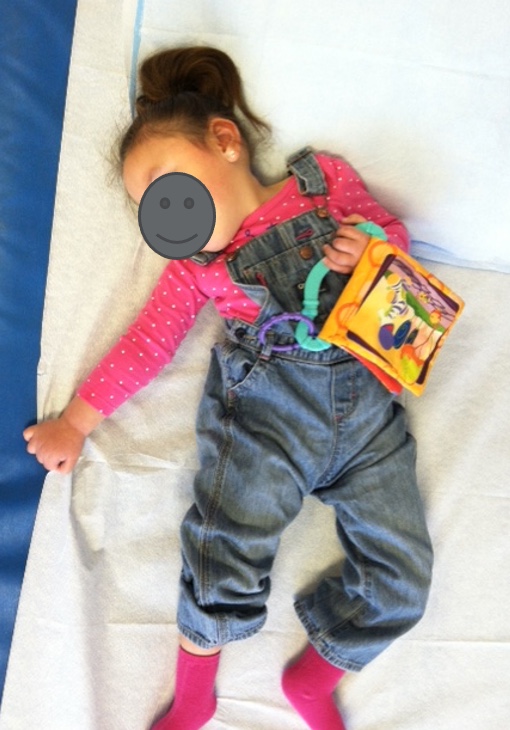
Figure 19. Client with an ATNR reflex in supine.
She also has a little external rotation and abduction in her left leg. All these things are essential to note. She is still very young, and I can get her to neutral and want to ensure I can do that over the years.
- Can the pelvis be placed in neutral?
- With the knees at 90 degrees?
- Without undesirable spinal changes?
We want to note whether we can place the pelvis in neutral while the client is supine. Can the pelvis remain neutral with the knees at about 90 degrees and the hips flexed? This does not mean we will position the client in a seating system at 90 degrees hip flexion and 90 degrees of the knees, which used to be very common. It is less common now, but we want to see if the person has the adequate range to do so. We also do not want undesirable changes to the spine when we hold the hips and knees in this position.
Mat Exam Supine Video
Wyatt has volunteered again to look at his position in the supine mat exam. It is imperative to do that on both legs because rarely is it symmetrical on one side. Hopefully, my voice was not too quiet there as I tried to keep Wyatt nice and calm.
Our clients often do try to help us out. It is essential to encourage them to relax and let you move them around so you can get a good sense of their true movement.
- The suppliers often do the measurements, as they are ultimately responsible for any error in final seating system dimensions.
Many measurements are done during the mat examination, often by the supplier, because they are the ones that are ultimately responsible for any errors. For example, if the seat depth measurement is not correct, it is on them to fix it afterward. They will not rely on my measurements if I do not get them quite right, and I often do not.
Here are measurements taken frequently in sitting and listed on certain evaluation forms (Figure 20).
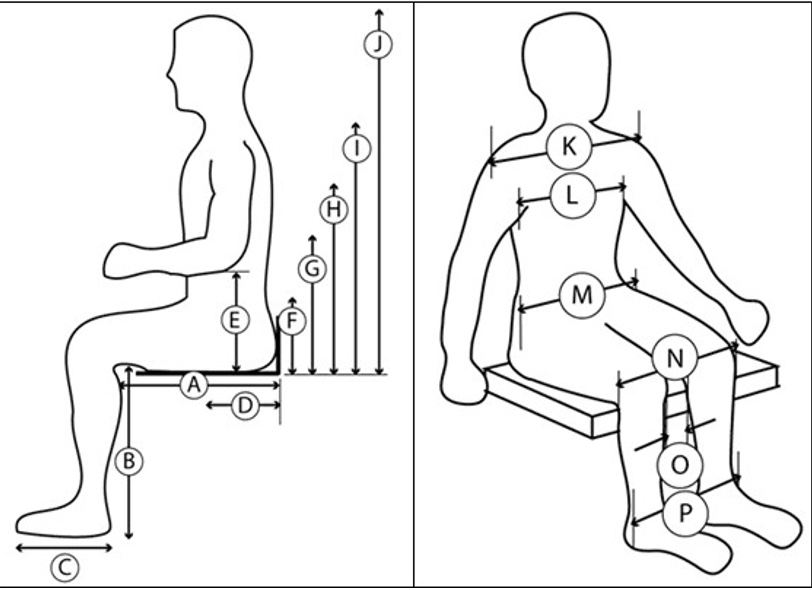
Figure 20. Seating measurements from Wheeled Mobility and Seating Evaluation form.
There is a Wheeled Mobility and Seating Evaluation form that I have a link to later in this presentation. It is free, and you are welcome to refer to it. The supplier often takes all these measurements, so they have everything they need to make the final recommendations.
- Measurements in Sitting:
- Shoulder width
- Chest width
- Chest depth
- Hip width
- Between knees
- Upper leg length
- Lower leg length
- Foot length
- Measurements in Sitting:
- Seat to:
- Top of head
- Occiput
- Axilla
- Top of shoulder
- Acromion process
- Inferior angle of scapula
- Elbow
- Iliac crest
- Seat to:
A Great Resource
- The Wheeled Mobility and Seating Evaluation form is available free to use online.
- This can be completed online as a fillable PDF and printed.
- https://nrrts.org/wp-content/uploads/2019/06/Wheeled-Mobility-and-Seating-Evaluation-fillable.pdf
Here is that resource, the Wheeled Mobility and Seating Evaluation form, developed initially by Jessica Pedersen and Jill Sparacio in the Chicago area and still used by the Illinois Medicaid program.
Many people use this throughout the country. There is a version you can print and fill out, but there is also an online fillable PDF. It is rather long, but it covers about everything. At the end of it, you have completed your letter of medical necessity.
4. Stimulation
- The mat exam determines roughly the available range, where support is required, and at what angles.
- Simulation lets us try this out before making final equipment recommendations.
- Simulation frees up our hands, allows for fine-tuning, and trial in functional activities.
- i.e., eating while seated
- Justification: take photos of the client in their current seating equipment and in the simulation to educate and justify recommendations
Next in our evaluation process is simulation. The mat examination determines roughly a client's available range, where they need support (what we do with our hands), and at what angle this client needs to be seated. Simulation lets us try this before we make the final equipment recommendations.
A simulator frees up our hands so we can step away from the client and look at them from all sides to get a sense of how they are looking and what we need to change. We can also try some functional activities. Most clients I work with are nonverbal, and many use speech-generating devices. I might have them try to access their device while they are in the simulated seating so I can determine the functional impact of this. I can also take before and after photos of the client's current seating before someone tries to make them look pretty. I want to see how they look when left alone for a little while. The funding person can also see what we are trying to accomplish.
There are a few simulators, and depending on your budget and where you work, you may be able to acquire one to use in evaluations.
- Linear options
- Determines where primary and secondary supports are required and at what angles
- Information can then be applied to multiple seating systems.
The Physipro Simulator is in Figure 21.

Figure 21. Physipro Simulator.
There are not a lot of simulators out there. Some of the ones that used to be available have gone away. These add gravity and support surfaces to help us determine how much support, where it is required, and at what angles. Even if the client does not have a final recommendation of a seating system with flatter surfaces, this still gives us the info we need regarding where support is required, regardless of whether it is flat, contoured, or even molded to the client.
- Pressure Mapping
- Can use in current seating
- Can use in simulator
- Can use on many cushions
We may include pressure mapping within our simulation, as noted in Figure 22.
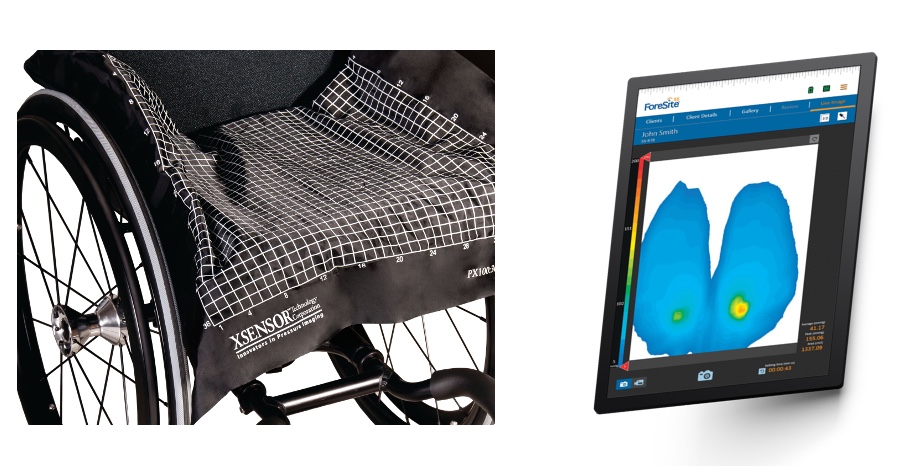
Figure 22. Xsensor Pressure Mapping System.
You can use a pressure map on top of the current seating to see what is happening with the client. We can use this in a simulation and on trial equipment, and we can then compare the information. We can see how much pressure there is on the current seating equipment and use that as a part of our justification.
- Molded options
- May be used for evaluation
- May be used for shape capture
We can also use molded simulators, as seen in Figure 23.
Figure 23. Tru-Shape (OBSS) Molded Seating Simulator.
We can use a molded seating simulator to capture someone's shape if we want to recommend a molded seating system, but we can also use it for evaluation. We can use the bags placed on these various simulators, like this one is through OBSS, which is a part of Permobil.
We can shape the bags around them to get an idea of how much support is required and at what angles. We could take pictures that can help us determine if the person needs a molded seating system, and then we can capture that shape to fabricate something appropriate when a molded seat, back, or both are recommended for a client. The molding may take place before funding approval, or we may have to wait until funding approval, especially in clients that are growing or may have orthopedic changes.
Molding
- When a molded seat and/or back are indicated, the molding may take place prior to funding approval.
- Team approach
- Molding is a process and evaluation/problem-solving is still occurring.
This young man's shape is being captured by Aspen Seating which I am very fortunate to have close to where I practice.
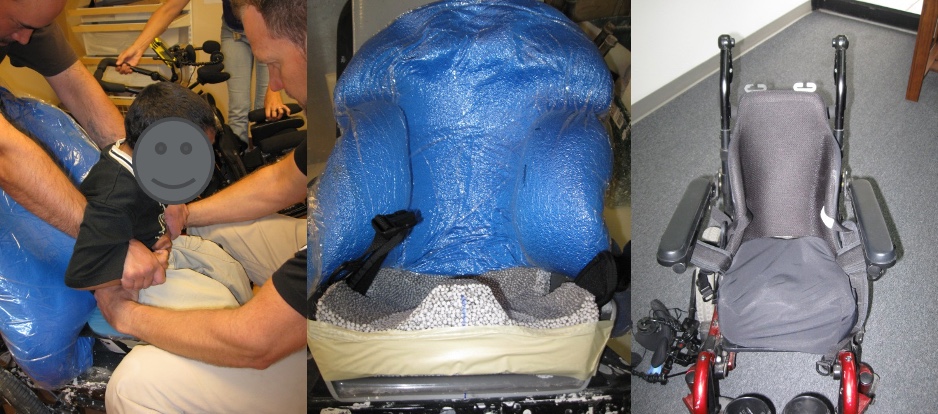
Figure 24. Custom molded seating by Aspen Seating.
We captured his shape through the molding bag behind his back and a specialized simulator underneath him for the seat. On the right, you can see the final product. The Aspen Seating Orthosis or ASO is on the far right.
Molding is an extension of the evaluation because, during this shape capture, we might continue to fine-tune and refine the exact position of the client. Figure 25 shows a young man in his older linear seating system, which he was outgrowing and was not meeting his postural needs. The molded seating system on the right keeps him in a great position. He was unhappy with us by this point of the evaluation, as he was exhausted and ready to go home but in a much better position.
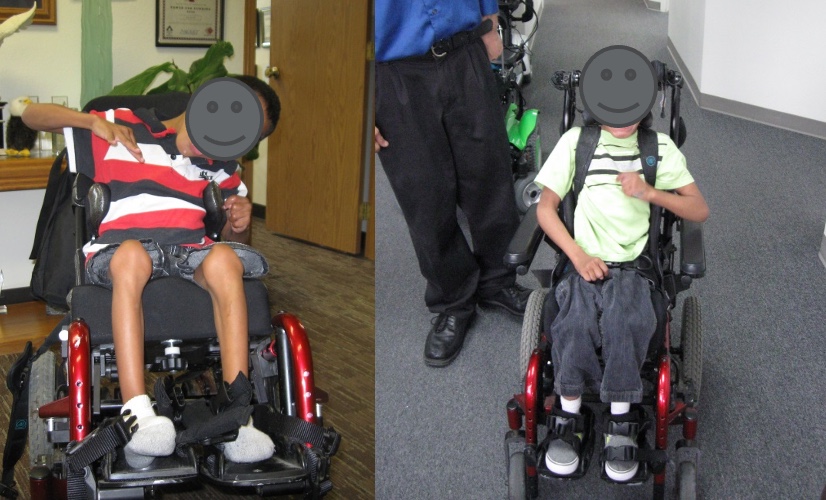
Figure 25. Client with improved positioning with molded seating.
He is usually a very happy guy. From the side, you can also see the difference in Figure 26.
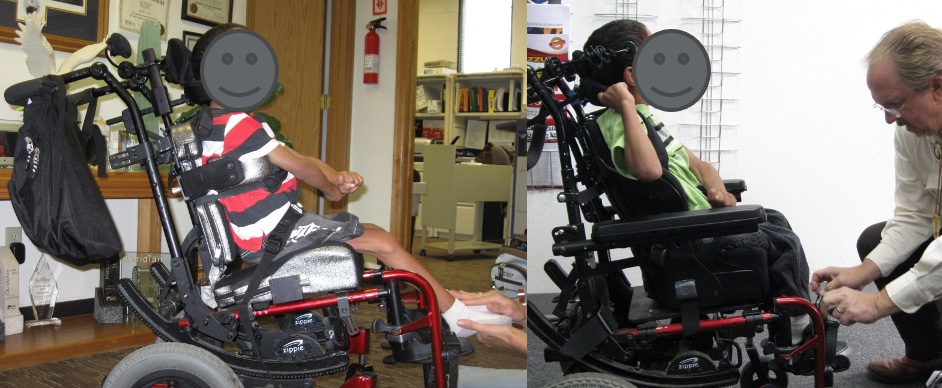
Figure 26. Side view of the client in molded seating.
This client is growing, and we wanted to protect his spine, which was already starting to show some asymmetry. He needed a much more supportive system to do that.
5. Equipment Trials
- Highly customized seating interventions can be hard to simulate, let alone trial for extended time periods.
- Trials of cushions may be indicated to ensure that there are no pressure issues over time or with a variety of activities, transfers, etc.
Moving to equipment trials, we can have difficulty fully simulating some of our recommendations. Depending on the client, we can get some of this equipment and try it out with them. It is hard to trial these things if they require a customized solution. If they need an off-the-shelf cushion or back, we can often get those and put them on their mobility base. An example of an off-the-shelf cushion is in Figure 27.
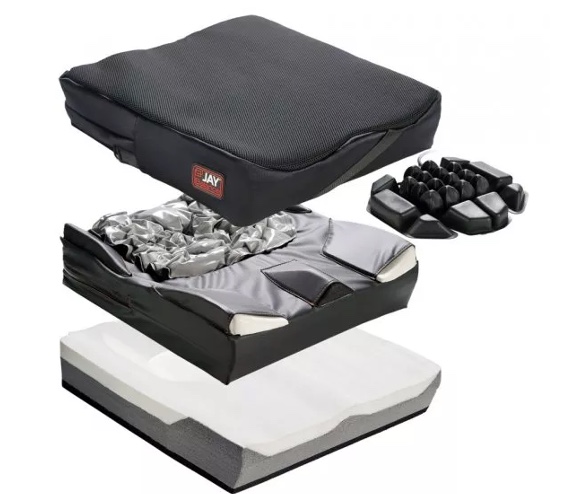
Figure 27. Jay Balance cushion.
They can try it out, see how it feels, how it impacts their posture, and how it impacts functional activities, like transfers.
An equipment trial is also a way of determining if the pressure will be an issue for this client over time. Any cushion feels pretty good when you first sit on it or if you are only sitting on it for a few minutes, but we want our clients to have a more extended period, if possible. For example, they may have pain elsewhere if they are not seated on an appropriate cushion.
6. Fabrication and Fitting
- Some seating interventions require fabrication or modification.
- The fitting is an extension of the evaluation, as some aspects may not work out as well as anticipated.
- Changes may need to be made during the fitting as a result, or as a result of growth or other client changes since the evaluation.
Then, we have the fabrication and the fitting portion of the process. This process is generally after funding has been secured and equipment is all ordered and arrived.
There may also be some fabrication or modification of the recommended equipment. The fitting is an extension of the evaluation, and many clinicians cannot attend a fitting. I encourage you to make sure that there is a way you can do that because some things we recommend, even if we have been thorough, do not turn out the way we anticipated during the actual delivery. It is crucial to evaluate whether the recommended equipment is still meeting the client's needs. Figure 28 shows an example of this.
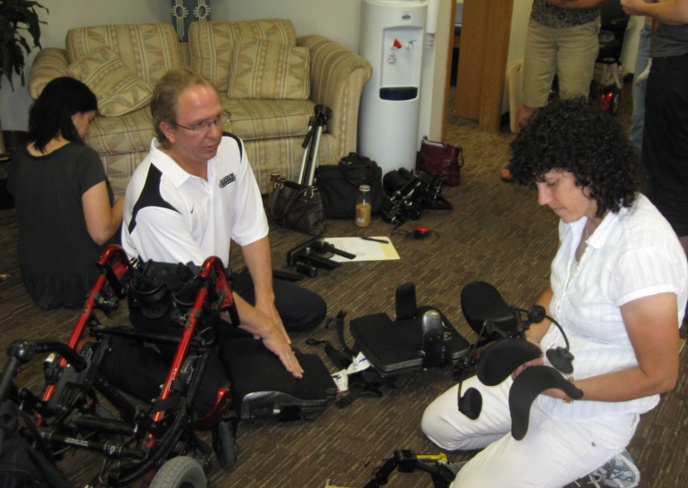
Figure 28. Fabrication and fitting of a wheelchair.
There can be quite a bit of time that elapses between the evaluation process and the delivery of equipment, and it can be upward of three to six months. We want to ensure the client's needs are still met, and we can make further changes at this delivery.
7. Follow Up
- All that hard work should not go to waste!
- Important to follow up and ensure that the seating intervention continues to meet the client's needs.
- Outcome measures
We do not want all that hard work to go to waste. We should check the client periodically even if they are not growing, as there can be other changes. We want to make sure that this intervention continues to meet their needs. This is also when we might want to look at outcome measures to determine our batting average. Are we meeting the client's goals? This process helps us improve our service delivery and better meet our client's needs. Outcomes can also keep us out of a rut, as it is easy to recommend the same things.
Positioning Outcomes
- Outcomes can keep you out of a rut.
- Outcomes can help with funding of services and equipment.
- Track percentage of successful intervention
- Track "failures" to increase your percentage and use as a learning tool.
- Surveys
Outcomes can also help us with funding, not only equipment but our services as well. We can track how successful our interventions are, and we can track what is not working so that we can address those issues. This can be as simple as a survey. We can ask the client or caregivers a few questions pre- and post-intervention and compare those. We can develop a couple of goals and write those as an outcome.
Referral
- How do I know if a Seating Assessment is required?
- How do I know seating is appropriate?
This brings us to referral. How do I know if somebody needs a seating assessment or not or if their current seating is appropriate? One of your handouts is a screening tool checklist that can help you determine whether seating intervention is required.
Seating Need
- The client may need modifications to or replacement of a seating system if:
- The system is outgrown
- Children grow
- Adults can grow also – just in other directions
The client may need modifications or replacement of a current seating system if they have grown. This is not just for children; adults grow in different directions.
- If the seat depth is too short
- Inadequate support under distal thighs
- If the footplates are too high
- Increased pressure over ITs
- If the back height is too short
- Anterior trunk supports may push down on shoulders
- If the seat width is too narrow
- Pressure against lateral hips, rubbing on tires
It might be that the client needs modification or replacement if the seat depth is too short. A short seat depth leads to inadequate support under the distal thighs. An example is shown in Figure 29.
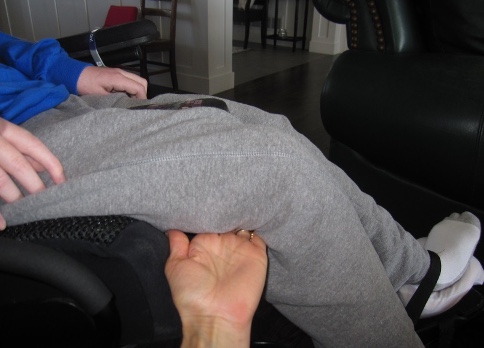
Figure 29. The seat depth is too short.
We want to distribute the pressure. If the footplates are too high, this might be a simple adjustment to reduce the pressure over the ischial tuberosities (ITs). We are not distributing the pressure equally along the buttocks, the posterior thighs, and the bottoms of the feet. If the back height is too short, it might be that the anterior trunk supports are now pushing down on their shoulders instead of bringing my trunk back into extension. If the seat width is too narrow, there could be pressure against the lateral hips, and I may even see someone's legs rubbing on the tires or the lower legs contacting the footrest hanger resulting in pressure.
- The client may need modifications to or replacement of a seating system if:
- The client has had body shape changes
- Spinal curvatures
- Trunk distortions
- The client's body shape may no longer match the seating system contours
If we see spinal curvatures or trunk distortions, then the body shape may no longer match the contours of the seating system, and modification or replacement may be required. This indicates a need for a seating assessment. If we see the client is not getting enough postural support, this could lead to orthopedic changes and a loss of range of motion and can impede function. The young man in Figure 30 was not in a good position, making it very difficult to see, breathe, swallow, and use his communication device.
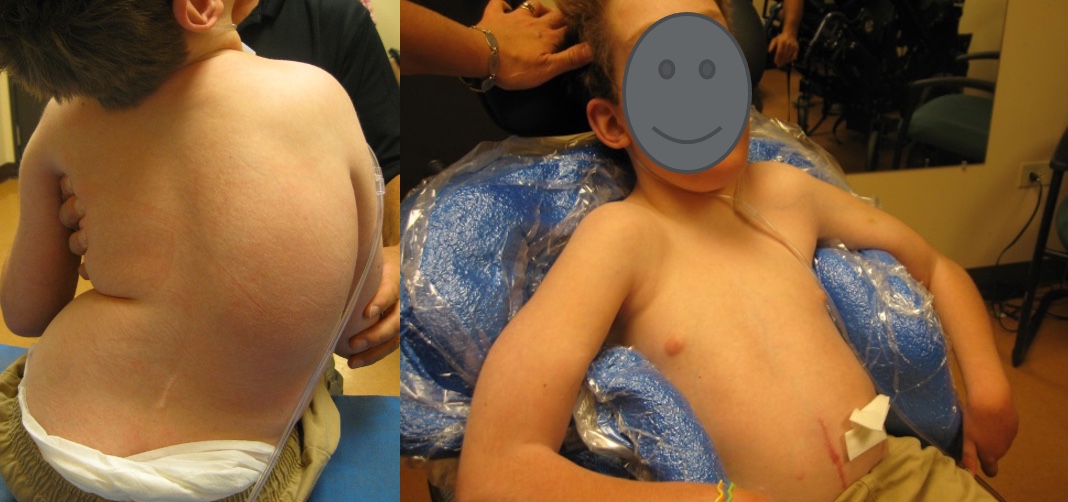
Figure 30. Increased positioning with a custom molded seat.
With some modifications to his frame and seating system, he was in a much better position, could visually regard his environment, and could access his communication device.
- The client may need modifications to or replacement of a seating system if:
- The client is not receiving adequate postural support
- Can lead to orthopedic changes
- Can impede function
Sometimes, we just need changes to the current seating system (Figure 31).
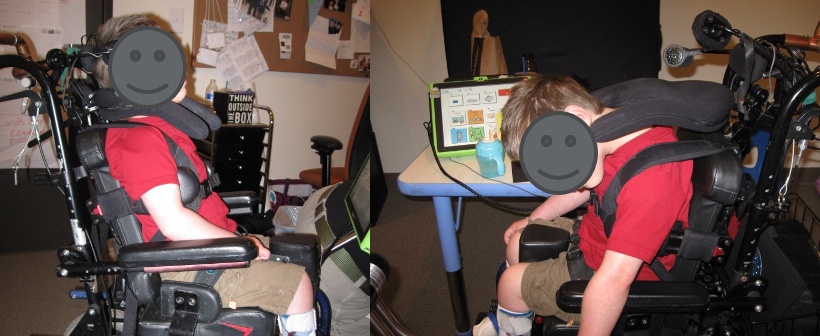
Figure 31. The client is in a better position with added wheelchair components.
If the client is developing any pressure issues, we must assess the seating system to see if changes or replacements are required.
- The client may need modifications to or replacement of a seating system if:
- The client is developing pressure issues
- Pressure distribution
- Pressure relief
We want to distribute pressure along areas of the body contacting the back and seat and provide adequate pressure relief. This young man (Figure 32) had ongoing changes to his trunk and spine. His lower right rib cage has a big red spot on it because it is about the only location contacting the back of his current seating system.
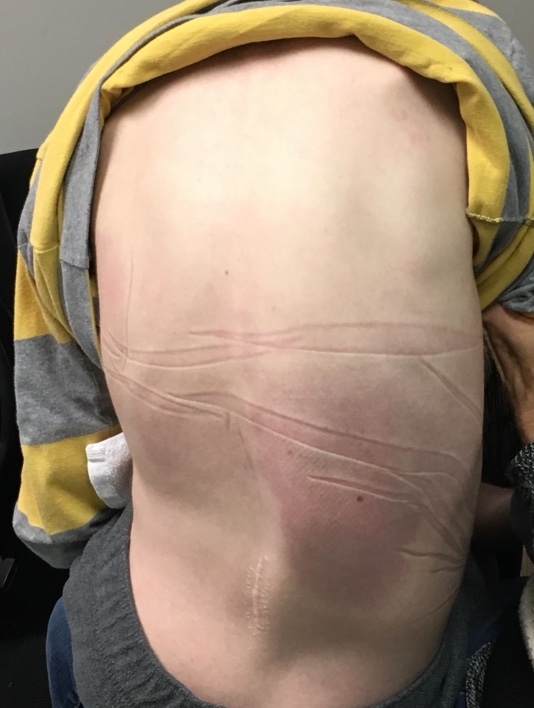
Figure 32. Red spot on client's back due to deformities.
We needed to distribute the pressure better along the entire posterior trunk and ensure he had proper weight shifts to relieve pressure.
- The client may need modifications to or replacement of a seating system if:
- The client is not as functional as they could be
- Stability is key to promote isolated control elsewhere
The client may need a change if they're not as functional as they can be. The client must have adequate stability to be as functional as possible. In the upper picture here, this young man is not getting the support he needs in his system, which means he cannot be functional in any task. We have changed his seating in the below picture (Figure 33). In his case, he needed a complete change, and now he is not only in a better posture, but he can also be more functional.
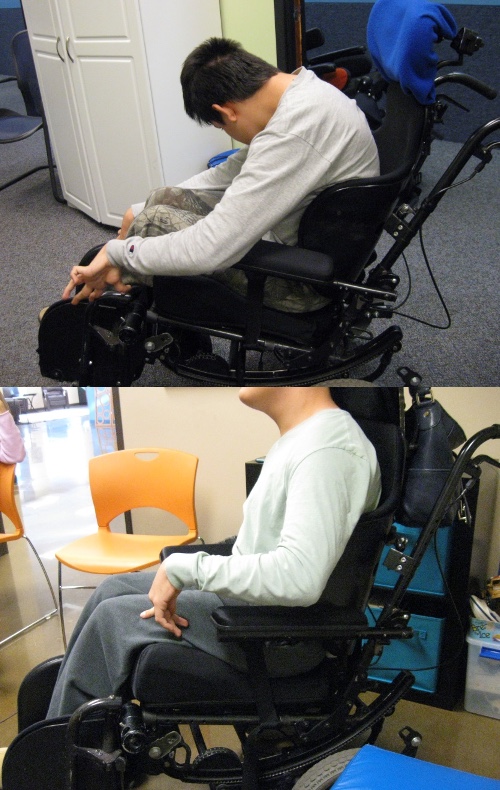
Figure 33. The client is in a much more functional wheelchair position after adjustments.
Another Resource
- One of your handouts is a checklist to help determine if current seating is meeting a client's needs.
- If not, referral is indicated.
You have a checklist that you can use, and if seating is no longer meeting the client's needs, it is important to refer them for a seating assessment or perform that yourself.
Take Home Message
- Clinicians need to understand the importance of appropriate positioning.
- Clinicians need to recognize when a seating system is not meeting a client's needs.
- Assessment for wheelchair seating requires additional training.
What is our take-home message today? Clinicians need to understand that positioning. We need to recognize when a seating system is not meeting a client's needs. Assessment for wheelchair training is a specialized area that requires more training. If this is something that excites you, please join me. Our field always needs more people excited about wheelchair seating.
Resources
- RESNA Wheelchair Service Provision Guide
- www.RESNA.org
- Positioning Chart
- www.atilange.com, under Resources
There are many courses and resources that you can pursue. That is fine if you do not work in this area. You just need to refer as needed.
Here are a couple more resources that are on your handout.
Hands-on Activity
- Contact a Seating and Mobility Clinic in your area
- Arrange to observe a mat exam
- Grab a colleague and practice doing mat exams on each other!
It is always nice to have hands-on experience. I would encourage you to contact a seating and mobility clinic in your area and arrange to observe a mat evaluation. Or, you can grab a colleague and practice doing mat exams on each other. It is a great way to learn.
Questions and Answers
In some settings, some of these accessories could be considered a restraint. How do we get past this?
That is an important question. A position paper on RESNA's website looks at wheelchair seating versus restraints and what to do when you are in a restraint-free setting. It is possible to use all these components, but specific regulations must be followed.
How have you navigated some of the craziness these past years and helped these folks?
Not well. During the pandemic, many places were moving towards telehealth. As we know, telehealth was funded under emergency directives and has been extended. Telehealth can be beneficial for screening, maybe even to facilitate delivery. For myself, I needed to get my hands on the client, but this was a little more difficult due to the restrictions in place. Of course, by wearing protective equipment, we were able to continue moving things along, but it was still challenging.
What do I do if I do not have a mat table available? Can I use the floor or the bed?
The challenge with the floor is getting up and down. The floor can be okay for the supine examination portion but not for sitting on the edge of a mat table. The problem with the bed surface for either sitting or lying is that it is a little too soft, making it harder to assess the client accurately. For example, when I am moving their hips up, it is easy for the pelvis to rock backward into that mattress where it would not on a mat table.
What happens to equipment that is still usable but is no longer appropriate for a specific client?
Several loaner closets are available. We have one in the Denver Metro area. I work with many kids, and as they outgrow equipment, they often donate it to that program. They clean things up and make them available to people who may not have funding for a particular item of equipment. Some people are hesitant to do that because of liability issues.
Several photos showed students' feet dangling when doing the mat exam. Do you ever look at feet on a box or foot support?
Yes, but it can be challenging with tiny clients. Even though we have a variety of height foot supports, it will depend on the client. Some clients, if they have something under their feet, are going to be more likely to push off of it, so I may not use it for the entire time.
What advice do you have for a semi-new grad to get into this setting? Most employers want experience and not the burden of training someone from scratch.
How in the world do you even get started? Suppose you are interested in getting a certification like the ATP. In that case, you must have a certain amount of hours in direct assistive technology provision before qualifying for the exam. There are some ways to build experience. First, there are a lot of CE courses that are available on this site. And if you are more of a reader, there are text versions of many of these courses. There are also articles and books out there. Specifically, the book Seating and Wheeled Mobility: A Clinical Resource Guide dives deep into seating and mobility. If you are working full-time, you may be able to take a personal day and hang out at a clinic. It can be a great learning experience. If you work in schools, you will run into several students using wheeled seating and mobility. This allows you to learn about that equipment and other related assistive technologies. There are also conferences, the main one being the International Seating Symposium. It will be in Pittsburgh in 2023.
Citation:
Lange, M. (2022). Seating assessment for mobility bases: An introduction. PhysicalTherapy.com, Article 4842. Available at www.PhysicalTherapy.com